使用 Logto SDK 自訂 FlutterFlow CustomAuthManager
FlutterFlow 內建的 自訂驗證 (custom authentication) 功能允許你使用自己的後端來驗證使用者。然而,內建的自訂驗證流程設計為僅需單一驗證 API 呼叫即可運作。如果你使用第三方身分提供者 (IdP),驗證請求只能使用 Resource Owner Password Credentials 授權類型,這不建議用於生產環境。詳情請參閱 Deprecated ropc grant type。
標準的 OpenID Connect (OIDC) 驗證流程涉及多個步驟,例如授權、權杖交換和使用者資訊檢索。要在 FlutterFlow 中使用像 Logto 這樣的 IdP 實現標準 OIDC 驗證流程,你需要自訂 FlutterFlow 中的 CustomAuthManager 類別。
本教程將向你展示如何使用 Logto Flutter SDK 自訂 FlutterFlow 中的 CustomAuthManager 類別。你可以利用 Logto SDK 進行標準 OIDC 驗證流程,同時保留 FlutterFlow UI 構建器的優勢。
- Logto SDK 套件可在 pub.dev 和 Logto GitHub 儲存庫 上獲得。
- 該 SDK 目前僅適用於 Android 和 iOS 平台。
先決條件
- 一個 Logto Cloud 帳戶或 自託管 Logto。
- 創建一個 Logto Flutter 應用程式。
- 一個 FlutterFlow 專案。
啟用 FlutterFlow 自訂代碼
為了自訂 CustomAuthManager 類別,你需要在 FlutterFlow 中啟用自訂代碼功能。按照 Manage Custom Code In GitHub 指南將你的 FlutterFlow 專案與 GitHub 同步。
在 GitHub 中管理自訂代碼是 FlutterFlow 的高級功能。你需要升級你的 FlutterFlow 到專業計劃以啟用此功能。
完成後,你的 GitHub FlutterFlow 儲存庫中將有三個不同的分支:
main:Flutter 專案的主分支。你需要此分支來部署你的專案。flutterflow:FlutterFlow將從 FlutterFlow 編輯器同步更改的分支。develop:你可以在此分支中修改自訂代碼。
在 FlutterFlow 中創建你的 UI
首先,在 FlutterFlow 中創建你的 UI。你可以按照 FlutterFlow 文檔 根據你的需求創建 UI。對於本教程,最低要求是創建兩個頁面:
- 一個帶有登入按鈕的簡單主頁。
- 一個用戶資料頁面,用於顯示用戶資訊和登出按鈕。
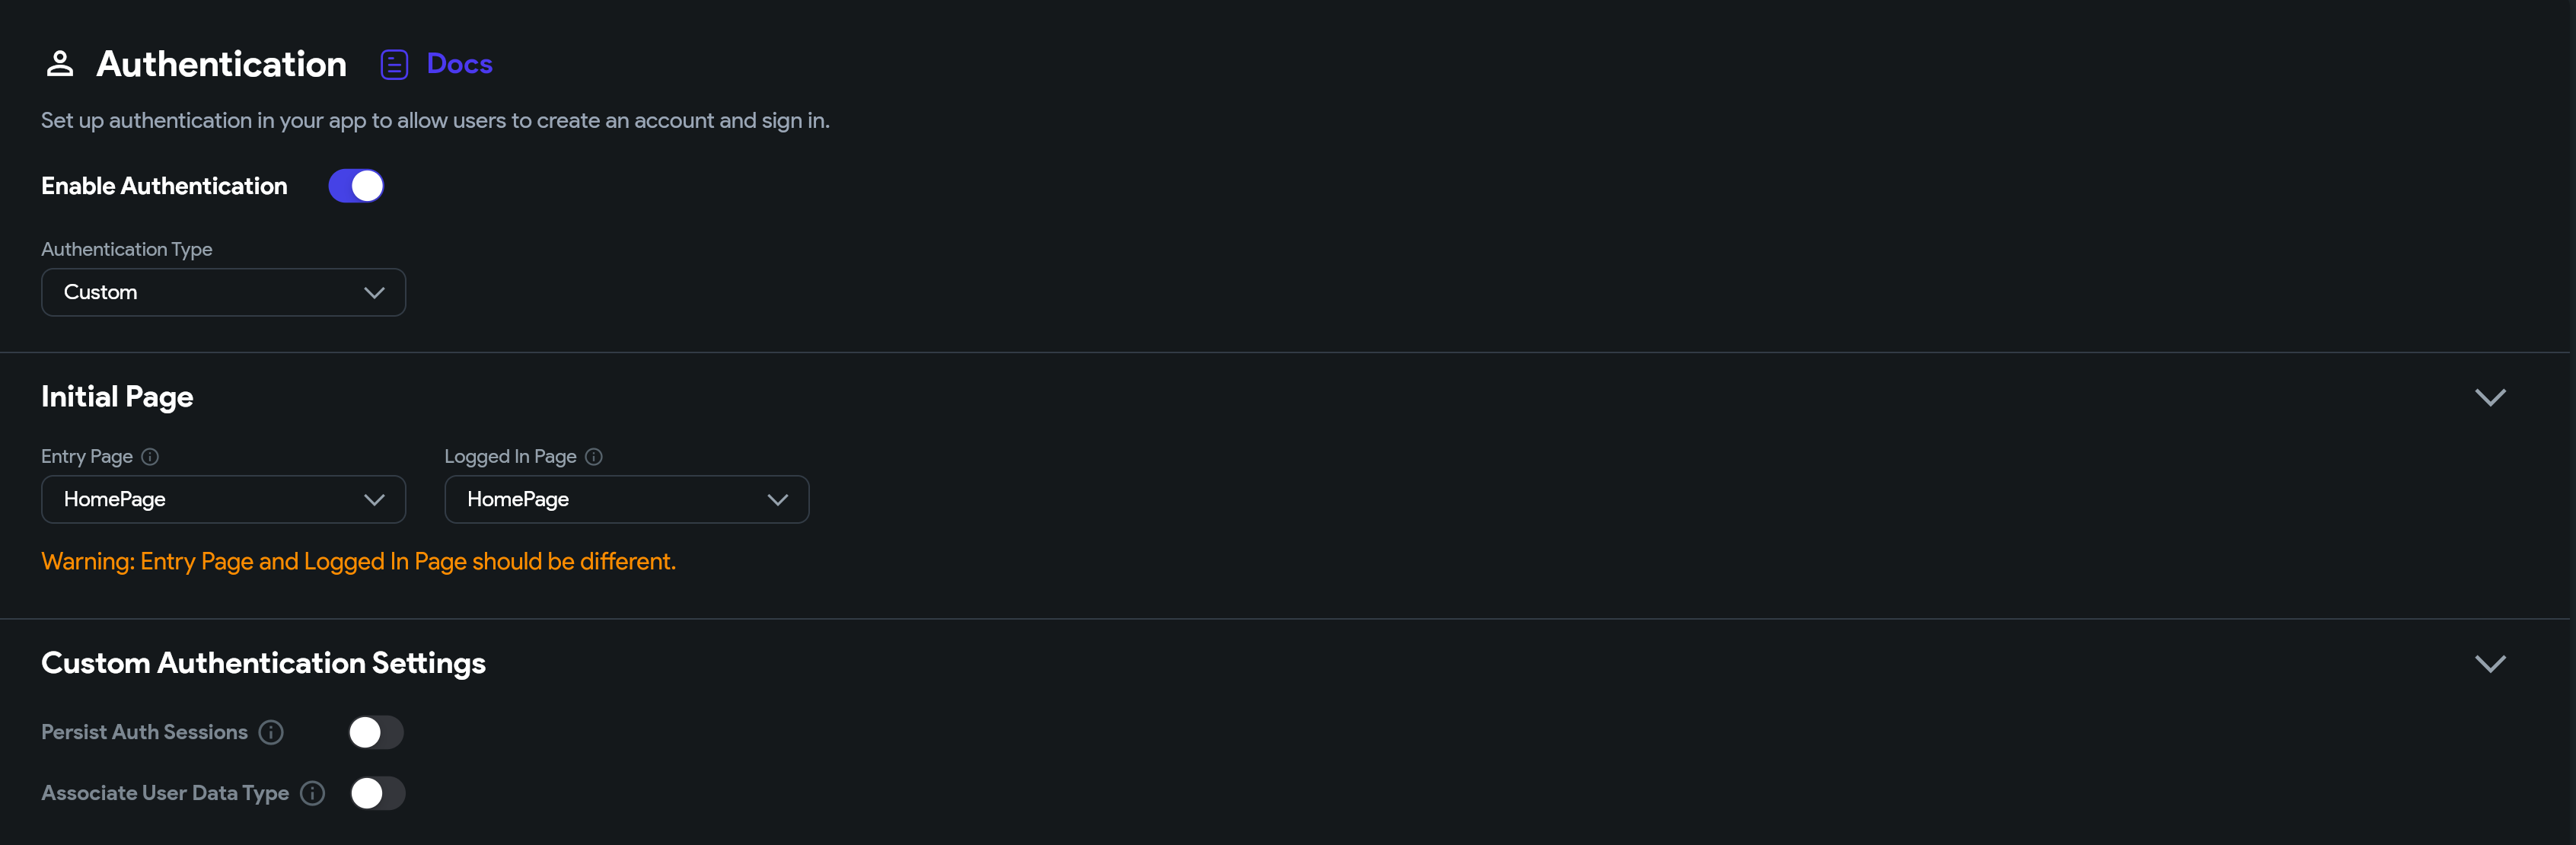
進入 App Settings -> Authentication 頁面並啟用自訂驗證。這將在你的 FlutterFlow 專案中創建一個 CustomAuthManager 類別。
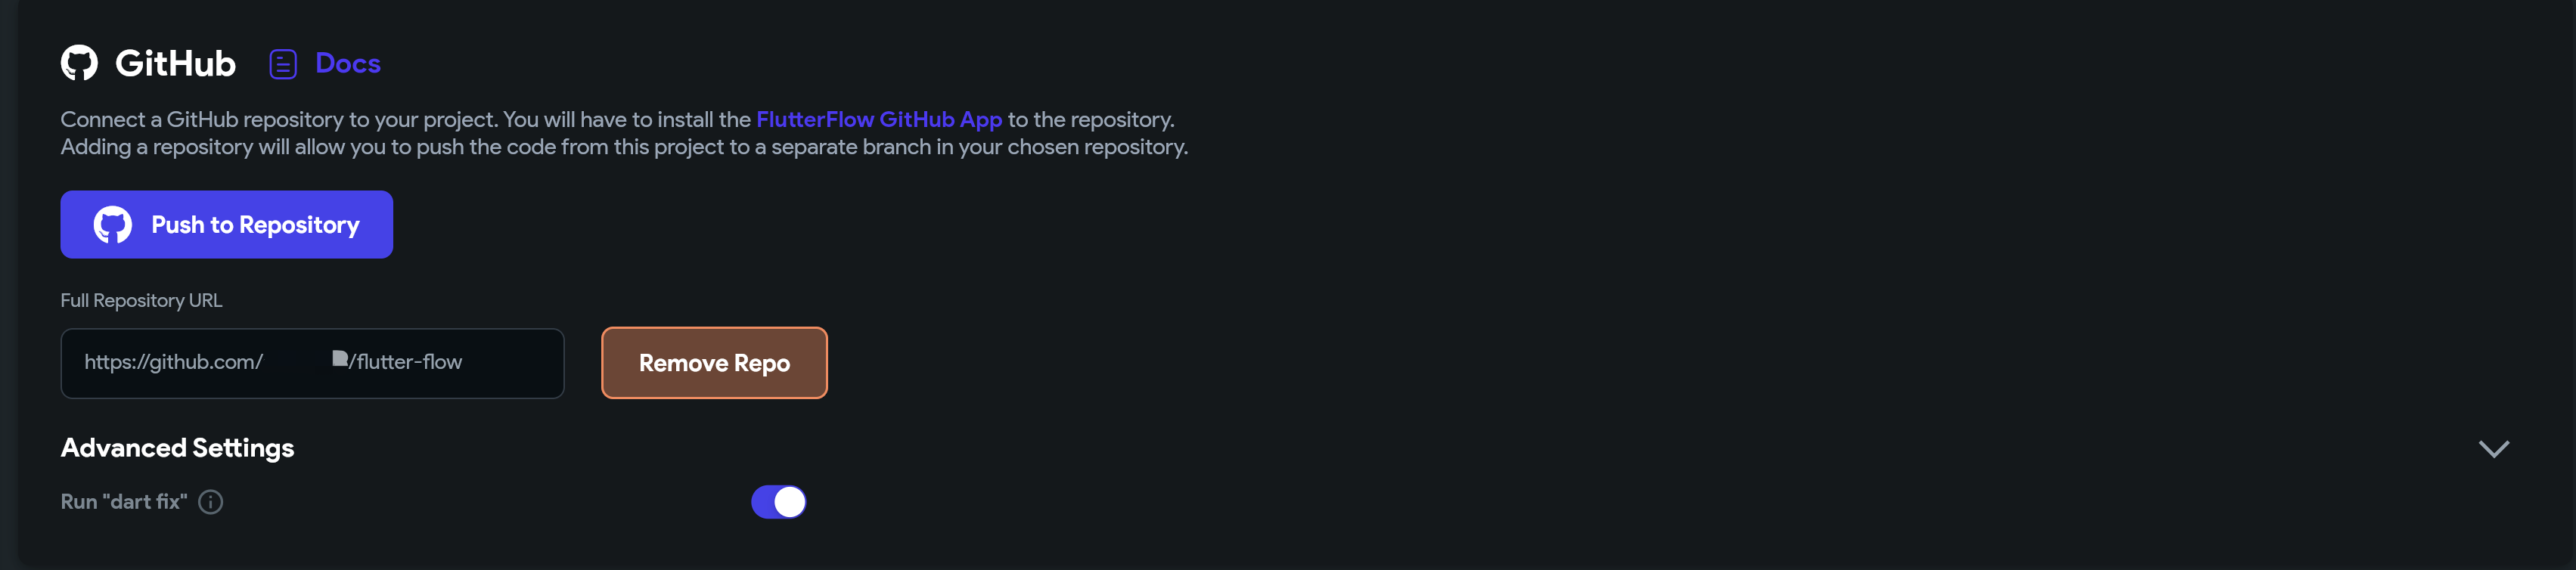
UI 準備好後,導航到 integrations -> GitHub 頁面,然後點擊 Push to Repository 按鈕將更改推送到 flutterflow 分支。
自訂 CustomAuthManager
切換到 GitHub 儲存庫中的 develop 分支,並合併來自 flutterflow 分支的最新更改。包括你的 UI 頁面和預建的 CustomAuthManager 類別。
安裝 Logto SDK 依賴
將 Logto SDK 依賴添加到你的專案中。
flutter pub add logto_dart_sdk
可選的 Http 套件:
Logto 客戶端需要一個 http 客戶端來進行 API 呼叫。你可以使用 http 套件或任何其他你選擇的 http 客戶端套件。
flutter pub add http
更新 UserProvider
將 OpenIdClaims 類別添加到 CustomAuthUserProvider 類別中以存儲用戶資訊。
OpenIdClaims類別是 Logto SDK 的一部分,將提供已驗證用戶的id_token宣告。
// lib/auth/custom_auth/custom_auth_user_provider.dart

import 'package:logto_dart_sdk/src/modules/id_token.dart';
import 'package:rxdart/rxdart.dart';

import 'custom_auth_manager.dart';

class FlutterFlowAuthAuthUser {
  FlutterFlowAuthAuthUser({required this.loggedIn, this.uid, this.idToken});

  bool loggedIn;
  String? uid;
  OpenIdClaims? idToken;
}

/// 生成已驗證使用者的資料流。
BehaviorSubject<FlutterFlowAuthAuthUser> flutterFlowAuthAuthUserSubject =
    BehaviorSubject.seeded(FlutterFlowAuthAuthUser(loggedIn: false));
Stream<FlutterFlowAuthAuthUser> flutterFlowAuthAuthUserStream() =>
    flutterFlowAuthAuthUserSubject
        .asBroadcastStream()
        .map((user) => currentUser = user);
在 CustomAuthManager 中初始化 logto 客戶端
在 CustomAuthManager 類別中初始化 Logto 客戶端。
// lib/auth/custom_auth/custom_auth_manager.dart

import 'dart:async';

import 'package:flutter/foundation.dart';
import 'package:http/http.dart' as http;
import 'package:logto_dart_sdk/logto_client.dart';
import 'package:logto_dart_sdk/src/modules/id_token.dart';

import 'custom_auth_user_provider.dart';

export 'custom_auth_manager.dart';


class CustomAuthManager {
  late LogtoClient logtoClient;

  final logtoConfig = const LogtoConfig(
      appId: '<YOUR-APP-ID>',
      endpoint: '<YOUR-LOGTO-ENDPOINT>');


  // ...

  FlutterFlowAuthAuthUser? _updateCurrentUser(
      {bool loggedIn = false, String? uid, OpenIdClaims? idToken}) {
    // 更新當前使用者流。
    final updatedUser = FlutterFlowAuthAuthUser(
      loggedIn: loggedIn,
      uid: uid,
      idToken: idToken,
    );

    flutterFlowAuthAuthUserSubject.add(updatedUser);

    return updatedUser;
  }

  Future initialize() async {
    logtoClient = LogtoClient(config: logtoConfig, httpClient: http.Client());

    late OpenIdClaims? idToken;

    try {
      idToken = await logtoClient.idTokenClaims;
    } catch (e) {
      if (kDebugMode) {
        print('初始化驗證時出錯: $e');
      }
    }

    _updateCurrentUser(
        loggedIn: idToken != null, uid: idToken?.subject, idToken: idToken);
  }
}

FlutterFlowAuthAuthUser? currentUser;
bool get loggedIn => currentUser?.loggedIn ?? false;
initialize 方法將初始化 Logto 客戶端並使用本地存儲中持久化的用戶驗證狀態更新當前用戶流。
Logto SDK 使用 flutter_secure_storage 套件安全地存儲用戶驗證資訊。
實現登入方法
調用 LogtoClient.signIn 方法將啟動標準 OIDC 驗證流程。Logto 登入頁面將使用 flutter_web_auth 在 webview 中打開。
// lib/auth/custom_auth/custom_auth_manager.dart

Future<FlutterFlowAuthAuthUser?> signIn(
    String redirectUri,
  ) async {
    await logtoClient.signIn(redirectUri);

    var idTokenClaims = await logtoClient.idTokenClaims;

    return _updateCurrentUser(
      loggedIn: idTokenClaims != null,
      uid: idTokenClaims?.subject,
      idToken: idTokenClaims,
    );
  }
LogtoClient 將處理授權、權杖交換和用戶資訊檢索步驟。一旦用戶驗證成功,idTokenClaims 將存儲在本地存儲中。
從 LogtoClient 檢索 idTokenClaims 並更新當前用戶流。
實現登出方法
// lib/auth/custom_auth/custom_auth_manager.dart

Future signOut() async {
    await logtoClient.signOut();

    flutterFlowAuthAuthUserSubject.add(
      FlutterFlowAuthAuthUser(loggedIn: false),
    );
  }
更新驗證工具方法
- 添加
authManagergetter 以訪問CustomAuthManager實例。 - 添加
currentUserUidgetter 以獲取當前用戶 uid。 - 添加
currentUserDatagetter 以獲取當前用戶資料。 - 添加
logtoClientgetter 以訪問 Logto 客戶端實例。
// lib/auth/custom_auth/auth_util.dart

import 'package:logto_dart_sdk/logto_client.dart';
import 'package:logto_dart_sdk/src/modules/id_token.dart';

import 'custom_auth_manager.dart';

export 'custom_auth_manager.dart';

final _authManager = CustomAuthManager();
CustomAuthManager get authManager => _authManager;
String get currentUserUid => currentUser?.uid ?? '';
OpenIdClaims? get currentUserData => currentUser?.idToken;
LogtoClient get logtoClient => _authManager.logtoClient;
在你的 UI 中整合自訂驗證
主頁
當用戶點擊登入按鈕時,調用 authManager.signIn 方法以啟動驗證流程。
redirectUri是用於從 Logto 登入頁面捕獲授權回調的回調 URL。 有關 redirectUri 的更多詳細資訊,請參閱 Flutter SDK。
// lib/pages/home_page/home_page_widget.dart

final redirectUri = 'io.logto://callback';

// ...

FFButtonWidget(
  onPressed: () async {
    GoRouter.of(context).prepareAuthEvent();

    await authManager.signIn(redirectUri);

    context.replaceNamed('user');
  },
  text: 'Sign In',
  // ...
)
用戶資料頁面
使用驗證工具 getter 訪問當前用戶資料和 Logto 客戶端實例。
// lib/pages/user/user_widget.dart

import '/auth/custom_auth/auth_util.dart';

// ...

children: [
  Text(
    'User ID: $currentUserUid',
  ),
  Text(
    'Display Name: ${currentUserData?.name}',
  ),
  Text(
    'Username: ${currentUserData?.username}',
  ),
  Text(
    'Email: ${currentUserData?.emailVerified ?? currentUserData?.email}',
  ),
]
當用戶點擊登出按鈕時,實現登出方法。
// lib/pages/user/user_widget.dart

FFButtonWidget(
  onPressed: () async {
    await authManager.signOut();

    context.replaceNamed('HomePage');
  },
  text: 'Sign Out',
  // ...
)
進一步閱讀
Logto SDK 提供更多方法與 Logto API 互動。你可以進一步自訂 CustomAuthManager 類別以實現更多功能。
依賴問題排查
flutter_secure_storage
我們使用 flutter_secure_storage 來實現跨平台的持久安全權杖存儲。在底層:
- iOS 使用 Keychain
- Android 使用 AES 加密。
配置 Android 版本:
在 [project]/android/app/build.gradle 中將 minSdkVersion 設置為 >= 18。
  android {
      ...

      defaultConfig {
          ...
          minSdkVersion 18
          ...
      }
  }
禁用自動備份:
預設情況下,Android 會在 Google Drive 上備份數據。這可能會導致例外 java.security.InvalidKeyException:Failed to unwrap key。
為避免此情況,你可以禁用應用程式的自動備份或從 FlutterSecureStorage 中排除 sharedprefs。
-
要禁用自動備份,請前往應用程式的 manifest 文件並設置布林值 android:allowBackup:
<manifest ... >...<applicationandroid:allowBackup="false"android:fullBackupContent="false"...>...</application></manifest> -
從 FlutterSecureStorage 中排除 sharedprefs。
如果你需要為應用程式啟用 android:fullBackupContent,請設置備份規則以 排除 插件使用的 prefs:
<application ...android:fullBackupContent="@xml/backup_rules"></application><?xml version="1.0" encoding="utf-8"?><full-backup-content><exclude domain="sharedpref" path="FlutterSecureStorage"/></full-backup-content>請查看 flutter_secure_storage 以獲取更多詳細資訊。
flutter_web_auth
flutter_web_auth 在 Logto 的 flutter SDK 中被使用。我們依賴其基於 webview 的互動介面來開啟 Logto 的授權頁面。
此插件在 iOS 12+ 和 macOS 10.15+ 上使用 ASWebAuthenticationSession,在 iOS 11 上使用 SFAuthenticationSession,在 Android 上使用 Chrome Custom Tabs,並在 Web 上開啟新視窗。 你可以在 iOS 8+ 上構建它,但目前僅支援 iOS 11 或更高版本。
在 Android 上註冊回呼 URL
為了從 Logto 的登入網頁捕獲回呼 URL,你需要將你的登入 redirectUri 註冊到 AndroidManifest.xml 中。
<activity android:name="com.linusu.flutter_web_auth.CallbackActivity" android:exported="true">
    <intent-filter android:label="flutter_web_auth">
        <action android:name="android.intent.action.VIEW"/>
        <category android:name="android.intent.category.DEFAULT"/>
        <category android:name="android.intent.category.BROWSABLE"/>
        <data android:scheme="io.logto"/>
    </intent-filter>
</activity>