ปรับแต่ง FlutterFlow CustomAuthManager ด้วย Logto SDK
FlutterFlow มีฟีเจอร์ custom authentication ในตัวที่ช่วยให้คุณยืนยันตัวตนผู้ใช้ด้วย backend ของคุณเอง อย่างไรก็ตาม flow การยืนยันตัวตนแบบ custom ที่มีในตัวถูกออกแบบมาให้ทำงานกับ API การยืนยันตัวตนเพียงครั้งเดียวเท่านั้น หากคุณใช้ผู้ให้บริการข้อมูลระบุตัวตน (IdP) ของบุคคลที่สาม คำขอการยืนยันตัวตนจะสามารถทำได้เฉพาะโดยใช้ grant type Resource Owner Password Credentials ซึ่งไม่แนะนำให้ใช้ใน production ดูรายละเอียดเพิ่มเติมที่ Deprecated ropc grant type
flow การยืนยันตัวตนแบบมาตรฐาน OpenID Connect (OIDC) จะมีหลายขั้นตอน เช่น การอนุญาต (Authorization) การแลกเปลี่ยนโทเค็น และการดึงข้อมูลผู้ใช้ หากต้องการใช้งาน flow OIDC มาตรฐานกับ IdP อย่าง Logto คุณจำเป็นต้องปรับแต่งคลาส CustomAuthManager ใน FlutterFlow
คู่มือนี้จะแสดงวิธีปรับแต่งคลาส CustomAuthManager ใน FlutterFlow โดยใช้ Flutter SDK ของ Logto คุณจะได้ประโยชน์จาก SDK ของ Logto สำหรับ flow OIDC มาตรฐาน พร้อมกับยังคงใช้ UI builder ของ FlutterFlow ได้
- แพ็กเกจ Logto SDK มีให้ใช้งานบน pub.dev และ Logto github repository
- SDK นี้เหมาะสำหรับแพลตฟอร์ม Android และ iOS เท่านั้น
ข้อกำหนดเบื้องต้น
- บัญชี Logto Cloud หรือ Logto ที่ติดตั้งเอง
- สร้างแอปพลิเคชัน Logto Flutter
- โปรเจกต์ FlutterFlow
เปิดใช้งาน custom code ใน FlutterFlow
เพื่อปรับแต่งคลาส CustomAuthManager คุณต้องเปิดใช้งานฟีเจอร์ custom code ใน FlutterFlow โดยทำตามคู่มือ Manage Custom Code In GitHub เพื่อซิงค์โปรเจกต์ FlutterFlow ของคุณกับ GitHub
การจัดการ custom code ใน GitHub เป็นฟีเจอร์ระดับพรีเมียมใน FlutterFlow คุณต้องอัปเกรด FlutterFlow เป็นแผน pro เพื่อเปิดใช้งานฟีเจอร์นี้
เมื่อเสร็จแล้ว คุณจะมี 3 branch ใน repository GitHub ของ FlutterFlow:
main: branch หลักสำหรับโปรเจกต์ flutter ใช้สำหรับ deploy โปรเจกต์ของคุณflutterflow: branch ที่FlutterFlowจะซิงค์การเปลี่ยนแปลงจาก editor ของ FlutterFlowdevelop: branch ที่คุณสามารถแก้ไข custom code ของคุณ
สร้าง UI ของคุณใน FlutterFlow
เริ่มต้นด้วยการสร้าง UI ของคุณใน FlutterFlow คุณสามารถดู เอกสาร FlutterFlow เพื่อสร้าง UI ตามที่ต้องการ สำหรับคู่มือนี้ ขั้นต่ำเราจะสร้าง 2 หน้า:
- หน้าโฮมแบบง่ายพร้อมปุ่มเข้าสู่ระบบ
- หน้าข้อมูลผู้ใช้เพื่อแสดงข้อมูลผู้ใช้และปุ่มออกจากระบบ
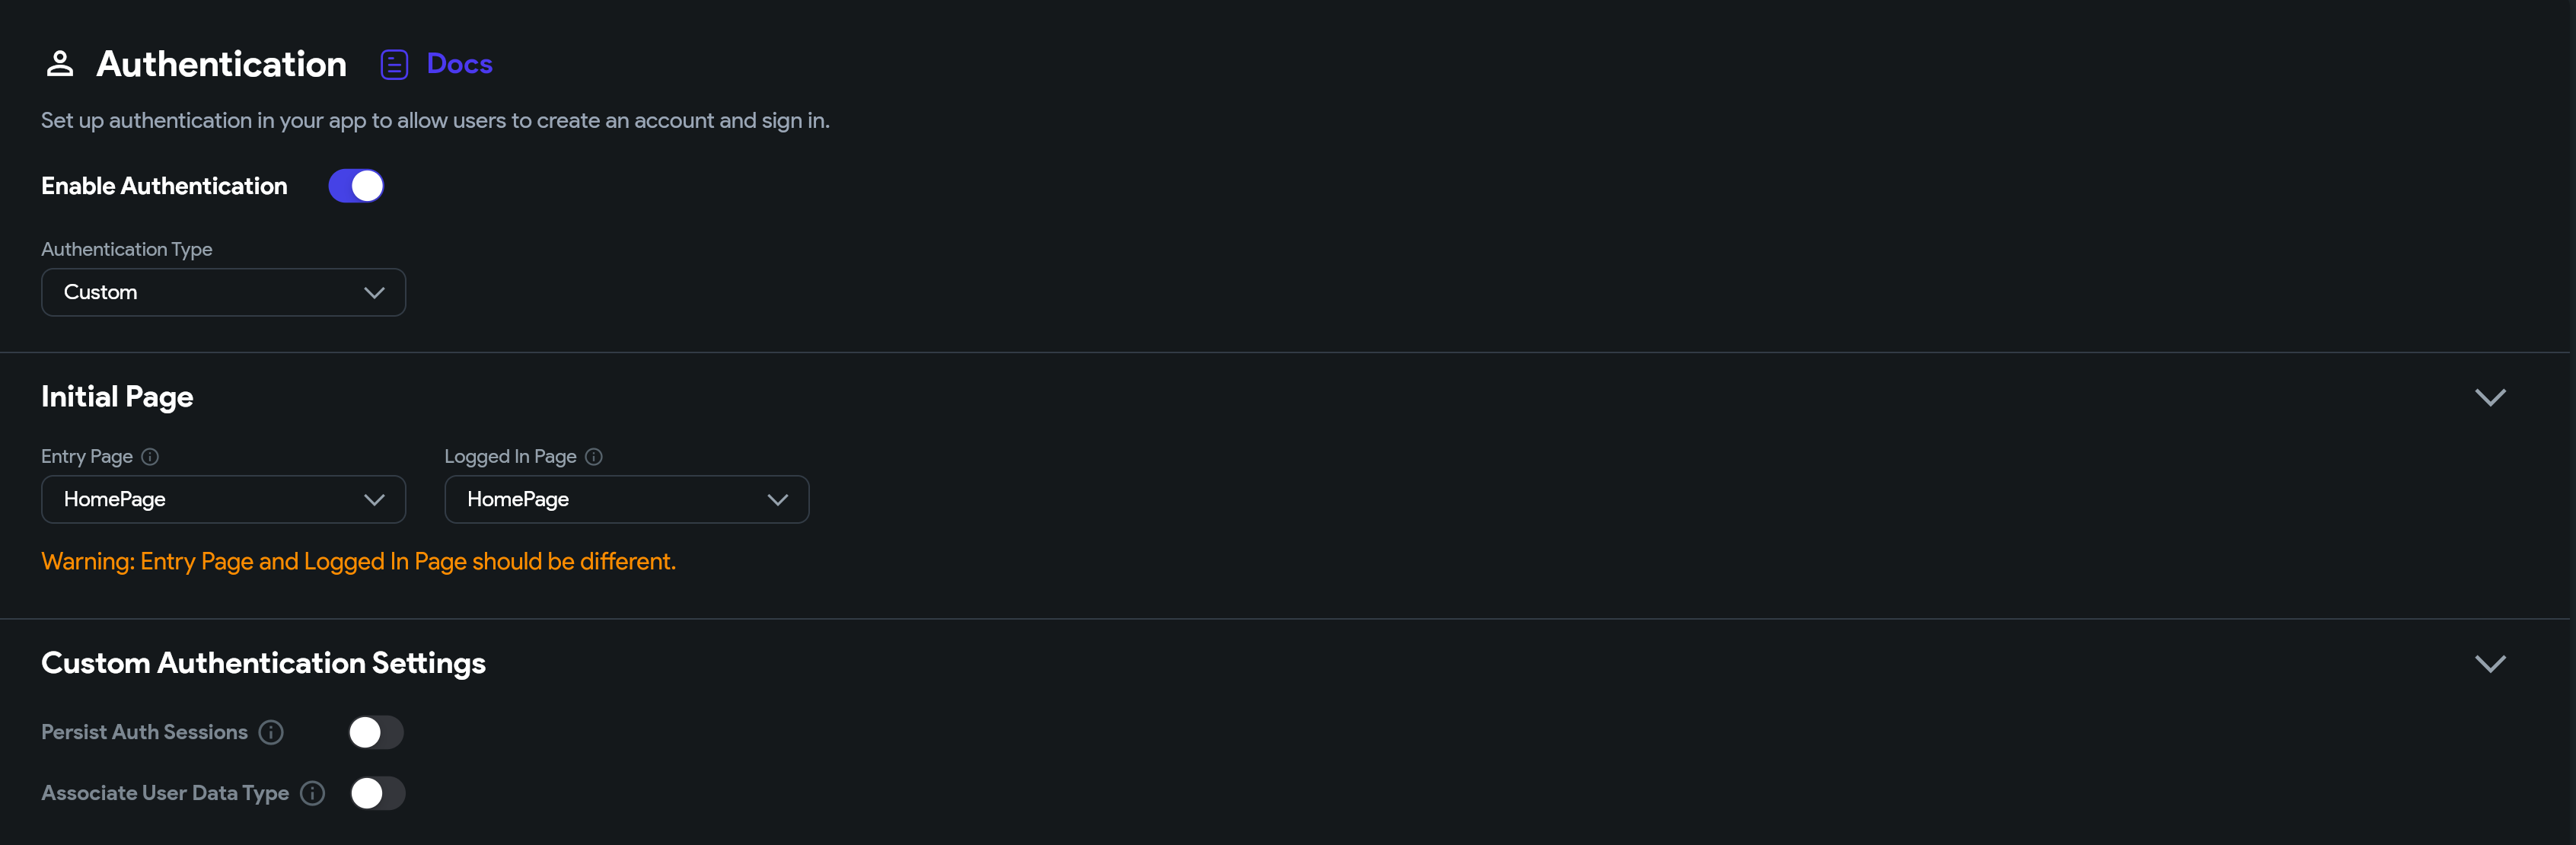
ไปที่ App Settings -> หน้า Authentication และเปิดใช้งาน custom authentication ระบบจะสร้างคลาส CustomAuthManager ในโปรเจกต์ FlutterFlow ของคุณ
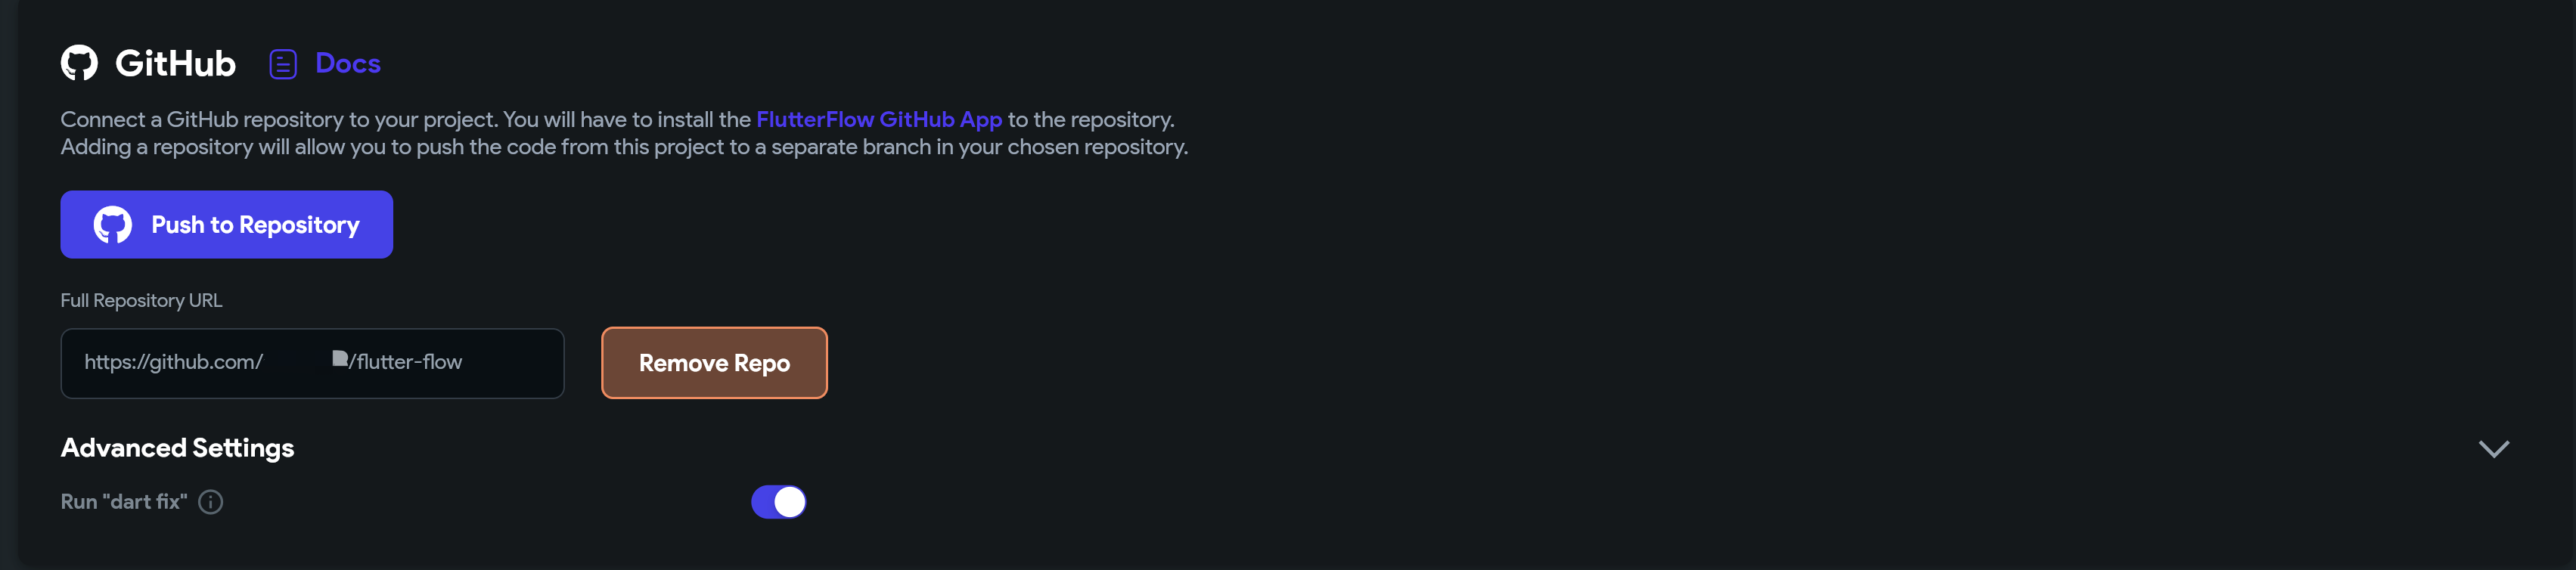
เมื่อ UI พร้อมแล้ว ให้ไปที่หน้า integrations -> GitHub แล้วคลิกปุ่ม Push to Repository เพื่อ push การเปลี่ยนแปลงไปยัง branch flutterflow
ปรับแต่ง CustomAuthManager
สลับไปที่ branch develop ใน repository GitHub ของคุณ และ merge การเปลี่ยนแปลงล่าสุดจาก branch flutterflow รวมถึงหน้า UI ของคุณ และคลาส CustomAuthManager ที่สร้างไว้ล่วงหน้า
ติดตั้ง dependency Logto SDK
เพิ่ม dependency Logto SDK ลงในโปรเจกต์ของคุณ
flutter pub add logto_dart_sdk
แพ็กเกจ Http เสริม:
Logto client ต้องการ http client เพื่อเรียก API คุณสามารถใช้แพ็กเกจ http หรือ http client อื่นที่คุณต้องการ
flutter pub add http
อัปเดต UserProvider
เพิ่มคลาส OpenIdClaims ลงในคลาส CustomAuthUserProvider เพื่อเก็บข้อมูลผู้ใช้
คลาส
OpenIdClaimsเป็นส่วนหนึ่งของ Logto SDK ซึ่งจะให้ claims ของid_tokenสำหรับผู้ใช้ที่ยืนยันตัวตนแล้ว
// lib/auth/custom_auth/custom_auth_user_provider.dart

import 'package:logto_dart_sdk/src/modules/id_token.dart';
import 'package:rxdart/rxdart.dart';

import 'custom_auth_manager.dart';

class FlutterFlowAuthAuthUser {
  FlutterFlowAuthAuthUser({required this.loggedIn, this.uid, this.idToken});

  bool loggedIn;
  String? uid;
  OpenIdClaims? idToken;
}

/// สร้าง stream ของผู้ใช้ที่ผ่านการยืนยันตัวตนแล้ว
BehaviorSubject<FlutterFlowAuthAuthUser> flutterFlowAuthAuthUserSubject =
    BehaviorSubject.seeded(FlutterFlowAuthAuthUser(loggedIn: false));
Stream<FlutterFlowAuthAuthUser> flutterFlowAuthAuthUserStream() =>
    flutterFlowAuthAuthUserSubject
        .asBroadcastStream()
        .map((user) => currentUser = user);
เริ่มต้น logto client ใน CustomAuthManager
เริ่มต้น logto client ในคลาส CustomAuthManager
// lib/auth/custom_auth/custom_auth_manager.dart

import 'dart:async';

import 'package:flutter/foundation.dart';
import 'package:http/http.dart' as http;
import 'package:logto_dart_sdk/logto_client.dart';
import 'package:logto_dart_sdk/src/modules/id_token.dart';

import 'custom_auth_user_provider.dart';

export 'custom_auth_manager.dart';


class CustomAuthManager {
  late LogtoClient logtoClient;

  final logtoConfig = const LogtoConfig(
      appId: '<YOUR-APP-ID>',
      endpoint: '<YOUR-LOGTO-ENDPOINT>');


  // ...

  FlutterFlowAuthAuthUser? _updateCurrentUser(
      {bool loggedIn = false, String? uid, OpenIdClaims? idToken}) {
    // อัปเดตสตรีมผู้ใช้ปัจจุบัน
    final updatedUser = FlutterFlowAuthAuthUser(
      loggedIn: loggedIn,
      uid: uid,
      idToken: idToken,
    );

    flutterFlowAuthAuthUserSubject.add(updatedUser);

    return updatedUser;
  }

  Future initialize() async {
    logtoClient = LogtoClient(config: logtoConfig, httpClient: http.Client());

    late OpenIdClaims? idToken;

    try {
      idToken = await logtoClient.idTokenClaims;
    } catch (e) {
      if (kDebugMode) {
        print('เกิดข้อผิดพลาดขณะเริ่มต้น auth: $e');
      }
    }

    _updateCurrentUser(
        loggedIn: idToken != null, uid: idToken?.subject, idToken: idToken);
  }
}

FlutterFlowAuthAuthUser? currentUser;
bool get loggedIn => currentUser?.loggedIn ?? false;
เมธอด initialize จะเริ่มต้น logto client และอัปเดต current user stream ด้วยสถานะการยืนยันตัวตนของผู้ใช้ที่เก็บไว้ใน local storage
Logto SDK ใช้แพ็กเกจ flutter_secure_storage เพื่อเก็บข้อมูลการยืนยันตัวตนของผู้ใช้อย่างปลอดภัย
สร้างเมธอด Sign-in
เรียกเมธอด LogtoClient.signIn เพื่อเริ่ม flow การยืนยันตัวตน OIDC มาตรฐาน หน้า Logto Sign-In จะถูกเปิดใน webview โดยใช้ flutter_web_auth
// lib/auth/custom_auth/custom_auth_manager.dart

Future<FlutterFlowAuthAuthUser?> signIn(
    String redirectUri,
  ) async {
    await logtoClient.signIn(redirectUri);

    var idTokenClaims = await logtoClient.idTokenClaims;

    return _updateCurrentUser(
      loggedIn: idTokenClaims != null,
      uid: idTokenClaims?.subject,
      idToken: idTokenClaims,
    );
  }
LogtoClient จะจัดการขั้นตอนการอนุญาต (authorization) การแลกเปลี่ยนโทเค็น และการดึงข้อมูลผู้ใช้ เมื่อผู้ใช้ได้รับการยืนยันตัวตนแล้ว idTokenClaims จะถูกเก็บไว้ใน local storage
ดึง idTokenClaims จาก LogtoClient และอัปเดต current user stream
สร้างเมธอด Sign-out
// lib/auth/custom_auth/custom_auth_manager.dart

Future signOut() async {
    await logtoClient.signOut();

    flutterFlowAuthAuthUserSubject.add(
      FlutterFlowAuthAuthUser(loggedIn: false),
    );
  }
อัปเดตเมธอด auth util
- เพิ่ม getter
authManagerเพื่อเข้าถึง instance ของCustomAuthManager - เพิ่ม getter
currentUserUidเพื่อดึง uid ของผู้ใช้ปัจจุบัน - เพิ่ม getter
currentUserDataเพื่อดึงข้อมูลผู้ใช้ปัจจุบัน - เพิ่ม getter
logtoClientเพื่อเข้าถึง instance ของ Logto client
// lib/auth/custom_auth/auth_util.dart

import 'package:logto_dart_sdk/logto_client.dart';
import 'package:logto_dart_sdk/src/modules/id_token.dart';

import 'custom_auth_manager.dart';

export 'custom_auth_manager.dart';

final _authManager = CustomAuthManager();
CustomAuthManager get authManager => _authManager;
String get currentUserUid => currentUser?.uid ?? '';
OpenIdClaims? get currentUserData => currentUser?.idToken;
LogtoClient get logtoClient => _authManager.logtoClient;
เชื่อมต่อ custom authentication เข้ากับ UI ของคุณ
หน้าโฮม
เรียกเมธอด authManager.signIn เพื่อเริ่ม flow การยืนยันตัวตนเมื่อผู้ใช้คลิกปุ่มเข้าสู่ระบบ
redirectUriคือ callback URL ที่จะใช้รับ callback การอนุญาตจากหน้า Logto sign-in ดูรายละเอียดเพิ่มเติมเกี่ยวกับ redirectUri ได้ที่ Flutter SDK
// lib/pages/home_page/home_page_widget.dart

final redirectUri = 'io.logto://callback';

// ...

FFButtonWidget(
  onPressed: () async {
    GoRouter.of(context).prepareAuthEvent();

    await authManager.signIn(redirectUri);

    context.replaceNamed('user');
  },
  text: 'Sign In',
  // ...
)
หน้าข้อมูลผู้ใช้
ใช้ auth util getter เพื่อเข้าถึงข้อมูลผู้ใช้ปัจจุบันและ instance ของ Logto client
// lib/pages/user/user_widget.dart

import '/auth/custom_auth/auth_util.dart';

// ...

children: [
  Text(
    'User ID: $currentUserUid',
  ),
  Text(
    'Display Name: ${currentUserData?.name}',
  ),
  Text(
    'Username: ${currentUserData?.username}',
  ),
  Text(
    'Email: ${currentUserData?.emailVerified ?? currentUserData?.email}',
  ),
]
สร้างเมธอด sign-out เมื่อผู้ใช้คลิกปุ่มออกจากระบบ
// lib/pages/user/user_widget.dart

FFButtonWidget(
  onPressed: () async {
    await authManager.signOut();

    context.replaceNamed('HomePage');
  },
  text: 'Sign Out',
  // ...
)
อ่านเพิ่มเติม
Logto SDK มีเมธอดเพิ่มเติมสำหรับโต้ตอบกับ Logto API คุณสามารถปรับแต่งคลาส CustomAuthManager เพิ่มเติมเพื่อเพิ่มฟีเจอร์อื่น ๆ ได้
การแก้ไขปัญหา dependency
flutter_secure_storage
เราใช้ flutter_secure_storage เพื่อสร้างการจัดเก็บโทเค็นที่ปลอดภัยแบบถาวรข้ามแพลตฟอร์ม เบื้องหลัง:
- ใช้ Keychain สำหรับ iOS
- ใช้การเข้ารหัส AES สำหรับ Android
ตั้งค่าเวอร์ชัน Android:
ใน [project]/android/app/build.gradle ตั้งค่า minSdkVersion เป็น >= 18
  android {
      ...

      defaultConfig {
          ...
          minSdkVersion 18
          ...
      }
  }
ปิดใช้งาน autobackup:
โดยปกติ Android จะสำรองข้อมูลไปยัง Google Drive อัตโนมัติ ซึ่งอาจทำให้เกิด exception java.security.InvalidKeyException:Failed to unwrap key
เพื่อหลีกเลี่ยงปัญหานี้ คุณสามารถปิดการสำรองข้อมูลอัตโนมัติสำหรับแอปของคุณ หรือยกเว้น sharedprefs จาก FlutterSecureStorage
-
หากต้องการปิดการสำรองข้อมูลอัตโนมัติ ให้ไปที่ไฟล์ manifest ของแอปและตั้งค่าค่า boolean android:allowBackup:
<manifest ... >...<applicationandroid:allowBackup="false"android:fullBackupContent="false"...>...</application></manifest> -
ยกเว้น sharedprefs จาก FlutterSecureStorage
หากคุณจำเป็นต้องเปิดใช้งาน android:fullBackupContent สำหรับแอปของคุณ ให้ตั้งค่ากฎการสำรองข้อมูลเพื่อ ยกเว้น prefs ที่ปลั๊กอินนี้ใช้:
<application ...android:fullBackupContent="@xml/backup_rules"></application><?xml version="1.0" encoding="utf-8"?><full-backup-content><exclude domain="sharedpref" path="FlutterSecureStorage"/></full-backup-content>โปรดตรวจสอบรายละเอียดเพิ่มเติมที่ flutter_secure_storage
flutter_web_auth
flutter_web_auth ถูกใช้เบื้องหลังใน SDK ของ Logto สำหรับ flutter เราอาศัยอินเทอร์เฟซการโต้ตอบแบบ webview ของมันเพื่อเปิดหน้าการอนุญาต (authorization) ของ Logto
ปลั๊กอินนี้ใช้ ASWebAuthenticationSession บน iOS 12+ และ macOS 10.15+, SFAuthenticationSession บน iOS 11, Chrome Custom Tabs บน Android และเปิดหน้าต่างใหม่บน Web คุณสามารถ build ได้กับ iOS 8+ แต่ปัจจุบันรองรับเฉพาะ iOS 11 ขึ้นไปเท่านั้น
ลงทะเบียน callback url บน Android
เพื่อจับ callback url จากหน้าลงชื่อเข้าใช้ของ Logto คุณจะต้องลงทะเบียน redirectUri สำหรับการลงชื่อเข้าใช้ของคุณใน AndroidManifest.xml
<activity android:name="com.linusu.flutter_web_auth.CallbackActivity" android:exported="true">
    <intent-filter android:label="flutter_web_auth">
        <action android:name="android.intent.action.VIEW"/>
        <category android:name="android.intent.category.DEFAULT"/>
        <category android:name="android.intent.category.BROWSABLE"/>
        <data android:scheme="io.logto"/>
    </intent-filter>
</activity>