使用角色型存取控制 (RBAC, Role-based Access Control) 與 JWT 驗證 (JWT validation) 保護你的 NestJS API
本指南將協助你透過 角色型存取控制 (RBAC, Role-based Access Control) 以及由 Logto 簽發的 JSON Web Token (JWT),為你的 NestJS API 實作授權 (Authorization) 機制,提升安全性。
開始前
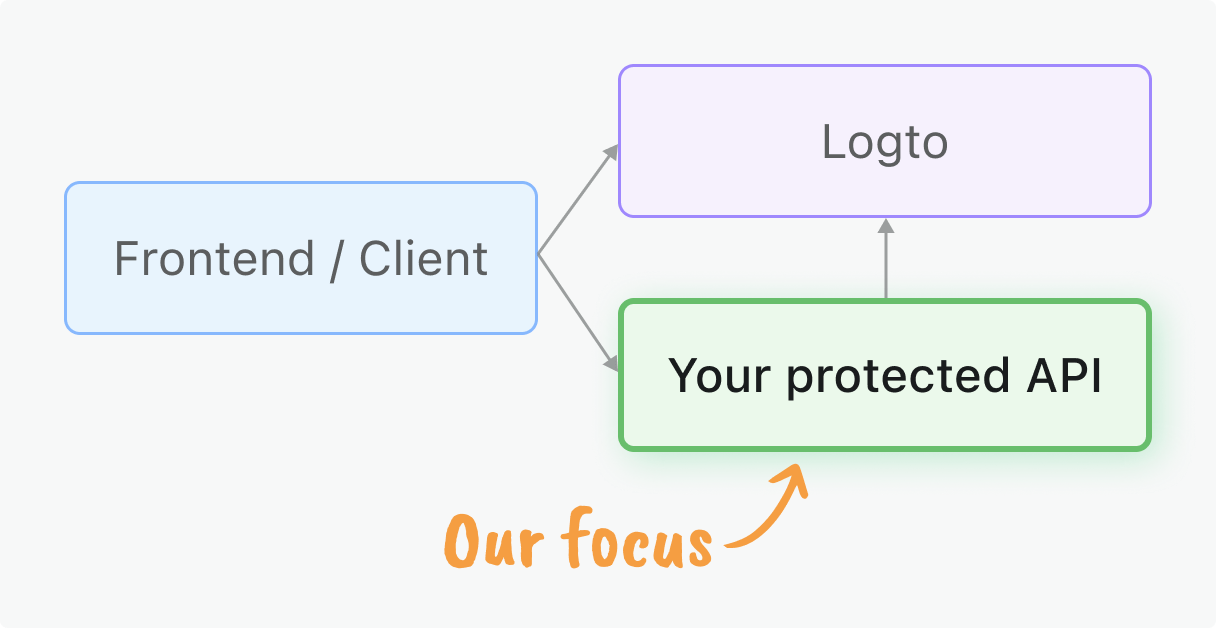
你的用戶端應用程式需要從 Logto 取得存取權杖 (Access tokens)。如果你尚未完成用戶端整合,請參考我們針對 React、Vue、Angular 或其他前端框架的 快速入門,或伺服器對伺服器存取請參閱 機器對機器指南。
本指南聚焦於在你的 NestJS 應用程式中,對這些權杖進行伺服器端驗證。
你將學到
- JWT 驗證: 學習如何驗證存取權杖 (Access tokens) 並擷取驗證 (Authentication) 資訊
- 中介軟體實作: 建立可重複使用的中介軟體以保護 API
- 權限模型: 理解並實作不同的授權 (Authorization) 模式:
- 全域 API 資源 (Global API resources) 用於應用程式層級端點
- 組織權限 (Organization permissions) 控制租戶專屬功能
- 組織層級 API 資源 (Organization-level API resources) 用於多租戶資料存取
- RBAC 整合: 在 API 端點強制執行角色型權限 (Role-based permissions) 與權限範圍 (Scopes)
先決條件
- 已安裝最新版穩定版 Node.js
- 基本了解 NestJS 與 Web API 開發
- 已設定 Logto 應用程式(如有需要請參閱 快速入門)
權限 (Permission) 模型總覽
在實作保護機制前,請先選擇最適合你應用程式架構的權限模型。這與 Logto 的三大授權 (Authorization) 情境相符:
- 全域 API 資源 (Global API resources)
- 組織(非 API)權限 (Organization (non-API) permissions)
- 組織層級 API 資源 (Organization-level API resources)
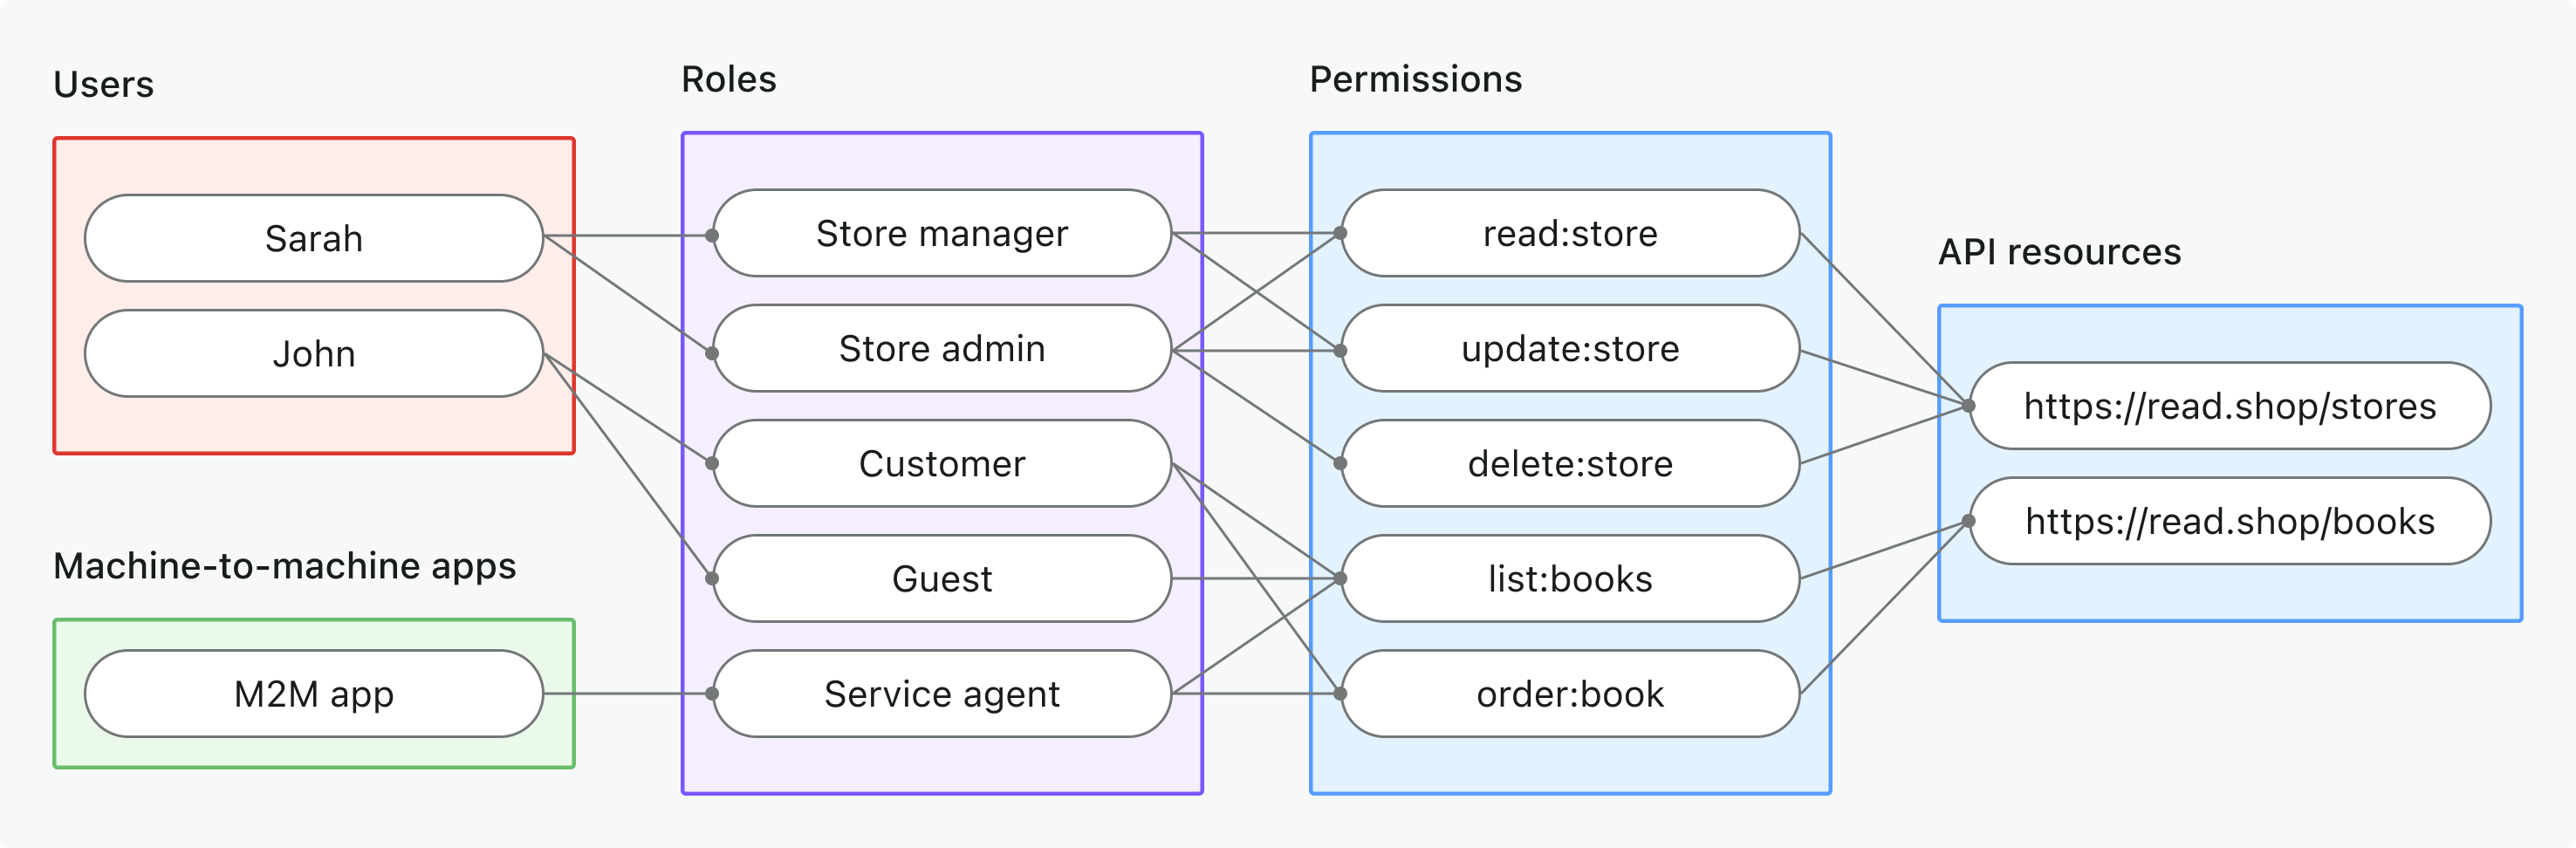
- 適用情境: 保護整個應用程式共用的 API 資源(非組織專屬)
- 權杖類型: 具有全域受眾 (global audience) 的存取權杖 (Access token)
- 範例: 公開 API、核心產品服務、管理端點
- 最適用於: 所有客戶共用 API 的 SaaS 產品、無租戶隔離的微服務架構
- 深入瞭解: 保護全域 API 資源
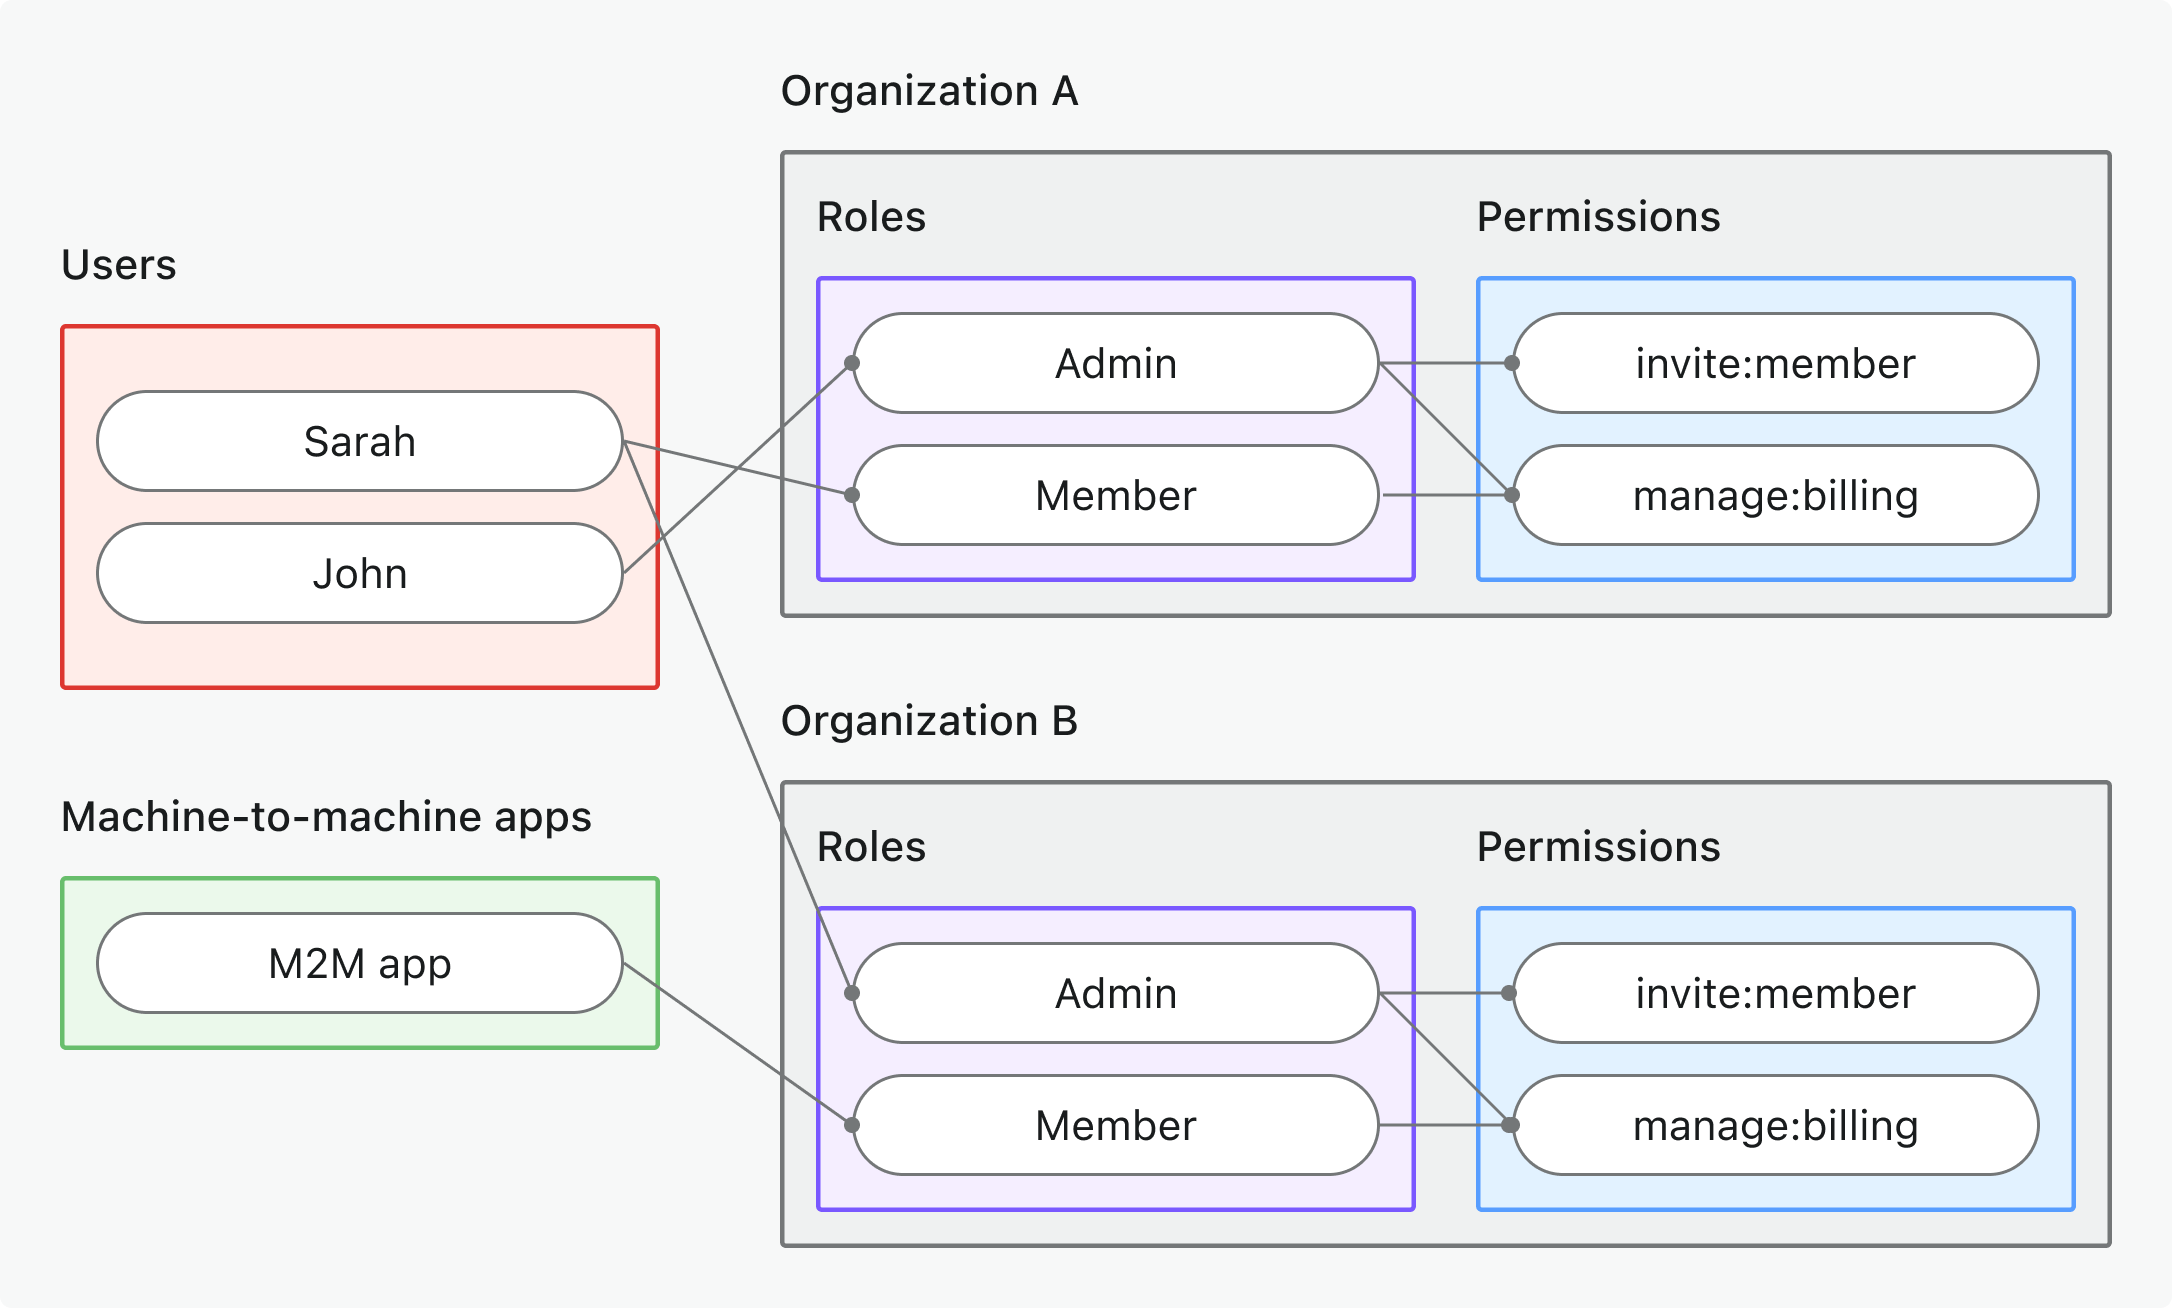
- 適用情境: 控制組織專屬的操作、UI 功能或商業邏輯(非 API)
- 權杖類型: 具有組織專屬受眾 (organization-specific audience) 的組織權杖 (Organization token)
- 範例: 功能開關、儀表板權限、成員邀請控制
- 最適用於: 具有組織專屬功能與流程的多租戶 SaaS
- 深入瞭解: 保護組織(非 API)權限
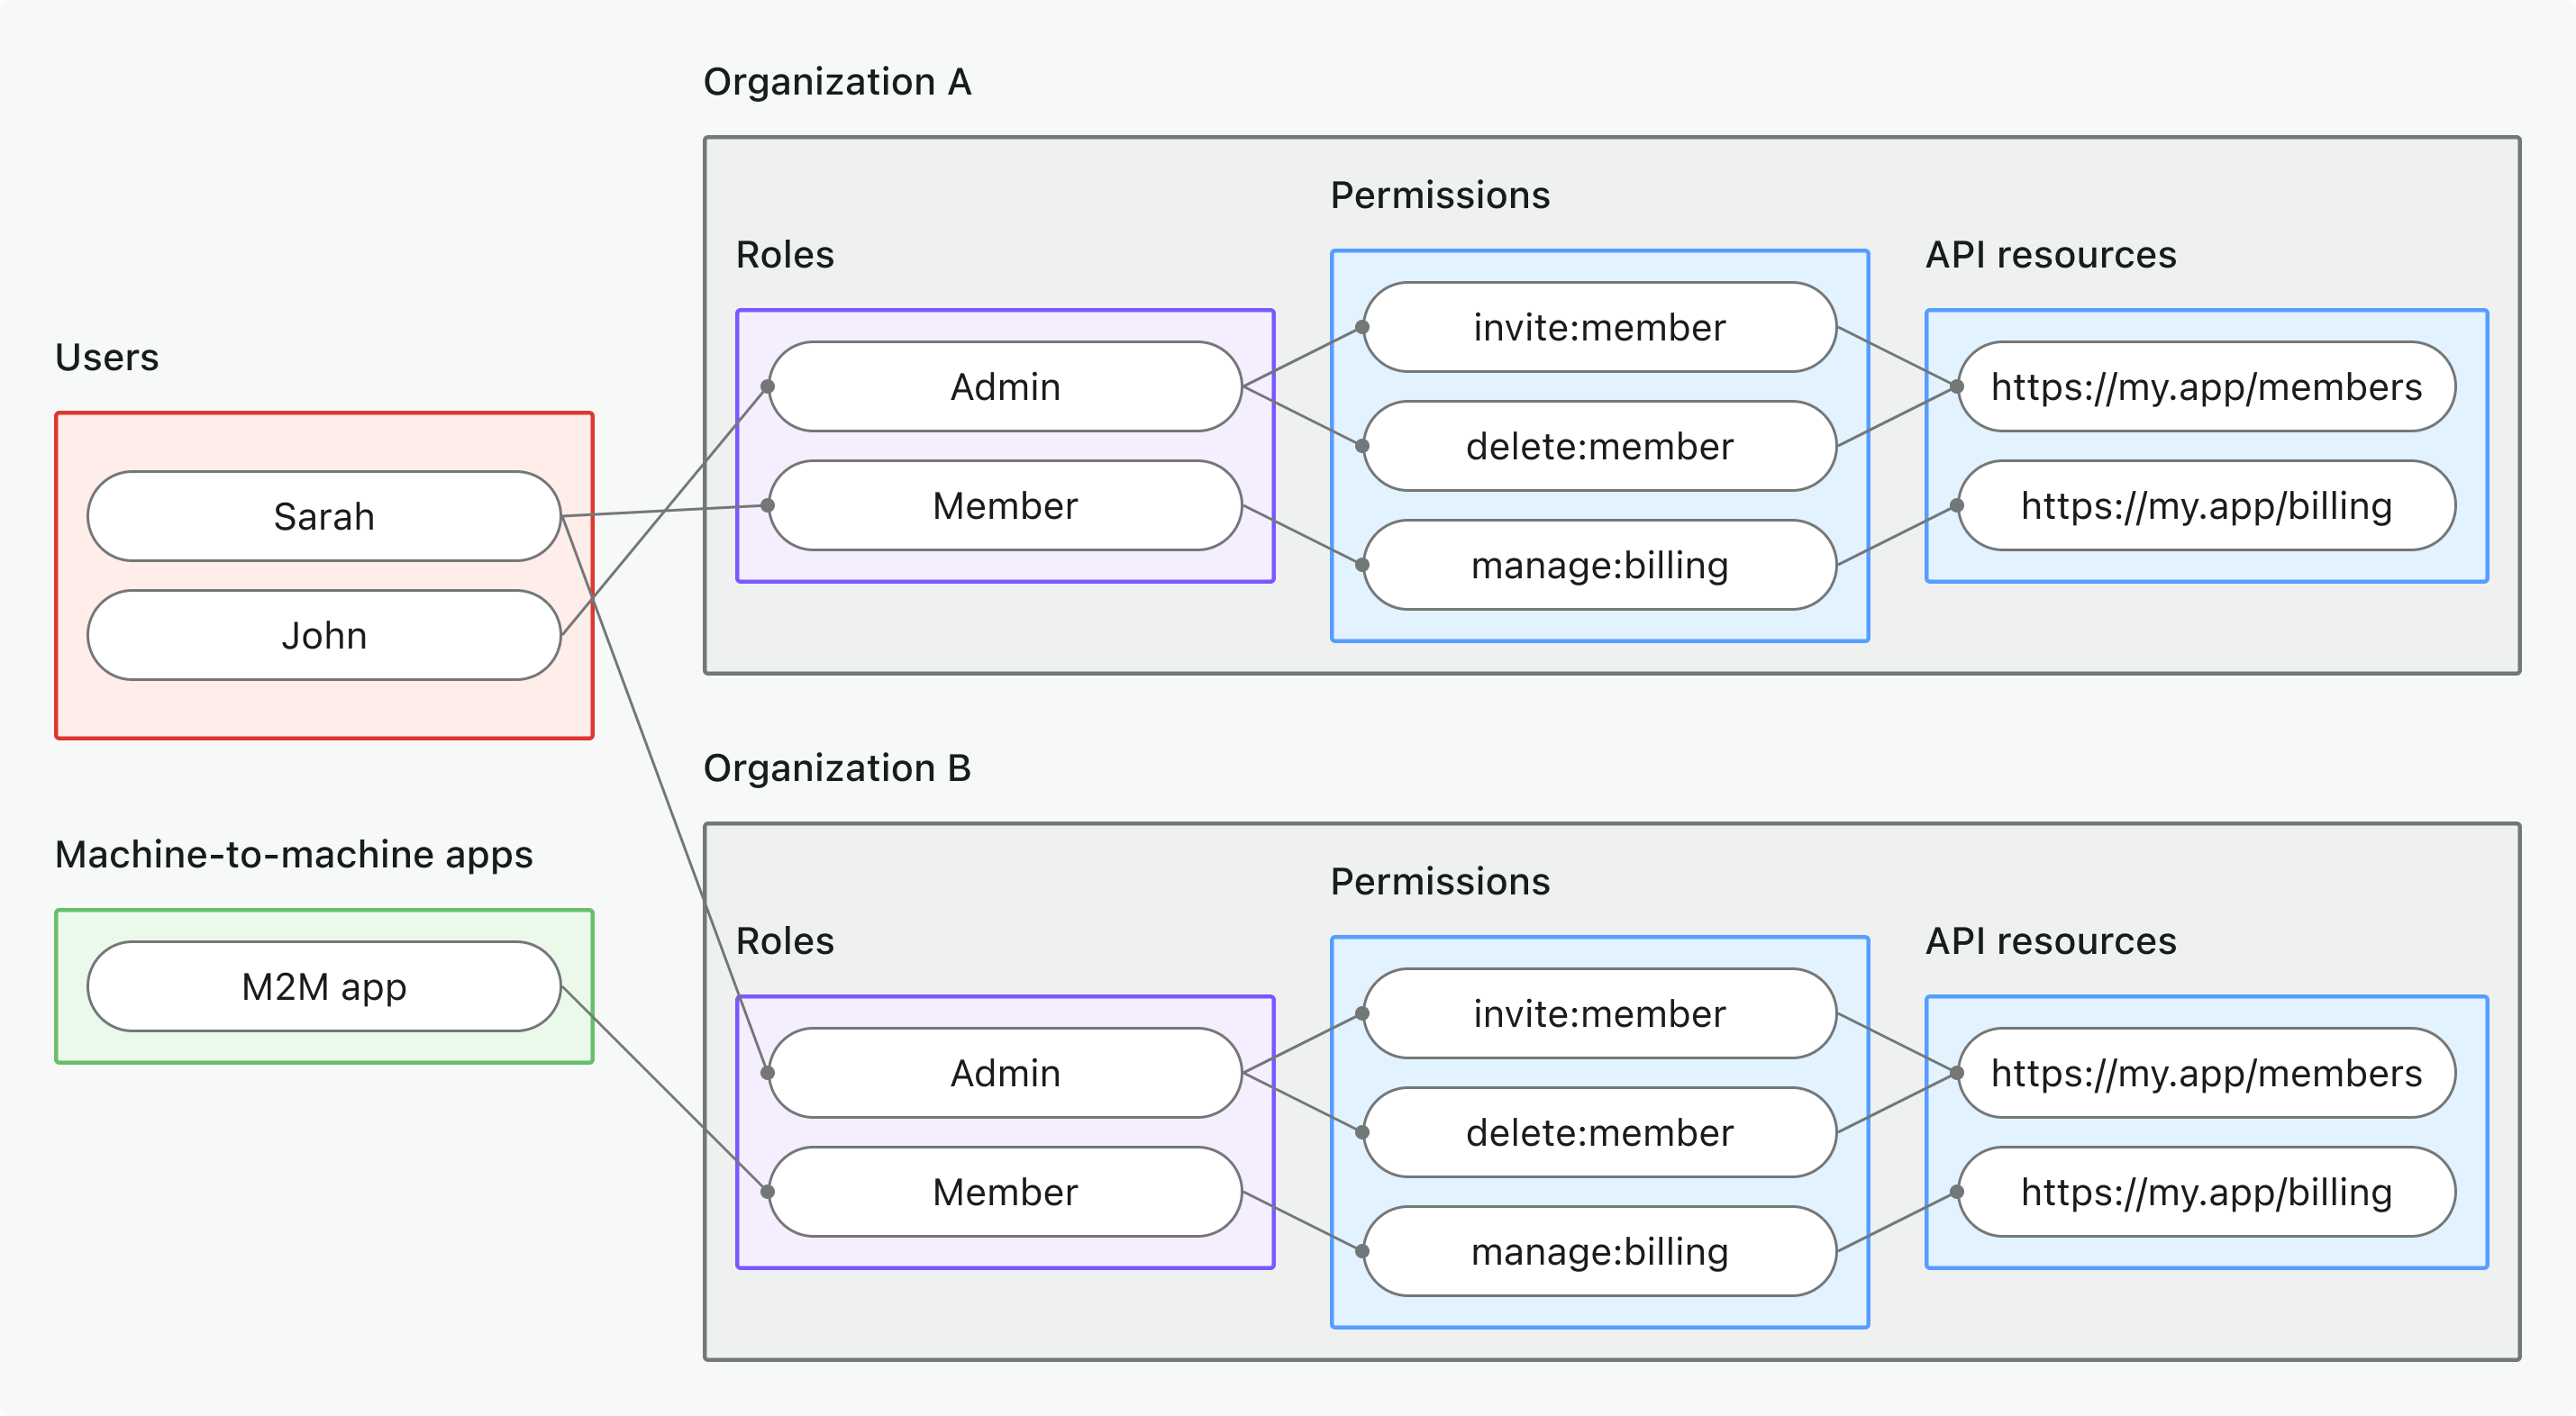
- 適用情境: 保護僅在特定組織情境下可存取的 API 資源
- 權杖類型: 具有 API 資源受眾 (API resource audience) + 組織情境 (organization context) 的組織權杖 (Organization token)
- 範例: 多租戶 API、組織範圍資料端點、租戶專屬微服務
- 最適用於: API 資料以組織為範圍的多租戶 SaaS
- 深入瞭解: 保護組織層級 API 資源
💡 請在繼續前選擇你的模型 —— 本指南後續內容將以你選擇的方式為參考。
快速準備步驟
設定 Logto 資源與權限 (Permissions)
- 全域 API 資源 (Global API resources)
- 組織(非 API)權限 (Organization (non-API) permissions)
- 組織層級 API 資源 (Organization-level API resources)
- 建立 API 資源 (API resource): 前往 Console → API 資源 (API resources) 並註冊你的 API(例如:
https://api.yourapp.com) - 定義權限 (Permissions): 新增如
read:products、write:orders等權限範圍 (Scopes) —— 參考 定義帶有權限的 API 資源 - 建立全域角色 (Global roles): 前往 Console → 角色 (Roles) 並建立包含 API 權限的角色 —— 參考 設定全域角色
- 指派角色 (Assign roles): 將角色指派給需要 API 存取權的使用者或 M2M 應用程式
- 定義組織權限 (Organization permissions): 在組織範本中建立如
invite:member、manage:billing等非 API 組織權限 - 設定組織角色 (Organization roles): 在組織範本中配置組織專屬角色並指派權限給這些角色
- 指派組織角色 (Assign organization roles): 在每個組織情境下將使用者指派到組織角色
- 建立 API 資源 (API resource): 如上註冊你的 API 資源,但將用於組織情境
- 定義權限 (Permissions): 新增如
read:data、write:settings等限定於組織情境的權限範圍 (Scopes) - 設定組織範本 (Configure organization template): 設定包含 API 資源權限的組織角色
- 指派組織角色 (Assign organization roles): 將使用者或 M2M 應用程式指派到包含 API 權限的組織角色
- 多租戶設定 (Multi-tenant setup): 確保你的 API 能處理組織範圍的資料與驗證
建議從我們的 角色型存取控制 (RBAC) 指南 開始,獲得逐步設定說明。
更新你的用戶端應用程式
在用戶端請求適當的權限範圍 (Scopes):
- 使用者驗證 (Authentication):更新你的應用程式 → 以請求你的 API 權限範圍和/或組織情境
- 機器對機器 (M2M):設定 M2M 權限範圍 → 以進行伺服器對伺服器存取
通常需要在用戶端設定中新增以下一項或多項:
- OAuth 流程中的
scope參數 - 用於 API 資源存取的
resource參數 - 組織情境下的
organization_id
請確保你測試的使用者或 M2M 應用程式已被指派包含所需 API 權限的正確角色或組織角色。
初始化你的 API 專案
要初始化一個新的 Node.js 專案並使用 NestJS,你可以透過 Nest CLI 快速建立。步驟如下:
npm i -g @nestjs/cli
nest new my-api
cd my-api
或者,你也可以手動建立專案:
npm init -y
npm install @nestjs/core @nestjs/common @nestjs/platform-express reflect-metadata rxjs
如果你使用 TypeScript,請記得相應地設定 TypeScript 環境。
接著,建立一個基本的 NestJS 伺服器設定:
import { NestFactory } from '@nestjs/core';
import { AppModule } from './app.module';

async function bootstrap() {
  const app = await NestFactory.create(AppModule);
  await app.listen(3000);
  console.log('Server running on http://localhost:3000');
}
bootstrap();
import { Module } from '@nestjs/common';
import { AppController } from './app.controller';
import { AppService } from './app.service';

@Module({
  imports: [],
  controllers: [AppController],
  providers: [AppService],
})
export class AppModule {}
如需更多關於如何設定 controller、service 及其他功能的細節,請參考 NestJS 官方文件。你也可以探索 NestJS CLI 指令,輕鬆產生元件與模組。
初始化常數與工具函式
在你的程式碼中定義必要的常數與工具函式,以處理權杖(token)的擷取與驗證。一個有效的請求必須包含 Authorization 標頭,格式為 Bearer <存取權杖 (Access token)>。
import { IncomingHttpHeaders } from 'http';

const JWKS_URI = 'https://your-tenant.logto.app/oidc/jwks';
const ISSUER = 'https://your-tenant.logto.app/oidc';

export class AuthInfo {
  constructor(
    public sub: string,
    public clientId?: string,
    public organizationId?: string,
    public scopes: string[] = [],
    public audience: string[] = []
  ) {}
}

export class AuthorizationError extends Error {
  name = 'AuthorizationError';
  constructor(
    message: string,
    public status = 403
  ) {
    super(message);
  }
}

export function extractBearerTokenFromHeaders({ authorization }: IncomingHttpHeaders): string {
  const bearerPrefix = 'Bearer ';

  if (!authorization) {
    throw new AuthorizationError('Authorization header is missing', 401);
  }

  if (!authorization.startsWith(bearerPrefix)) {
    throw new AuthorizationError(`Authorization header must start with "${bearerPrefix}"`, 401);
  }

  return authorization.slice(bearerPrefix.length);
}
取得你的 Logto 租戶資訊
你需要以下數值來驗證 Logto 發行的權杖:
- JSON Web Key Set (JWKS) URI:Logto 公鑰的網址,用於驗證 JWT 簽章。
- 簽發者 (Issuer):預期的簽發者值(Logto 的 OIDC URL)。
首先,找到你的 Logto 租戶端點。你可以在多個地方找到:
- 在 Logto Console,設定 → 網域。
- 在你於 Logto 配置過的任何應用程式設定中,設定 → 端點與憑證。
從 OpenID Connect 探索端點取得
這些數值可以從 Logto 的 OpenID Connect 探索端點取得:
https://<your-logto-endpoint>/oidc/.well-known/openid-configuration
以下為範例回應(為簡潔省略其他欄位):
{
  "jwks_uri": "https://your-tenant.logto.app/oidc/jwks",
  "issuer": "https://your-tenant.logto.app/oidc"
}
在程式碼中硬編碼(不建議)
由於 Logto 不允許自訂 JWKS URI 或簽發者 (Issuer),你可以將這些數值硬編碼在程式碼中。但這不建議用於正式環境,因為若未來有設定變更,可能會增加維護負擔。
- JWKS URI:
https://<your-logto-endpoint>/oidc/jwks - 簽發者 (Issuer):
https://<your-logto-endpoint>/oidc
驗證權杖與權限
在擷取權杖並取得 OIDC 設定後,請驗證以下項目:
- 簽章 (Signature): JWT 必須有效且由 Logto(透過 JWKS)簽署。
- 簽發者 (Issuer): 必須符合你的 Logto 租戶簽發者。
- 受眾 (Audience): 必須符合在 Logto 註冊的 API 資源標示符 (resource indicator),或在適用時符合組織 (Organization) 上下文。
- 過期時間 (Expiration): 權杖不得過期。
- 權限範圍 (Permissions, scopes): 權杖必須包含 API/操作所需的權限範圍 (scopes)。scopes 會以空格分隔字串出現在
scope宣告 (claim) 中。 - 組織 (Organization) 上下文: 若保護的是組織層級 API 資源,需驗證
organization_id宣告 (claim)。
詳情請參閱 JSON Web Token 以瞭解 JWT 結構與宣告 (claims)。
各權限模型需檢查的項目
不同權限模型下,宣告 (claims) 與驗證規則有所不同:
- 全域 API 資源
- 組織(非 API)權限
- 組織層級 API 資源
- 受眾宣告 (
aud): API 資源標示符 (API resource indicator) - 組織宣告 (
organization_id): 不存在 - 權限範圍需檢查 (
scope): API 資源權限 (API resource permissions)
- 受眾宣告 (
aud):urn:logto:organization:<id>(組織上下文於aud宣告中) - 組織宣告 (
organization_id): 不存在 - 權限範圍需檢查 (
scope): 組織權限 (Organization permissions)
- 受眾宣告 (
aud): API 資源標示符 (API resource indicator) - 組織宣告 (
organization_id): 組織 ID(必須與請求相符) - 權限範圍需檢查 (
scope): API 資源權限 (API resource permissions)
對於非 API 組織權限,組織上下文由 aud 宣告表示 (例如
urn:logto:organization:abc123)。organization_id 宣告僅存在於組織層級 API 資源權杖中。
對於多租戶 API,務必同時驗證權限範圍 (scopes) 及上下文(受眾 (audience)、組織 (organization)),以確保安全。
新增驗證邏輯
我們在本範例中使用 jose 來驗證 JWT。如果尚未安裝,請先安裝:
npm install jose
或使用你偏好的套件管理工具(例如 pnpm 或 yarn)。
首先,新增這些共用工具來處理 JWT 驗證:
import { createRemoteJWKSet, jwtVerify, JWTPayload } from 'jose';
import { AuthInfo, AuthorizationError } from './auth-middleware.js';

const jwks = createRemoteJWKSet(new URL(JWKS_URI));

export async function validateJwt(token: string): Promise<JWTPayload> {
  const { payload } = await jwtVerify(token, jwks, {
    issuer: ISSUER,
  });

  verifyPayload(payload);
  return payload;
}

export function createAuthInfo(payload: JWTPayload): AuthInfo {
  const scopes = (payload.scope as string)?.split(' ') ?? [];
  const audience = Array.isArray(payload.aud) ? payload.aud : payload.aud ? [payload.aud] : [];

  return new AuthInfo(
    payload.sub!,
    payload.client_id as string,
    payload.organization_id as string,
    scopes,
    audience
  );
}

function verifyPayload(payload: JWTPayload): void {
  // 在此根據權限模型實作你的驗證邏輯
  // 相關內容會在下方權限模型區段展示
}
接著,實作 middleware 來驗證存取權杖 (Access token):
import {
  Injectable,
  CanActivate,
  ExecutionContext,
  UnauthorizedException,
  ForbiddenException,
} from '@nestjs/common';
import { validateJwt, createAuthInfo } from './jwt-validator.js';

@Injectable()
export class AccessTokenGuard implements CanActivate {
  async canActivate(context: ExecutionContext): Promise<boolean> {
    const req = context.switchToHttp().getRequest();

    try {
      const token = extractBearerTokenFromHeaders(req.headers);
      const payload = await validateJwt(token);

      // 將驗證資訊 (auth info) 儲存在請求中以便通用使用
      req.auth = createAuthInfo(payload);

      return true;
    } catch (err: any) {
      if (err.status === 401) throw new UnauthorizedException(err.message);
      throw new ForbiddenException(err.message);
    }
  }
}
根據你的權限模型,在 jwt-validator.ts 中實作相應的驗證邏輯:
- 全域 API 資源 (Global API resources)
- 組織(非 API)權限 (Organization (non-API) permissions)
- 組織層級 API 資源 (Organization-level API resources)
function verifyPayload(payload: JWTPayload): void {
  // 檢查 audience 宣告是否符合你的 API 資源標示符 (Resource indicator)
  const audiences = Array.isArray(payload.aud) ? payload.aud : payload.aud ? [payload.aud] : [];
  if (!audiences.includes('https://your-api-resource-indicator')) {
    throw new AuthorizationError('Invalid audience');
  }

  // 檢查全域 API 資源所需的權限範圍 (Scopes)
  const requiredScopes = ['api:read', 'api:write']; // 請替換為實際所需的權限範圍
  const scopes = (payload.scope as string)?.split(' ') ?? [];
  if (!requiredScopes.every((scope) => scopes.includes(scope))) {
    throw new AuthorizationError('Insufficient scope');
  }
}
function verifyPayload(payload: JWTPayload): void {
  // 檢查 audience 宣告是否符合組織格式
  const audiences = Array.isArray(payload.aud) ? payload.aud : payload.aud ? [payload.aud] : [];
  const hasOrgAudience = audiences.some((aud) => aud.startsWith('urn:logto:organization:'));

  if (!hasOrgAudience) {
    throw new AuthorizationError('Invalid audience for organization permissions');
  }

  // 檢查組織 ID 是否與情境相符(你可能需要從請求內容中取得)
  const expectedOrgId = 'your-organization-id'; // 從請求內容取得
  const expectedAud = `urn:logto:organization:${expectedOrgId}`;
  if (!audiences.includes(expectedAud)) {
    throw new AuthorizationError('Organization ID mismatch');
  }

  // 檢查所需的組織權限範圍 (Scopes)
  const requiredScopes = ['invite:users', 'manage:settings']; // 請替換為實際所需的權限範圍
  const scopes = (payload.scope as string)?.split(' ') ?? [];
  if (!requiredScopes.every((scope) => scopes.includes(scope))) {
    throw new AuthorizationError('Insufficient organization scope');
  }
}
function verifyPayload(payload: JWTPayload): void {
  // 檢查 audience 宣告是否符合你的 API 資源標示符 (Resource indicator)
  const audiences = Array.isArray(payload.aud) ? payload.aud : payload.aud ? [payload.aud] : [];
  if (!audiences.includes('https://your-api-resource-indicator')) {
    throw new AuthorizationError('Invalid audience for organization-level API resources');
  }

  // 檢查組織 ID 是否與情境相符(你可能需要從請求內容中取得)
  const expectedOrgId = 'your-organization-id'; // 從請求內容取得
  const orgId = payload.organization_id as string;
  if (expectedOrgId !== orgId) {
    throw new AuthorizationError('Organization ID mismatch');
  }

  // 檢查組織層級 API 資源所需的權限範圍 (Scopes)
  const requiredScopes = ['api:read', 'api:write']; // 請替換為實際所需的權限範圍
  const scopes = (payload.scope as string)?.split(' ') ?? [];
  if (!requiredScopes.every((scope) => scopes.includes(scope))) {
    throw new AuthorizationError('Insufficient organization-level API scopes');
  }
}
套用中介軟體至你的 API
現在,將中介軟體套用到你受保護的 API 路由。
import { Controller, Get, UseGuards, Req } from '@nestjs/common';
import { AccessTokenGuard } from './access-token.guard.js';

@Controller('api')
export class ProtectedController {
  @Get('protected')
  @UseGuards(AccessTokenGuard)
  getProtected(@Req() req: any) {
    // 從 req.auth 取得驗證 (Authentication) 資訊
    return { auth: req.auth };
  }
}
測試你的受保護 API
取得存取權杖 (Access tokens)
從你的用戶端應用程式取得: 如果你已完成用戶端整合,你的應用程式可以自動取得權杖。擷取存取權杖 (Access token) 並在 API 請求中使用。
使用 curl / Postman 測試:
-
使用者權杖 (User tokens): 使用你的用戶端應用程式的開發者工具,從 localStorage 或網路分頁複製存取權杖 (Access token)
-
機器對機器權杖 (Machine-to-machine tokens): 使用 client credentials flow。以下是使用 curl 的非標準範例:
curl -X POST https://your-tenant.logto.app/oidc/token \-H "Content-Type: application/x-www-form-urlencoded" \-d "grant_type=client_credentials" \-d "client_id=your-m2m-client-id" \-d "client_secret=your-m2m-client-secret" \-d "resource=https://your-api-resource-indicator" \-d "scope=api:read api:write"你可能需要根據你的 API 資源 (API resource) 和權限 (Permissions) 調整
resource和scope參數;如果你的 API 以組織 (Organization) 為範圍,也可能需要organization_id參數。
需要檢查權杖內容嗎?請使用我們的 JWT 解碼工具 來解碼並驗證你的 JWT。
測試受保護端點
有效權杖請求
curl -H "Authorization: Bearer eyJhbGciOiJSUzI1NiIsInR5cCI6IkpXVCJ9..." \
  http://localhost:3000/api/protected
預期回應:
{
  "auth": {
    "sub": "user123",
    "clientId": "app456",
    "organizationId": "org789",
    "scopes": ["api:read", "api:write"],
    "audience": ["https://your-api-resource-indicator"]
  }
}
缺少權杖
curl http://localhost:3000/api/protected
預期回應 (401):
{
  "error": "Authorization header is missing"
}
無效權杖
curl -H "Authorization: Bearer invalid-token" \
  http://localhost:3000/api/protected
預期回應 (401):
{
  "error": "Invalid token"
}
權限模型專屬測試
- 全域 API 資源 (Global API resources)
- 組織(非 API)權限 (Organization (non-API) permissions)
- 組織層級 API 資源 (Organization-level API resources)
針對以全域權限範圍 (Scopes) 保護的 API 測試情境:
- 有效權限範圍 (Valid scopes): 使用包含所需 API 權限範圍(如
api:read、api:write)的權杖測試 - 缺少權限範圍 (Missing scopes): 權杖缺少必要權限範圍時,預期回傳 403 Forbidden
- 錯誤受眾 (Wrong audience): 權杖受眾 (Audience) 不符合 API 資源時,預期回傳 403 Forbidden
# 權杖缺少必要權限範圍 - 預期 403
curl -H "Authorization: Bearer token-without-required-scopes" \
  http://localhost:3000/api/protected
針對組織專屬存取控制的測試情境:
- 有效組織權杖 (Valid organization token): 使用包含正確組織 (Organization) 資訊(組織 ID 與權限範圍)的權杖測試
- 缺少權限範圍 (Missing scopes): 使用者沒有執行請求操作的權限時,預期回傳 403 Forbidden
- 錯誤組織 (Wrong organization): 權杖受眾 (Audience) 不符合組織上下文(
urn:logto:organization:<organization_id>)時,預期回傳 403 Forbidden
# 錯誤組織的權杖 - 預期 403
curl -H "Authorization: Bearer token-for-different-organization" \
  http://localhost:3000/api/protected
結合 API 資源驗證與組織上下文的測試情境:
- 有效組織 + API 權限範圍 (Valid organization + API scopes): 權杖同時具備組織上下文與所需 API 權限範圍時測試
- 缺少 API 權限範圍 (Missing API scopes): 組織權杖缺少必要 API 權限時,預期回傳 403 Forbidden
- 錯誤組織 (Wrong organization): 使用不同組織的權杖存取 API 時,預期回傳 403 Forbidden
- 錯誤受眾 (Wrong audience): 權杖受眾 (Audience) 不符合組織層級 API 資源時,預期回傳 403 Forbidden
# 組織權杖缺少 API 權限範圍 - 預期 403
curl -H "Authorization: Bearer organization-token-without-api-scopes" \
  http://localhost:3000/api/protected
延伸閱讀
RBAC 實務應用:為你的應用程式實現安全授權 (Authorization)
建立多租戶 SaaS 應用程式:從設計到實作的完整指南