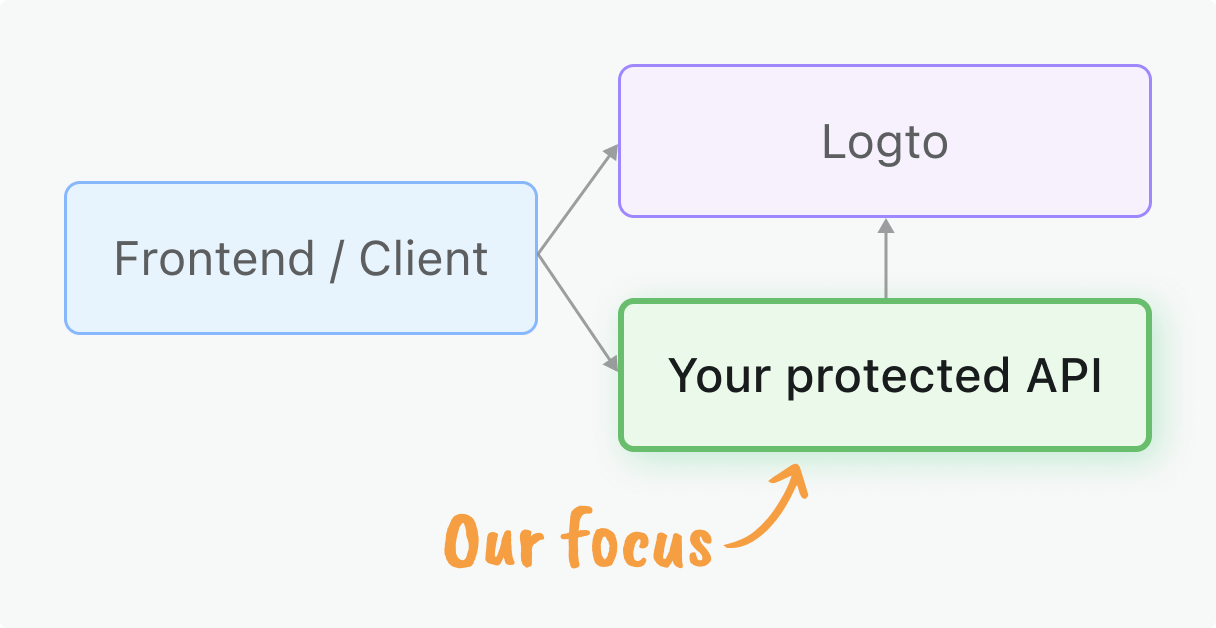
Protect your Vert.x Web API with RBAC and JWT validation
This guide will help you implement authorization to secure your Vert.x Web APIs using Role-based access control (RBAC) and JSON Web Tokens (JWTs) issued by Logto.
Before you start
Your client applications need to obtain access tokens from Logto. If you haven't set up client integration yet, check out our Quick starts for React, Vue, Angular, or other client frameworks, or see our Machine-to-machine guide for server-to-server access.
This guide focuses on the server-side validation of those tokens in your Vert.x Web application.
What you will learn
- JWT validation: Learn to validate access tokens and extract authentication information
- Middleware implementation: Create reusable middleware for API protection
- Permission models: Understand and implement different authorization patterns:
- Global API resources for application-wide endpoints
- Organization permissions for tenant-specific feature control
- Organization-level API resources for multi-tenant data access
- RBAC integration: Enforce role-based permissions and scopes in your API endpoints
Prerequisites
- Latest stable version of Java installed
- Basic understanding of Vert.x Web and web API development
- A Logto application configured (see Quick starts if needed)
Permission models overview
Before implementing protection, choose the permission model that fits your application architecture. This aligns with Logto's three main authorization scenarios:
- Global API resources
- Organization (non-API) permissions
- Organization-level API resources
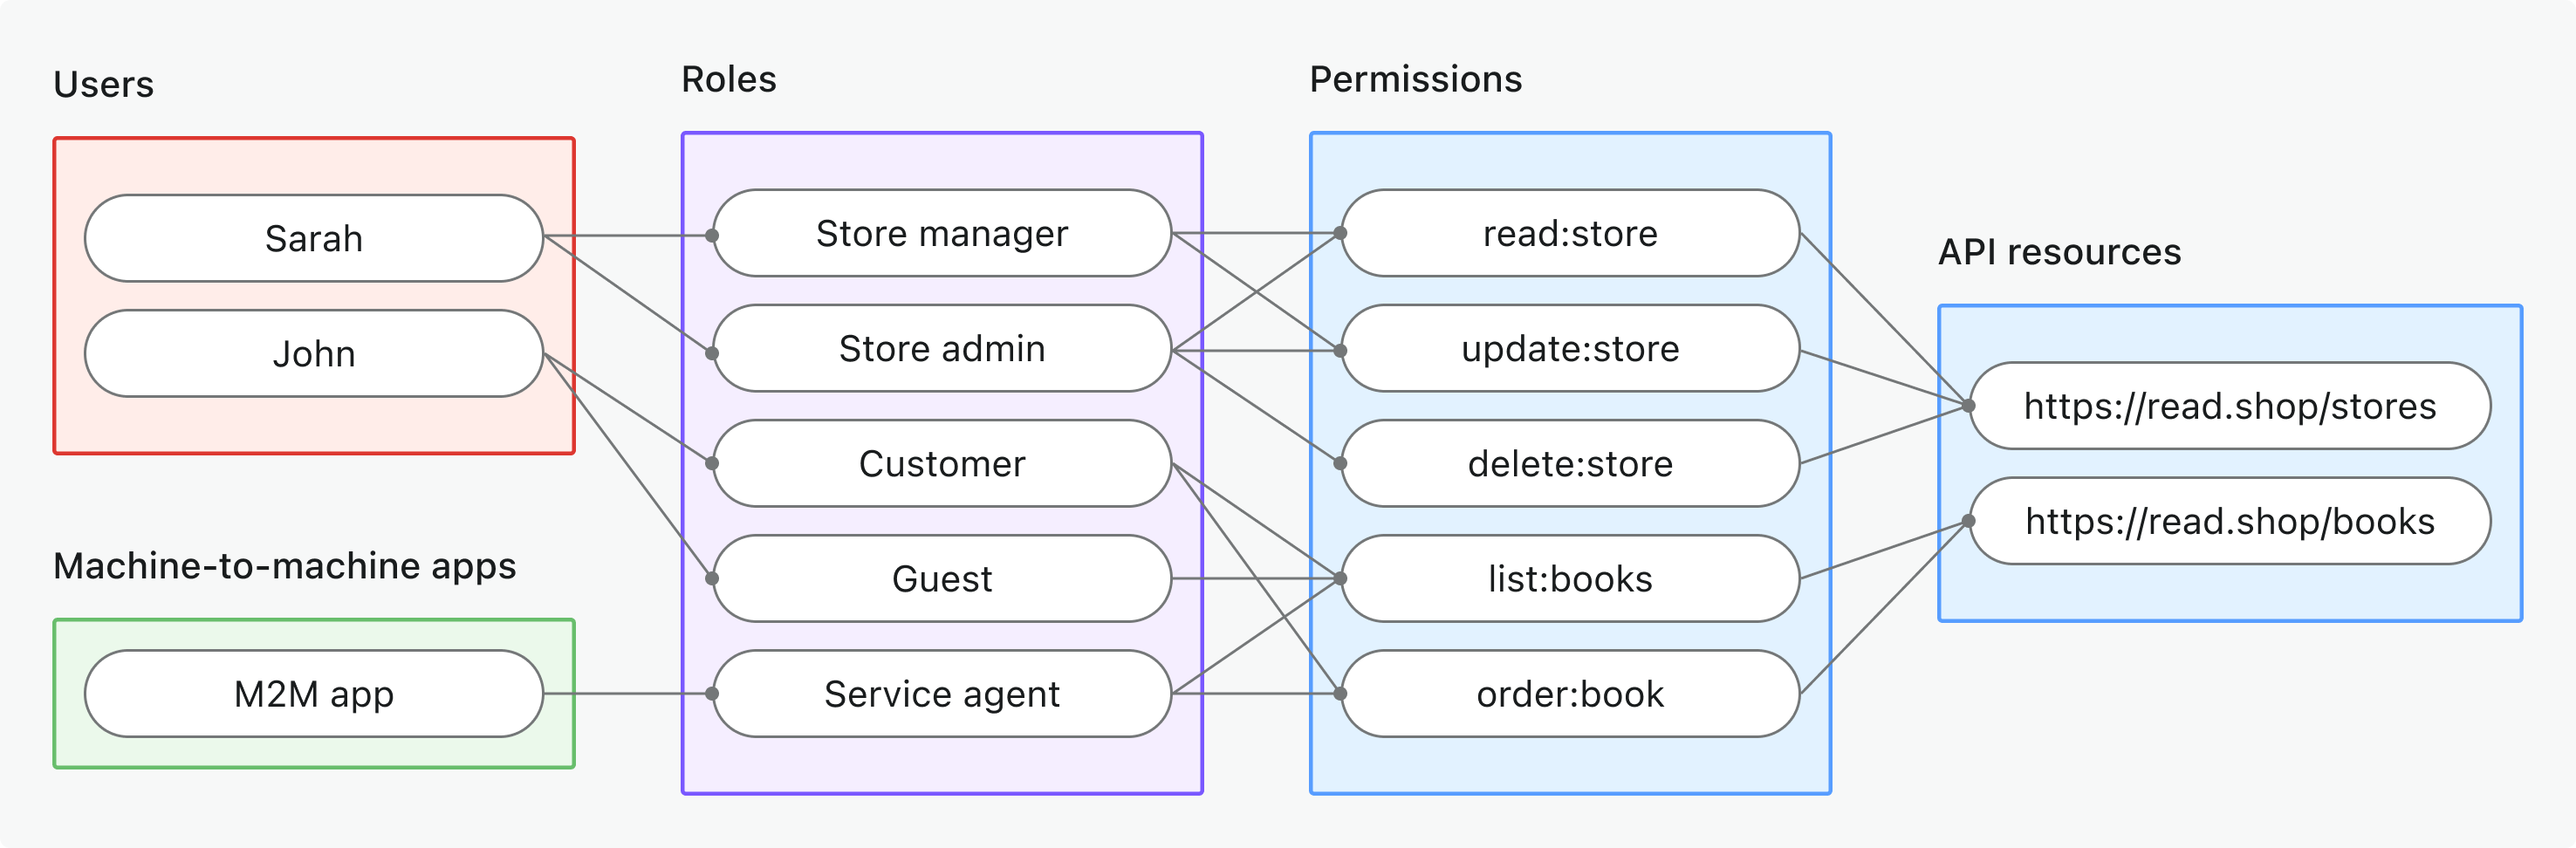
- Use case: Protect API resources shared across your entire application (not organization-specific)
- Token type: Access token with global audience
- Examples: Public APIs, core product services, admin endpoints
- Best for: SaaS products with APIs used by all customers, microservices without tenant isolation
- Learn more: Protect global API resources
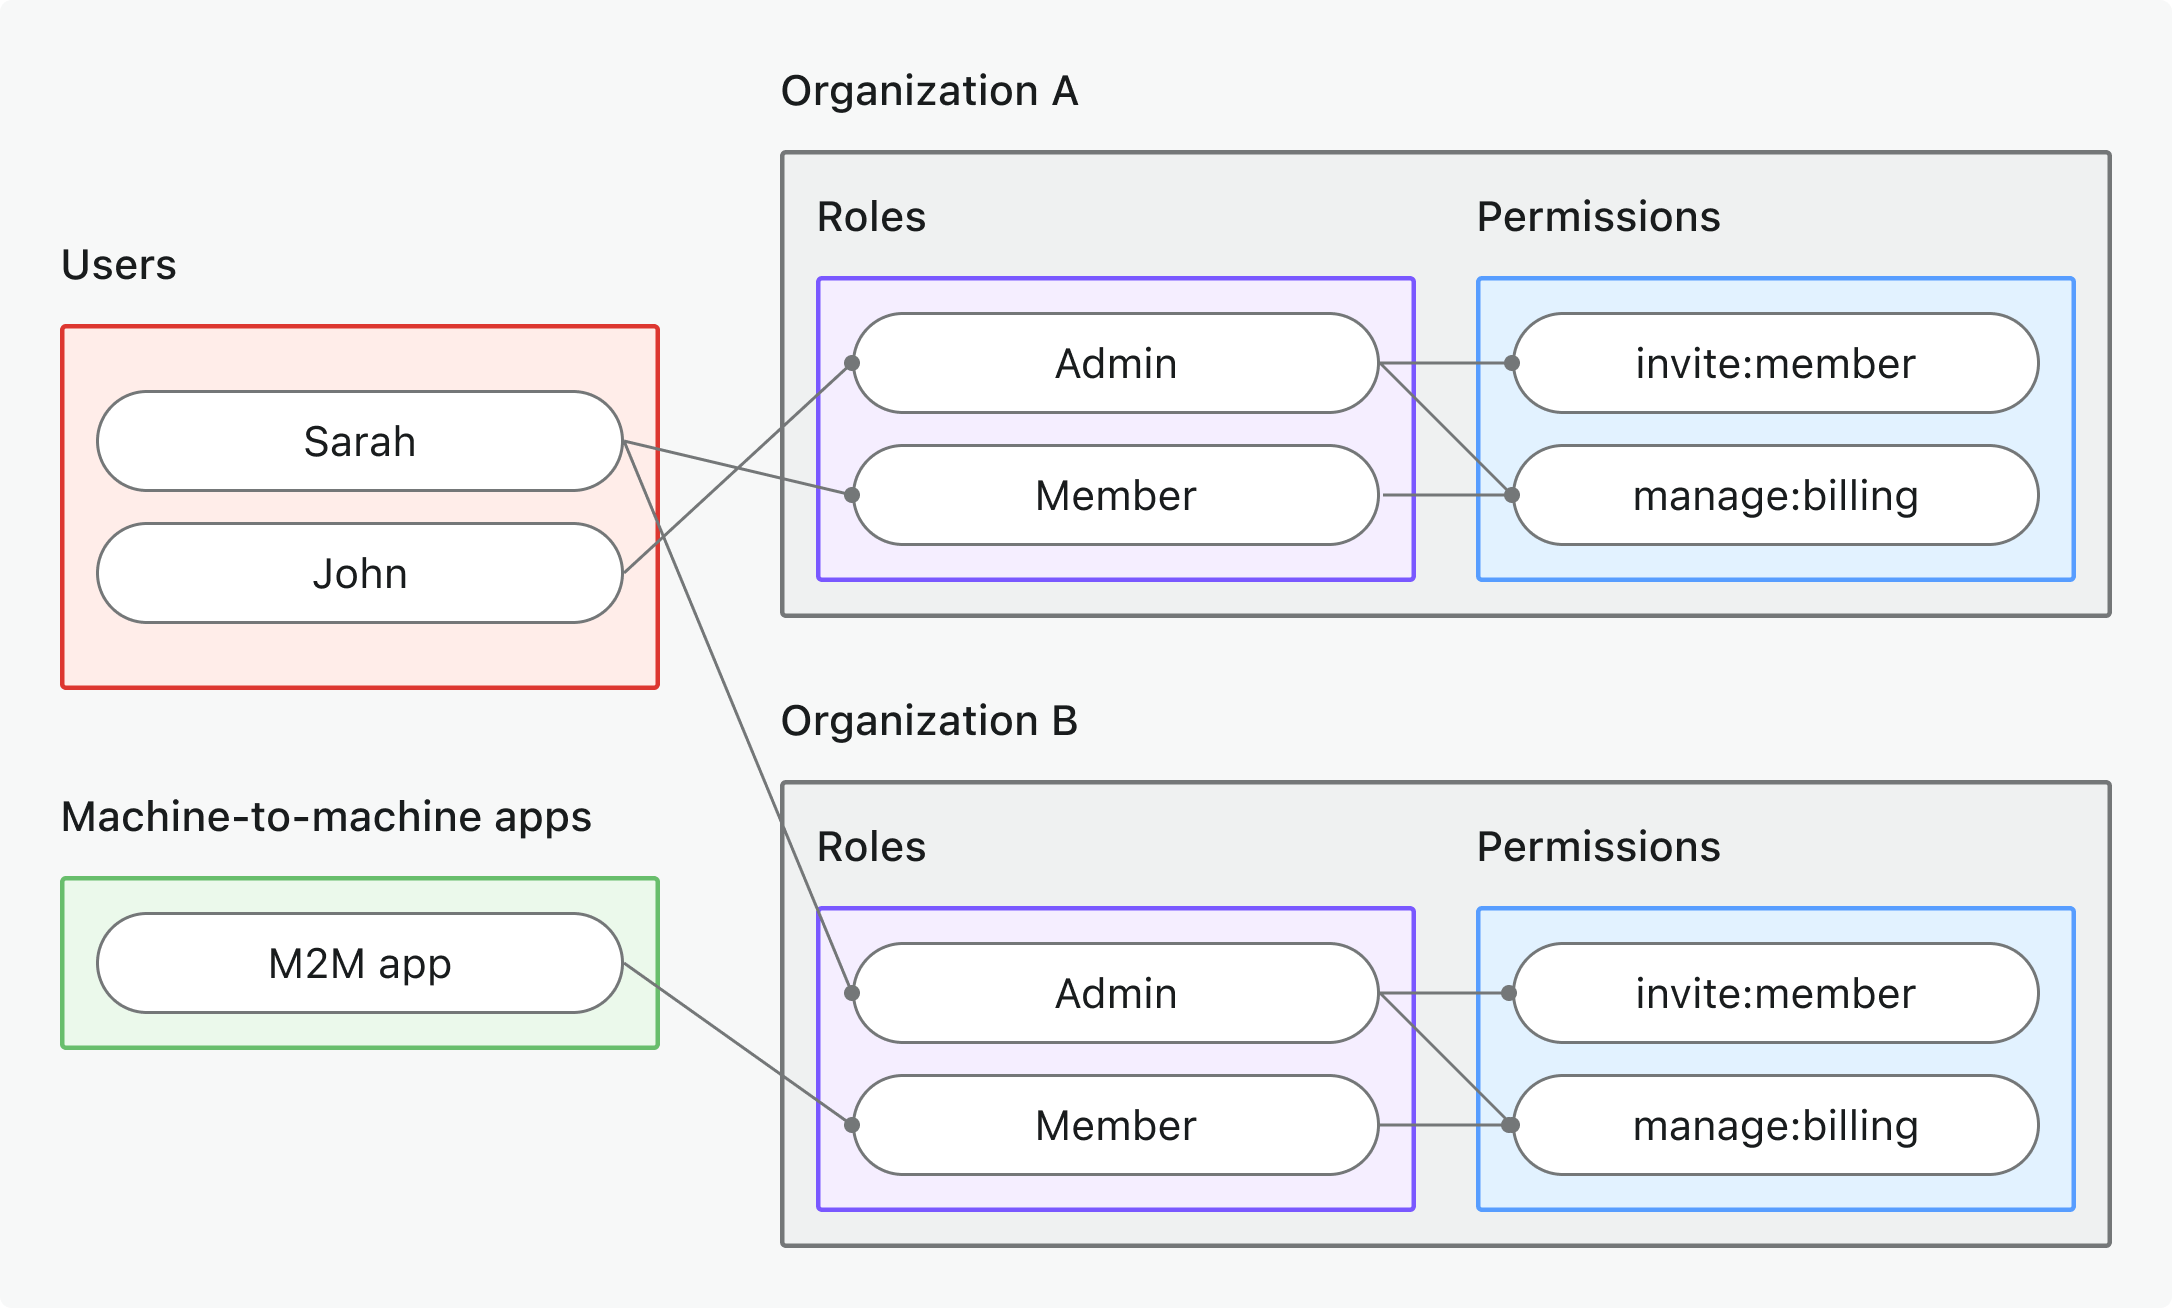
- Use case: Control organization-specific actions, UI features, or business logic (not APIs)
- Token type: Organization token with organization-specific audience
- Examples: Feature gating, dashboard permissions, member invitation controls
- Best for: Multi-tenant SaaS with organization-specific features and workflows
- Learn more: Protect organization (non-API) permissions
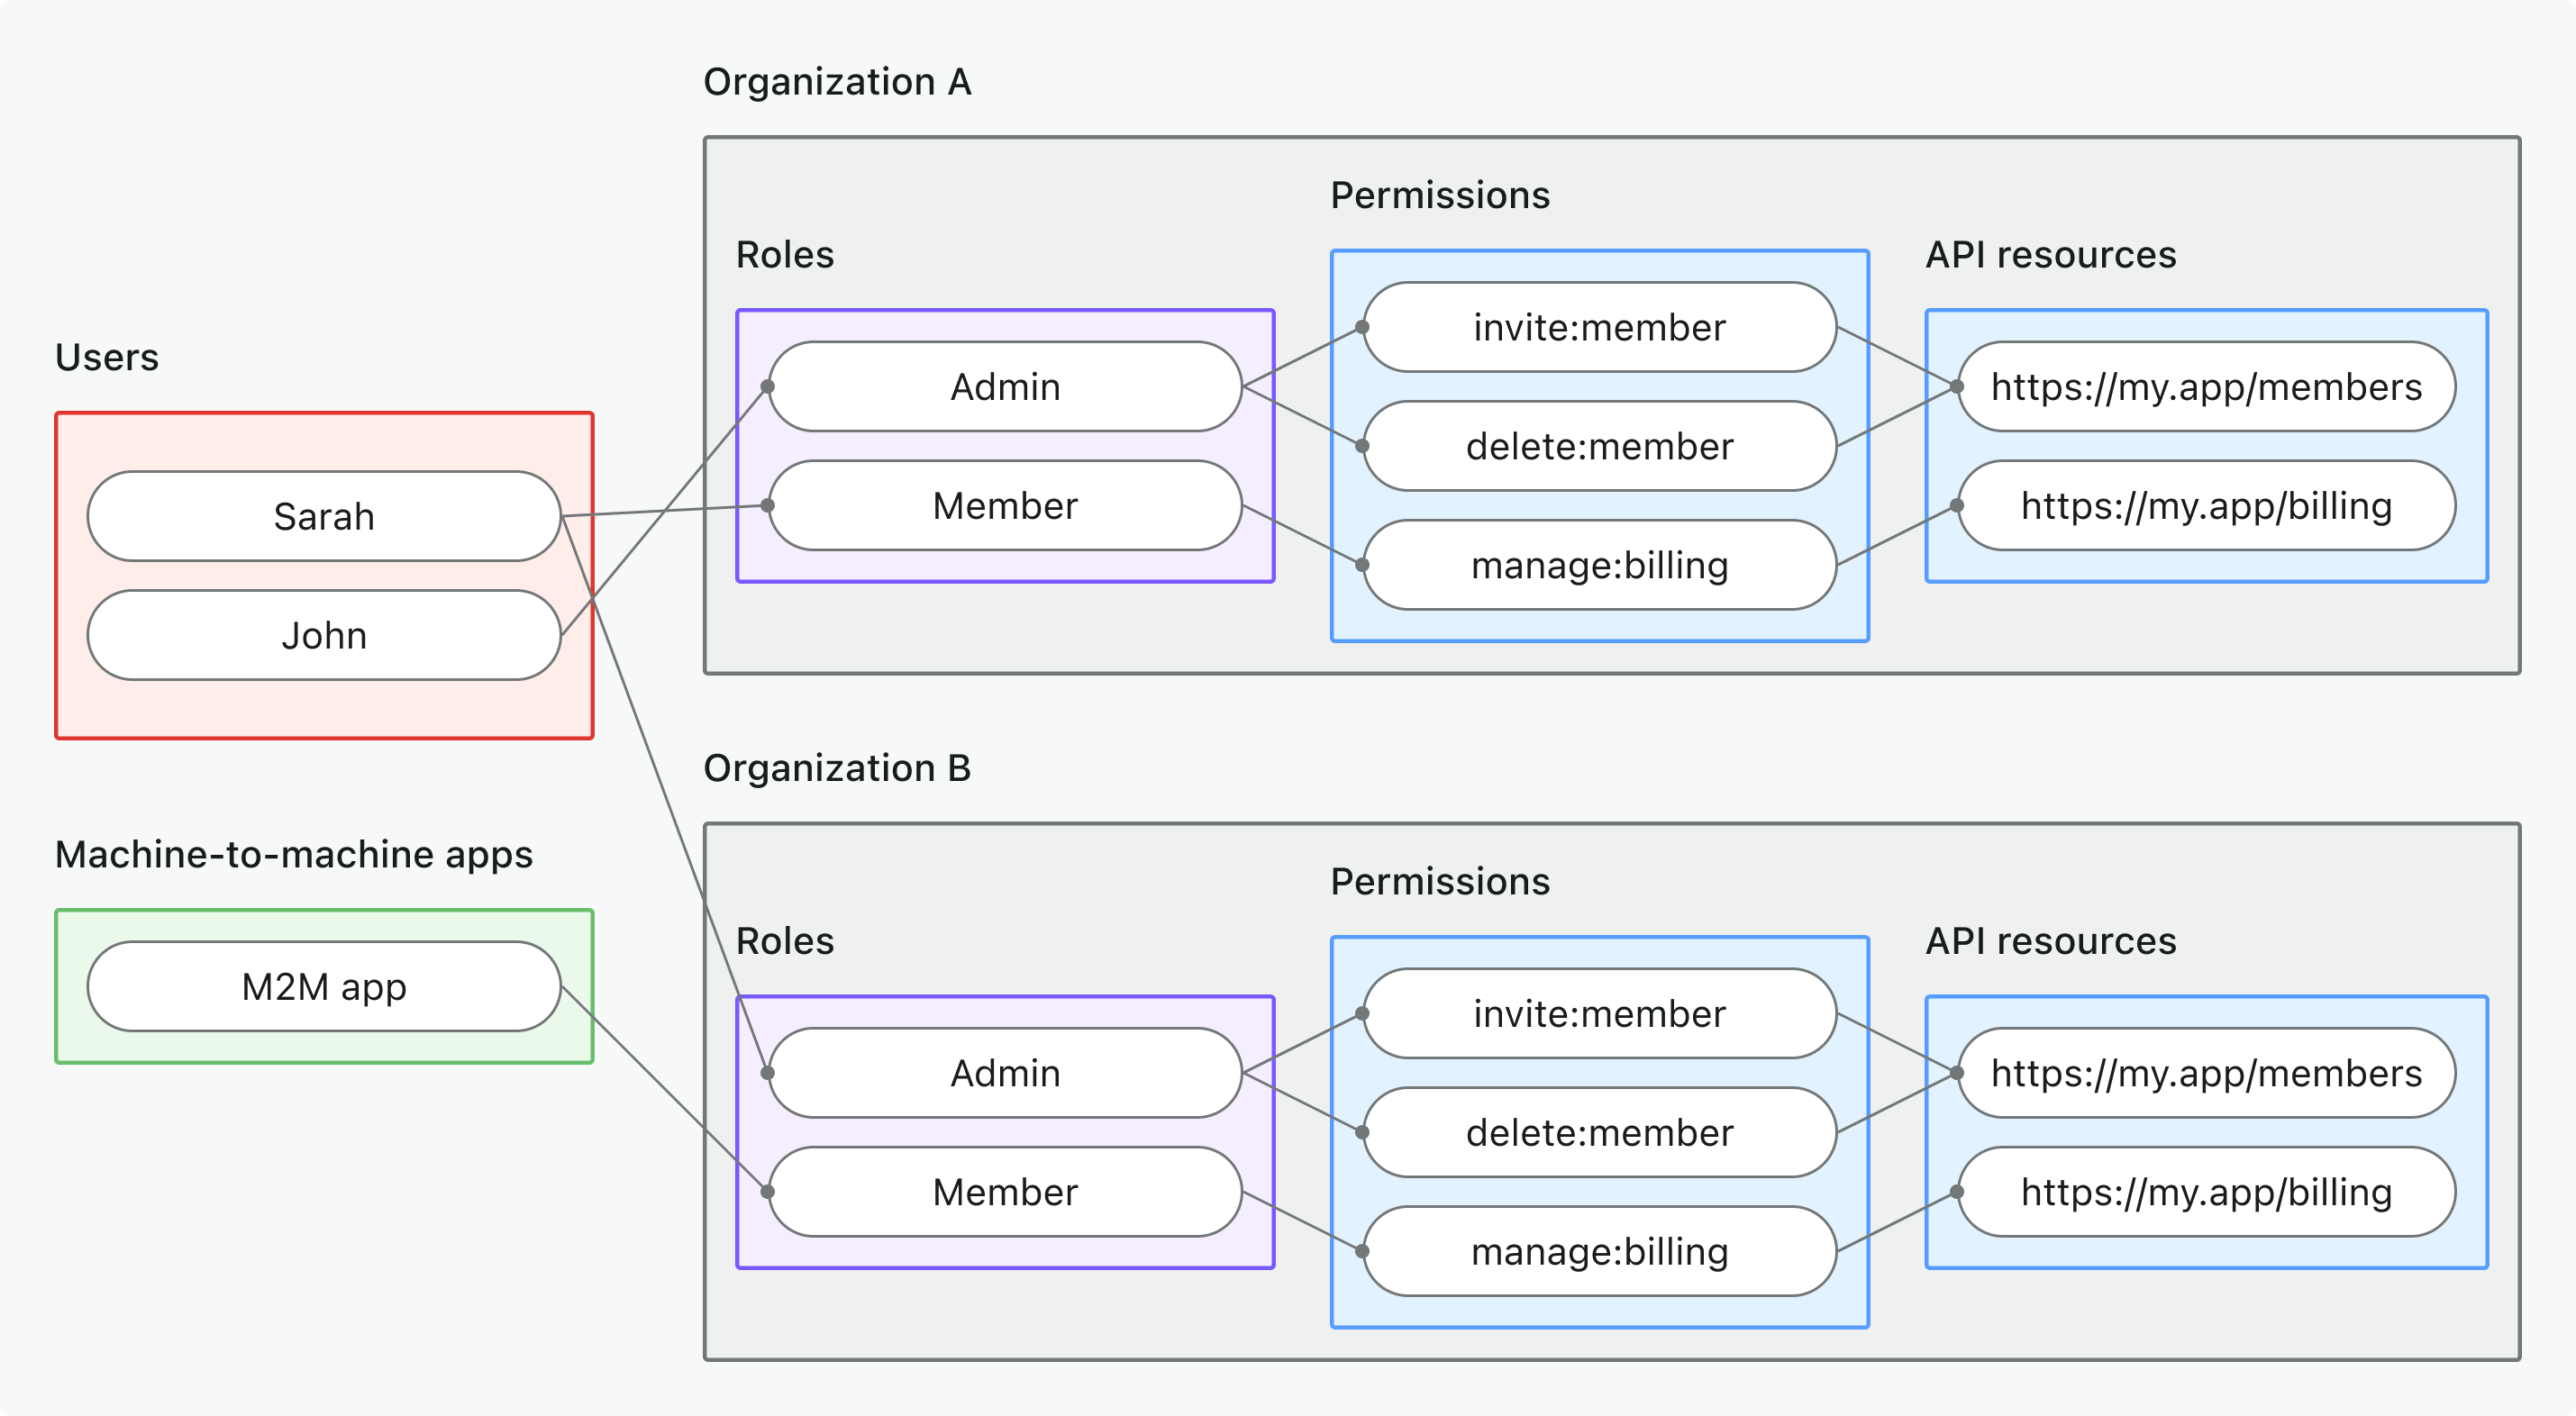
- Use case: Protect API resources accessible within a specific organization context
- Token type: Organization token with API resource audience + organization context
- Examples: Multi-tenant APIs, organization-scoped data endpoints, tenant-specific microservices
- Best for: Multi-tenant SaaS where API data is organization-scoped
- Learn more: Protect organization-level API resources
💡 Choose your model before proceeding - the implementation will reference your chosen approach throughout this guide.
Quick preparation steps
Configure Logto resources & permissions
- Global API resources
- Organization (non-API) permissions
- Organization-level API resources
- Create API resource: Go to Console → API resources and register your API (e.g.,
https://api.yourapp.com) - Define permissions: Add scopes like
read:products,write:orders– see Define API resources with permissions - Create global roles: Go to Console → Roles and create roles that include your API permissions – see Configure global roles
- Assign roles: Assign roles to users or M2M applications that need API access
- Define organization permissions: Create non-API organization permissions like
invite:member,manage:billingin the organization template - Set up organization roles: Configure the organization template with organization-specific roles and assign permissions to them
- Assign organization roles: Assign users to organization roles within each organization context
- Create API resource: Register your API resource as above, but it will be used in organization context
- Define permissions: Add scopes like
read:data,write:settingsthat are scoped to organization context - Configure organization template: Set up organization roles that include your API resource permissions
- Assign organization roles: Assign users or M2M applications to organization roles that include API permissions
- Multi-tenant setup: Ensure your API can handle organization-scoped data and validation
Start with our Role-based access control guide for step-by-step setup instructions.
Update your client application
Request appropriate scopes in your client:
- User authentication: Update your app → to request your API scopes and/or organization context
- Machine-to-machine: Configure M2M scopes → for server-to-server access
The process usually involves updating your client configuration to include one or more of the following:
scopeparameter in OAuth flowsresourceparameter for API resource accessorganization_idfor organization context
Make sure the user or M2M app you are testing has been assigned proper roles or organization roles that include the necessary permissions for your API.
Initialize your API project
To initialize a new Vert.x Web project, you can create a Maven project manually:
<?xml version="1.0" encoding="UTF-8"?>
<project xmlns="http://maven.apache.org/POM/4.0.0"
         xmlns:xsi="http://www.w3.org/2001/XMLSchema-instance"
         xsi:schemaLocation="http://maven.apache.org/POM/4.0.0
         http://maven.apache.org/xsd/maven-4.0.0.xsd">
    <modelVersion>4.0.0</modelVersion>

    <groupId>com.example</groupId>
    <artifactId>your-api-name</artifactId>
    <version>1.0-SNAPSHOT</version>

    <properties>
        <maven.compiler.source>17</maven.compiler.source>
        <maven.compiler.target>17</maven.compiler.target>
        <project.build.sourceEncoding>UTF-8</project.build.sourceEncoding>
        <vertx.version>4.5.0</vertx.version>
    </properties>

    <dependencies>
        <dependency>
            <groupId>io.vertx</groupId>
            <artifactId>vertx-web</artifactId>
            <version>${vertx.version}</version>
        </dependency>
        <dependency>
            <groupId>io.vertx</groupId>
            <artifactId>vertx-auth-jwt</artifactId>
            <version>${vertx.version}</version>
        </dependency>
        <dependency>
            <groupId>io.vertx</groupId>
            <artifactId>vertx-web-client</artifactId>
            <version>${vertx.version}</version>
        </dependency>
    </dependencies>
</project>
Create a basic Vert.x Web server:
package com.example;

import io.vertx.core.AbstractVerticle;
import io.vertx.core.Promise;
import io.vertx.ext.web.Router;
import io.vertx.ext.web.handler.BodyHandler;

public class MainVerticle extends AbstractVerticle {

    @Override
    public void start(Promise<Void> startPromise) throws Exception {
        Router router = Router.router(vertx);

        router.route().handler(BodyHandler.create());

        router.get("/hello").handler(ctx -> {
            ctx.response()
                .putHeader("content-type", "text/plain")
                .end("Hello from Vert.x Web!");
        });

        vertx.createHttpServer()
            .requestHandler(router)
            .listen(3000, http -> {
                if (http.succeeded()) {
                    startPromise.complete();
                    System.out.println("HTTP server started on port 3000");
                } else {
                    startPromise.fail(http.cause());
                }
            });
    }
}
package com.example;

import io.vertx.core.Vertx;

public class Application {
    public static void main(String[] args) {
        Vertx vertx = Vertx.vertx();
        vertx.deployVerticle(new MainVerticle());
    }
}
Refer to the Vert.x Web documentation for more details on how to set up routes, handlers, and other features.
Initialize constants and utilities
Define necessary constants and utilities in your code to handle token extraction and validation. A valid request must include an Authorization header in the form Bearer <access_token>.
public class AuthorizationException extends RuntimeException {
    private final int statusCode;

    public AuthorizationException(String message) {
        this(message, 403); // Default to 403 Forbidden
    }

    public AuthorizationException(String message, int statusCode) {
        super(message);
        this.statusCode = statusCode;
    }

    public int getStatusCode() {
        return statusCode;
    }
}
Retrieve info about your Logto tenant
You’ll need the following values to validate Logto-issued tokens:
- JSON Web Key Set (JWKS) URI: The URL to Logto’s public keys, used to verify JWT signatures.
- Issuer: The expected issuer value (Logto’s OIDC URL).
First, find your Logto tenant’s endpoint. You can find it in various places:
- In the Logto Console, under Settings → Domains.
- In any application settings where you configured in Logto, Settings → Endpoints & Credentials.
Fetch from OpenID Connect discovery endpoint
These values can be retrieved from Logto’s OpenID Connect discovery endpoint:
https://<your-logto-endpoint>/oidc/.well-known/openid-configuration
Here’s an example response (other fields omitted for brevity):
{
  "jwks_uri": "https://your-tenant.logto.app/oidc/jwks",
  "issuer": "https://your-tenant.logto.app/oidc"
}
Hardcode in your code (not recommended)
Since Logto doesn't allow customizing the JWKS URI or issuer, you can hardcode these values in your code. However, this is not recommended for production applications as it may increase maintenance overhead if some configuration changes in the future.
- JWKS URI:
https://<your-logto-endpoint>/oidc/jwks - Issuer:
https://<your-logto-endpoint>/oidc
Validate the token and permissions
After extracting the token and fetching the OIDC config, validate the following:
- Signature: JWT must be valid and signed by Logto (via JWKS).
- Issuer: Must match your Logto tenant’s issuer.
- Audience: Must match the API’s resource indicator registered in Logto, or the organization context if applicable.
- Expiration: Token must not be expired.
- Permissions (scopes): Token must include required scopes for your API/action. Scopes are space-separated strings in the
scopeclaim. - Organization context: If protecting organization-level API resources, validate the
organization_idclaim.
See JSON Web Token to learn more about JWT structure and claims.
What to check for each permission model
The claims and validation rules differ by permission model:
- Global API resources
- Organization (non-API) permissions
- Organization-level API resources
- Audience claim (
aud): API resource indicator - Organization claim (
organization_id): Not present - Scopes (permissions) to check (
scope): API resource permissions
- Audience claim (
aud):urn:logto:organization:<id>(organization context is inaudclaim) - Organization claim (
organization_id): Not present - Scopes (permissions) to check (
scope): Organization permissions
- Audience claim (
aud): API resource indicator - Organization claim (
organization_id): Organization ID (must match request) - Scopes (permissions) to check (
scope): API resource permissions
For non-API organization permissions, the organization context is represented by the aud claim
(e.g., urn:logto:organization:abc123). The organization_id claim is only present for
organization-level API resource tokens.
Always validate both permissions (scopes) and context (audience, organization) for secure multi-tenant APIs.
Add the validation logic
We use different JWT libraries depending on the framework. Install the required dependencies:
Add to your pom.xml:
<dependency>
    <groupId>io.vertx</groupId>
    <artifactId>vertx-web</artifactId>
</dependency>
<dependency>
    <groupId>io.vertx</groupId>
    <artifactId>vertx-auth-jwt</artifactId>
</dependency>
<dependency>
    <groupId>io.vertx</groupId>
    <artifactId>vertx-web-client</artifactId>
</dependency>
import io.vertx.core.Future;
import io.vertx.core.Handler;
import io.vertx.core.Vertx;
import io.vertx.core.json.JsonArray;
import io.vertx.core.json.JsonObject;
import io.vertx.ext.auth.jwt.JWTAuth;
import io.vertx.ext.auth.jwt.JWTAuthOptions;
import io.vertx.ext.web.RoutingContext;
import io.vertx.ext.web.client.WebClient;
import java.util.List;
import java.util.ArrayList;

public class JwtAuthHandler implements Handler<RoutingContext> {

    private final JWTAuth jwtAuth;
    private final WebClient webClient;
    private final String expectedIssuer;
    private final String jwksUri;

    public JwtAuthHandler(Vertx vertx) {
        this.webClient = WebClient.create(vertx);
        this.jwtAuth = JWTAuth.create(vertx, new JWTAuthOptions());

        // Remember to set these environment variables in your deployment
        this.expectedIssuer = System.getenv("JWT_ISSUER");
        this.jwksUri = System.getenv("JWKS_URI");

        // Fetch JWKS and configure JWT auth
        fetchJWKS().onSuccess(jwks -> {
            // Configure JWKS (simplified - you may need a proper JWKS parser)
        });
    }

    @Override
    public void handle(RoutingContext context) {
        String authHeader = context.request().getHeader("Authorization");
        if (authHeader == null || !authHeader.startsWith("Bearer ")) {
            context.response()
                .setStatusCode(401)
                .putHeader("Content-Type", "application/json")
                .end("{\"error\": \"Authorization header missing or invalid\"}");
            return;
        }

        String token = authHeader.substring(7);
        jwtAuth.authenticate(new JsonObject().put("jwt", token))
            .onSuccess(user -> {
                try {
                    JsonObject principal = user.principal();
                    verifyPayload(principal);
                    context.put("auth", principal);
                    context.next();
                } catch (AuthorizationException e) {
                    context.response()
                        .setStatusCode(e.getStatusCode())  // Use the exception's status code
                        .putHeader("Content-Type", "application/json")
                        .end("{\"error\": \"" + e.getMessage() + "\"}");
                } catch (Exception e) {
                    context.response()
                        .setStatusCode(401)
                        .putHeader("Content-Type", "application/json")
                        .end("{\"error\": \"Invalid token\"}");
                }
            })
            .onFailure(err -> {
                context.response()
                    .setStatusCode(401)
                    .putHeader("Content-Type", "application/json")
                    .end("{\"error\": \"Invalid token: " + err.getMessage() + "\"}");
            });
    }

    private Future<JsonObject> fetchJWKS() {
        return webClient.getAbs(this.jwksUri)
            .send()
            .map(response -> response.bodyAsJsonObject());
    }

    private void verifyPayload(JsonObject principal) {
        // Verify issuer manually for Vert.x
        String issuer = principal.getString("iss");
        if (issuer == null || !expectedIssuer.equals(issuer)) {
            throw new AuthorizationException("Invalid issuer: " + issuer);
        }

        // Implement your additional verification logic here based on permission model
        // Use the helper methods below for claim extraction
    }

    // Helper methods for Vert.x JWT
    private List<String> extractAudiences(JsonObject principal) {
        JsonArray audiences = principal.getJsonArray("aud");
        if (audiences != null) {
            List<String> result = new ArrayList<>();
            for (Object aud : audiences) {
                result.add(aud.toString());
            }
            return result;
        }
        return List.of();
    }

    private String extractScopes(JsonObject principal) {
        return principal.getString("scope");
    }

    private String extractOrganizationId(JsonObject principal) {
        return principal.getString("organization_id");
    }
}
According to your permission model, implement the appropriate verification logic:
- Global API resources
- Organization (non-API) permissions
- Organization-level API resources
// Check audience claim matches your API resource indicator
List<String> audiences = extractAudiences(token); // Framework-specific extraction
if (!audiences.contains("https://your-api-resource-indicator")) {
    throw new AuthorizationException("Invalid audience");
}

// Check required scopes for global API resources
List<String> requiredScopes = Arrays.asList("api:read", "api:write"); // Replace with your actual required scopes
String scopes = extractScopes(token); // Framework-specific extraction
List<String> tokenScopes = scopes != null ? Arrays.asList(scopes.split(" ")) : List.of();

if (!tokenScopes.containsAll(requiredScopes)) {
    throw new AuthorizationException("Insufficient scope");
}
// Check audience claim matches organization format
List<String> audiences = extractAudiences(token); // Framework-specific extraction
boolean hasOrgAudience = audiences.stream()
    .anyMatch(aud -> aud.startsWith("urn:logto:organization:"));

if (!hasOrgAudience) {
    throw new AuthorizationException("Invalid audience for organization permissions");
}

// Check organization ID matches the context (you may need to extract this from request context)
String expectedOrgId = "your-organization-id"; // Extract from request context
String expectedAud = "urn:logto:organization:" + expectedOrgId;
if (!audiences.contains(expectedAud)) {
    throw new AuthorizationException("Organization ID mismatch");
}

// Check required organization scopes
List<String> requiredScopes = Arrays.asList("invite:users", "manage:settings"); // Replace with your actual required scopes
String scopes = extractScopes(token); // Framework-specific extraction
List<String> tokenScopes = scopes != null ? Arrays.asList(scopes.split(" ")) : List.of();

if (!tokenScopes.containsAll(requiredScopes)) {
    throw new AuthorizationException("Insufficient organization scope");
}
// Check audience claim matches your API resource indicator
List<String> audiences = extractAudiences(token); // Framework-specific extraction
if (!audiences.contains("https://your-api-resource-indicator")) {
    throw new AuthorizationException("Invalid audience for organization-level API resources");
}

// Check organization ID matches the context (you may need to extract this from request context)
String expectedOrgId = "your-organization-id"; // Extract from request context
String orgId = extractOrganizationId(token); // Framework-specific extraction
if (!expectedOrgId.equals(orgId)) {
    throw new AuthorizationException("Organization ID mismatch");
}

// Check required scopes for organization-level API resources
List<String> requiredScopes = Arrays.asList("api:read", "api:write"); // Replace with your actual required scopes
String scopes = extractScopes(token); // Framework-specific extraction
List<String> tokenScopes = scopes != null ? Arrays.asList(scopes.split(" ")) : List.of();

if (!tokenScopes.containsAll(requiredScopes)) {
    throw new AuthorizationException("Insufficient organization-level API scopes");
}
The helper methods for extracting claims are framework-specific. See the implementation details in the framework-specific validation files above.
Apply the middleware to your API
Now, apply the middleware to your protected API routes.
import io.vertx.core.AbstractVerticle;
import io.vertx.core.Promise;
import io.vertx.core.json.JsonObject;
import io.vertx.ext.web.Router;
import io.vertx.ext.web.RoutingContext;

public class MainVerticle extends AbstractVerticle {

    @Override
    public void start(Promise<Void> startPromise) throws Exception {
        Router router = Router.router(vertx);

        // Apply middleware to protected routes
        router.route("/api/protected*").handler(new JwtAuthHandler(vertx));
        router.get("/api/protected").handler(this::protectedEndpoint);

        vertx.createHttpServer()
            .requestHandler(router)
            .listen(8080, result -> {
                if (result.succeeded()) {
                    startPromise.complete();
                } else {
                    startPromise.fail(result.cause());
                }
            });
    }

    private void protectedEndpoint(RoutingContext context) {
        // Access JWT principal directly from context
        JsonObject principal = context.get("auth");
        if (principal == null) {
            context.response()
                .setStatusCode(500)
                .putHeader("Content-Type", "application/json")
                .end("{\"error\": \"JWT principal not found\"}");
            return;
        }

        String scopes = principal.getString("scope");
        JsonObject response = new JsonObject()
            .put("sub", principal.getString("sub"))
            .put("client_id", principal.getString("client_id"))
            .put("organization_id", principal.getString("organization_id"))
            .put("scopes", scopes != null ? scopes.split(" ") : new String[0])
            .put("audience", principal.getJsonArray("aud"));

        context.response()
            .putHeader("Content-Type", "application/json")
            .end(response.encode());
    }
}
Test your protected API
Get access tokens
From your client application: If you've set up a client integration, your app can obtain tokens automatically. Extract the access token and use it in API requests.
For testing with curl/Postman:
-
User tokens: Use your client app's developer tools to copy the access token from localStorage or the network tab
-
Machine-to-machine tokens: Use the client credentials flow. Here's a non-normative example using curl:
curl -X POST https://your-tenant.logto.app/oidc/token \-H "Content-Type: application/x-www-form-urlencoded" \-d "grant_type=client_credentials" \-d "client_id=your-m2m-client-id" \-d "client_secret=your-m2m-client-secret" \-d "resource=https://your-api-resource-indicator" \-d "scope=api:read api:write"You may need to adjust the
resourceandscopeparameters based on your API resource and permissions; anorganization_idparameter may also be required if your API is organization-scoped.
Need to inspect the token contents? Use our JWT decoder to decode and verify your JWTs.
Test protected endpoints
Valid token request
curl -H "Authorization: Bearer eyJhbGciOiJSUzI1NiIsInR5cCI6IkpXVCJ9..." \
  http://localhost:3000/api/protected
Expected response:
{
  "auth": {
    "sub": "user123",
    "clientId": "app456",
    "organizationId": "org789",
    "scopes": ["api:read", "api:write"],
    "audience": ["https://your-api-resource-indicator"]
  }
}
Missing token
curl http://localhost:3000/api/protected
Expected response (401):
{
  "error": "Authorization header is missing"
}
Invalid token
curl -H "Authorization: Bearer invalid-token" \
  http://localhost:3000/api/protected
Expected response (401):
{
  "error": "Invalid token"
}
Permission model-specific testing
- Global API resources
- Organization (non-API) permissions
- Organization-level API resources
Test scenarios for APIs protected with global scopes:
- Valid scopes: Test with tokens that include your required API scopes (e.g.,
api:read,api:write) - Missing scopes: Expect 403 Forbidden when token lacks required scopes
- Wrong audience: Expect 403 Forbidden when audience does not match the API resource
# Token with missing scopes - expect 403
curl -H "Authorization: Bearer token-without-required-scopes" \
  http://localhost:3000/api/protected
Test scenarios for organization-specific access control:
- Valid organization token: Test with tokens that include correct organization context (organization ID and scopes)
- Missing scopes: Expect 403 Forbidden when user doesn't have permissions for the requested action
- Wrong organization: Expect 403 Forbidden when audience does not match the organization context (
urn:logto:organization:<organization_id>)
# Token for wrong organization - expect 403
curl -H "Authorization: Bearer token-for-different-organization" \
  http://localhost:3000/api/protected
Test scenarios combining API resource validation with organization context:
- Valid organization + API scopes: Test with tokens that have both organization context and required API scopes
- Missing API scopes: Expect 403 Forbidden when organization token lacks required API permissions
- Wrong organization: Expect 403 Forbidden when accessing API with token from different organization
- Wrong audience: Expect 403 Forbidden when audience does not match the organization-level API resource
# Organization token without API scopes - expect 403
curl -H "Authorization: Bearer organization-token-without-api-scopes" \
  http://localhost:3000/api/protected
Further reading
RBAC in practice: Implementing secure authorization for your application
Build a multi-tenant SaaS application: A complete guide from design to implementation