啟用第三方 AI agent 存取你的 MCP 伺服器
本指南將帶你整合 Logto 與你的 MCP 伺服器,透過 mcp-auth 使用標準 OpenID Connect 流程驗證 (Authentication) 使用者並安全取得其身分資訊。
你將學會:
- 將 Logto 設定為 MCP 伺服器的授權 (Authorization) 伺服器。
- 在 MCP 伺服器中設置「whoami」工具,回傳當前使用者的身分宣告 (Claims)。
- 使用第三方 AI agent(MCP client)測試整體流程。
完成本教學後,你的 MCP 伺服器將能:
- 在你的 Logto 租戶中驗證 (Authentication) 使用者。
- 在「whoami」工具被呼叫時,回傳身分宣告(如
sub、username、name、email等)。
第三方 AI agent(MCP client)與你自己的 MCP client 的差異
讓我們看一個例子。假設你是一名開發者,運行 MCP 伺服器來管理電子郵件存取與自動化。
官方郵件應用程式(你自己的 MCP client)
- 你提供一個官方郵件應用程式,讓使用者閱讀與管理郵件。
- 運作方式:官方郵件應用程式透過 Logto 連接你的 MCP 伺服器進行驗證 (Authentication)。當 Alice 登入時,會自動取得郵件存取權,不需額外授權頁面,因為這是你信任的應用程式。
第三方 AI agent(第三方 MCP client)
- 你希望打造 MCP 伺服器的生態系,另一位開發者建立了「SmartMail AI」(一個能自動摘要郵件與排程會議的 AI 助理),並以第三方 client 方式整合。
- 運作方式:SmartMail AI(第三方 MCP client)希望透過你的 MCP 伺服器存取使用者郵件。當 Alice 使用她的帳號登入 SmartMail AI 時:
- 她會看到一個使用者授權頁面 (Consent screen),詢問是否允許 SmartMail AI 讀取她的郵件與行事曆。
- Alice 可以選擇允許或拒絕這個存取。
- 只有她同意的資料會分享給 SmartMail AI,SmartMail AI 無法在未經明確同意下存取其他資料。
這種存取(權限)控制確保了使用者資料安全。即使 MCP 伺服器管理所有資料,像 SmartMail AI 這樣的第三方應用程式只能存取使用者明確授權的內容。這一流程無法被繞過,因為它由你在 MCP 伺服器中的存取控制實作所強制執行。
總結
| Client 類型 | 範例 | 需要授權頁面? | 誰控制? |
|---|---|---|---|
| 官方郵件應用程式 | 你自己的郵件應用程式 | 否 | 你(開發者) |
| 第三方 AI agent | SmartMail AI 助理 | 是 | 其他開發者 |
如果你想將 MCP 伺服器與你自己的 AI agent 或應用程式整合,請參考 為你的 MCP 應用程式啟用 Logto 驗證 (Authentication) 指南。
先決條件
- 一個 Logto Cloud(或自架)租戶
- Node.js 或 Python 執行環境
架構說明
- MCP 伺服器 (MCP server):對 MCP 用戶端 (client) 提供工具與資源的伺服器。
- MCP 用戶端 (MCP client):用於啟動驗證流程並測試整合的用戶端。本指南將以第三方 AI agent 作為用戶端。
- Logto:作為 OpenID Connect 提供者(授權伺服器),負責管理使用者身分。
以下是一個非標準(non-normative)的時序圖,說明整體流程:
由於 MCP 發展迅速,上述圖表可能未完全反映最新狀態。請參閱 mcp-auth 文件以取得最新資訊。
在 Logto 設定第三方 AI agent
若要讓第三方 AI agent 存取你的 MCP 伺服器,你需要在 Logto 中建立一個第三方應用程式 (third-party app)。這個應用程式將代表 AI agent,並取得驗證 (Authentication) 與授權 (Authorization) 所需的憑證。
第三方應用程式 (third-party app) 是由外部開發者(非資源擁有者)建立的應用程式,需要使用者同意才能存取受保護資源。與第一方應用程式(你自己的應用程式)不同,第三方應用程式會顯示使用者授權頁面 (Consent screen),要求使用者在存取其資料前批准特定權限。這確保使用者能掌控與外部服務分享哪些資料。
想了解更多,請參閱 第三方應用程式。
允許開發者在 Logto 建立第三方應用程式
如果你正在打造市集或希望開發者能在 Logto 建立第三方應用程式,可以利用 Logto Management API 以程式方式建立第三方應用程式。這讓開發者能註冊他們的應用程式並取得驗證所需的憑證。
你需要自行架設服務來處理 client 註冊流程。該服務會與 Logto Management API 互動,代表開發者建立第三方應用程式。
你也可以在 Logto Console 手動建立第三方應用程式,以熟悉整個流程。
在 Logto 手動建立第三方應用程式
你可以在 Logto Console 手動建立第三方應用程式,作為測試或臨時整合之用。這在你想快速測試整合、尚未實作完整 client 註冊流程時特別有用。
-
登入你的 Logto Console。
-
前往 應用程式 (Applications) → 建立應用程式 (Create application) → 第三方應用程式 (Third-party app) -> OIDC。
-
輸入應用程式名稱及其他必要欄位,然後點擊 建立應用程式 (Create application)。
-
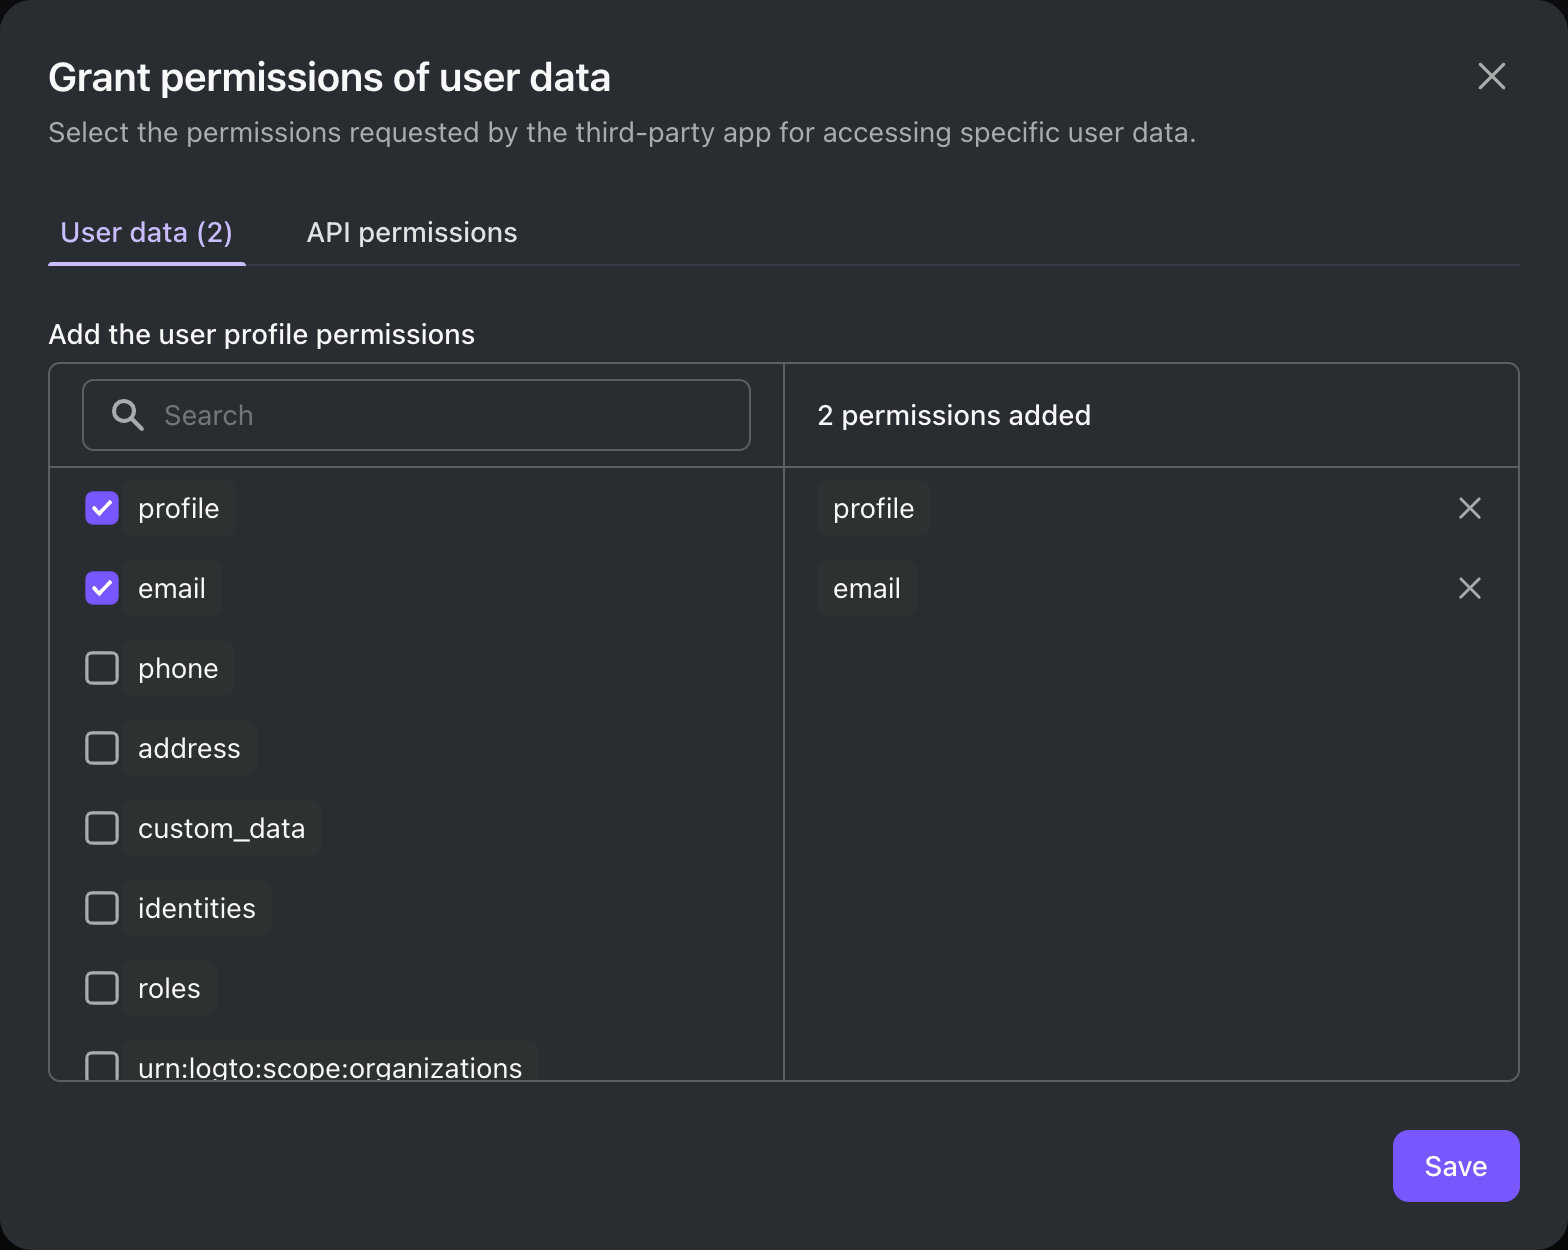
點選 權限 (Permissions) 分頁,在 使用者 (User) 區塊點擊「新增 (Add)」。
-
在開啟的對話框 -> 使用者資料 (User data) -> 勾選
profile、email權限,然後點擊 儲存 (Save)。 -
在第三方應用程式中,設定 scopes 以請求
openid profile email權限(scopes)。注意:
openid為 OIDC 必填,profile與email則是你在前一步新增的權限。 -
依需求設定你的第三方應用程式的 redirect URI,並記得在 Logto 中同步更新 redirect URI。
在底層,第三方應用程式是一個標準的 OAuth 2.0 / OIDC 用戶端。這表示你(或第三方開發者)可以使用任何 OAuth 2.0 / OIDC 函式庫或框架來整合 Logto。
幾點注意事項:
- 建立第三方應用程式時,請根據應用架構選擇合適的應用程式類型:
- 傳統網頁 (Traditional web):使用 client secret 進行驗證。
- 單頁應用程式 / 原生應用程式 (Single page app / Native):使用 PKCE 進行安全授權,無需 client secret。
- 我們的大多數快速入門指南是針對第一方應用程式撰寫,但你仍可將其作為第三方應用程式整合的參考。
- 主要差異在於第三方應用程式會顯示使用者授權頁面 (Consent screen),請求使用者明確授權存取其資料。
完整整合指南請參閱 第三方應用程式 (Third-party applications)。
設定 MCP 伺服器
建立專案並安裝相依套件
- Python
- Node.js
mkdir mcp-server
cd mcp-server
uv init # 或使用你自己的專案結構
uv add "mcp[cli]" starlette uvicorn mcpauth # 或使用你偏好的套件管理工具
mkdir mcp-server
cd mcp-server
npm init -y
npm install @modelcontextprotocol/sdk express mcp-auth # 或使用你偏好的套件管理工具
使用 Logto 設定 MCP 驗證 (Authentication)
請記得將 <your-logto-issuer-endpoint> 替換為你先前複製的簽發者 (Issuer) 端點。
- Python
- Node.js
在 whoami.py 中:
from mcpauth import MCPAuth
from mcpauth.config import AuthServerType
from mcpauth.utils import fetch_server_config

auth_issuer = '<your-logto-issuer-endpoint>'
auth_server_config = fetch_server_config(auth_issuer, type=AuthServerType.OIDC)
mcp_auth = MCPAuth(server=auth_server_config)
在 whoami.js 中:
import { MCPAuth, fetchServerConfig } from 'mcp-auth';

const authIssuer = '<your-logto-issuer-endpoint>';
const mcpAuth = new MCPAuth({
  server: await fetchServerConfig(authIssuer, { type: 'oidc' }),
});
實作存取權杖 (Access token) 驗證
由於我們將驗證存取權杖 (Access token) 並取得使用者資訊,因此需要如下實作存取權杖驗證:
- Python
- Node.js
import requests
from mcpauth.types import AuthInfo

def verify_access_token(token: str) -> AuthInfo:
    endpoint = auth_server_config.metadata.userinfo_endpoint
    response = requests.get(
        endpoint,
        headers={"Authorization": f"Bearer {token}"},
    )
    response.raise_for_status()
    data = response.json()
    return AuthInfo(
        token=token,
        subject=data.get("sub"),
        issuer=auth_server_config.metadata.issuer,
        claims=data,
    )
const verifyToken = async (token) => {
  const { userinfoEndpoint, issuer } = mcpAuth.config.server.metadata;
  const response = await fetch(userinfoEndpoint, {
    headers: { Authorization: `Bearer ${token}` },
  });
  if (!response.ok) throw new Error('Token verification failed');
  const userInfo = await response.json();
  return {
    token,
    issuer,
    subject: userInfo.sub,
    claims: userInfo,
  };
};
實作 "whoami" 工具
現在,讓我們實作 "whoami" 工具,該工具會使用客戶端傳來的存取權杖 (Access token) 請求 userinfo 端點,並回傳目前使用者的身分宣告 (Claims)。
本範例採用 SSE 傳輸方式,因目前 SDK 尚未正式支援 Streamable HTTP 傳輸。理論上,你可以使用任何相容 HTTP 的傳輸方式。
- Python
- Node.js
from mcp.server.fastmcp import FastMCP
from starlette.applications import Starlette
from starlette.routing import Mount
from starlette.middleware import Middleware

mcp = FastMCP("WhoAmI")

@mcp.tool()
def whoami() -> dict:
    """
    回傳目前使用者的身分資訊。
    """
    return (
        mcp_auth.auth_info.claims
        if mcp_auth.auth_info
        else {"error": "Not authenticated"}
    )

bearer_auth = Middleware(mcp_auth.bearer_auth_middleware(verify_access_token))
app = Starlette(
    routes=[
        mcp_auth.metadata_route(),  # 提供 OIDC metadata 供探索
        Mount('/', app=mcp.sse_app(), middleware=[bearer_auth]),
    ],
)
啟動伺服器:
uvicorn whoami:app --host 0.0.0.0 --port 3001
import { McpServer } from '@modelcontextprotocol/sdk/server/mcp.js';
import express from 'express';

// 建立 MCP 伺服器並註冊 whoami 工具
const server = new McpServer({ name: 'WhoAmI', version: '0.0.0' });
server.tool('whoami', ({ authInfo }) => ({
  content: [
    { type: 'text', text: JSON.stringify(authInfo?.claims ?? { error: 'Not authenticated' }) },
  ],
}));

// Express app 與 MCP Auth middleware
const app = express();
app.use(mcpAuth.delegatedRouter());
app.use(mcpAuth.bearerAuth(verifyToken));

// SSE 傳輸(如 SDK 文件所示)
const transports = {};
app.get('/sse', async (_req, res) => {
  const transport = new SSEServerTransport('/messages', res);
  transports[transport.sessionId] = transport;
  res.on('close', () => delete transports[transport.sessionId]);
  await server.connect(transport);
});
app.post('/messages', async (req, res) => {
  const sessionId = String(req.query.sessionId);
  const transport = transports[sessionId];
  if (transport) await transport.handlePostMessage(req, res, req.body);
  else res.status(400).send('No transport found for sessionId');
});

app.listen(3001);
啟動伺服器:
node whoami.js
測試整合流程
- 啟動 MCP 伺服器。
- 啟動 AI agent。
- 在 client 端呼叫
whoami工具,取得當前使用者的身分宣告 (Claims)。 - client 應處理 401 Unauthorized 回應並將使用者導向 Logto 進行驗證 (Authentication)。
- 驗證成功後,client 應取得存取權杖 (Access token),並用它向 MCP 伺服器發送請求。
- client 應能使用存取權杖 (Access token) 從 MCP 伺服器取得身分宣告 (Claims)。
- Python
- Node.js
完整的 MCP 伺服器程式碼可在 mcp-auth/python 儲存庫中找到。
完整的 MCP 伺服器程式碼可在 mcp-auth/js 儲存庫中找到。