ปกป้อง Axum API ของคุณด้วยการควบคุมการเข้าถึงตามบทบาท (RBAC) และการตรวจสอบ JWT
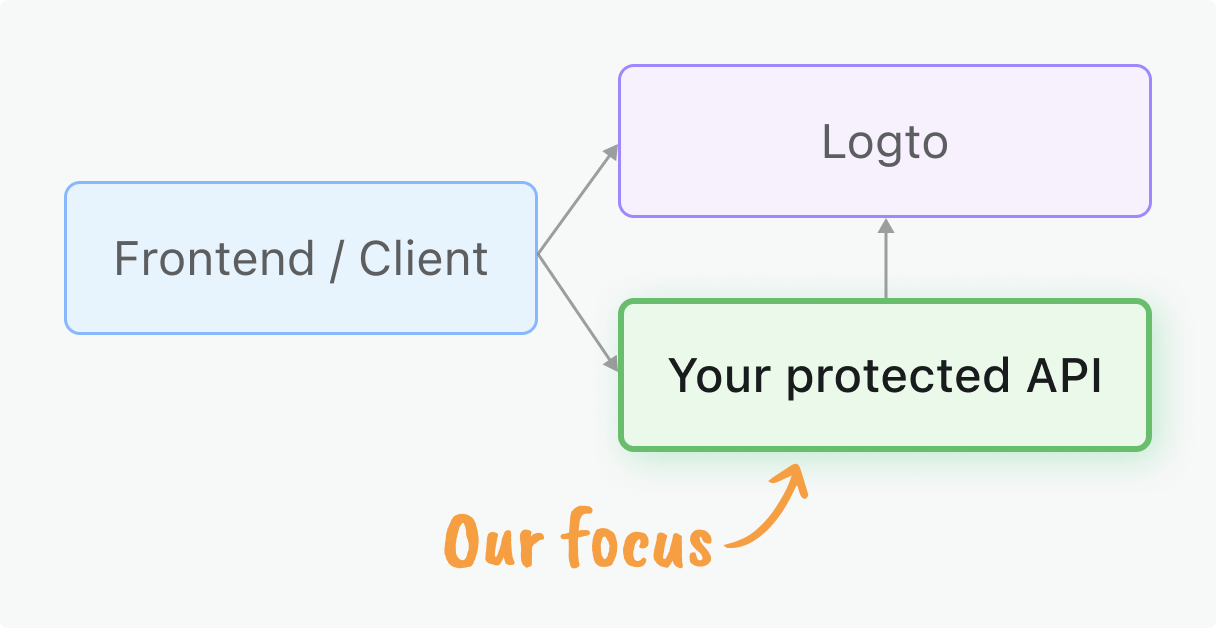
คู่มือนี้จะช่วยให้คุณนำการอนุญาต (Authorization) ไปใช้เพื่อรักษาความปลอดภัยให้กับ Axum API ของคุณ โดยใช้ การควบคุมการเข้าถึงตามบทบาท (RBAC) และ JSON Web Tokens (JWTs) ที่ออกโดย Logto
ก่อนเริ่มต้น
แอปพลิเคชันไคลเอนต์ของคุณจำเป็นต้องขอรับโทเค็นการเข้าถึง (Access tokens) จาก Logto หากคุณยังไม่ได้ตั้งค่าการเชื่อมต่อกับไคลเอนต์ โปรดดู เริ่มต้นอย่างรวดเร็ว สำหรับ React, Vue, Angular หรือเฟรมเวิร์กฝั่งไคลเอนต์อื่น ๆ หรือดู คู่มือเครื่องต่อเครื่อง สำหรับการเข้าถึงแบบเซิร์ฟเวอร์ต่อเซิร์ฟเวอร์
คู่มือนี้เน้นที่ การตรวจสอบโทเค็นฝั่งเซิร์ฟเวอร์ ในแอป Axum ของคุณ
สิ่งที่คุณจะได้เรียนรู้
- การตรวจสอบ JWT: เรียนรู้วิธีตรวจสอบโทเค็นการเข้าถึง (Access tokens) และดึงข้อมูลการยืนยันตัวตน (Authentication)
- การสร้าง Middleware: สร้าง middleware ที่นำกลับมาใช้ซ้ำได้สำหรับการปกป้อง API
- โมเดลสิทธิ์ (Permission models): เข้าใจและนำรูปแบบการอนุญาต (Authorization) ที่แตกต่างกันไปใช้:
- ทรัพยากร API ระดับโกลบอลสำหรับ endpoint ทั่วทั้งแอปพลิเคชัน
- สิทธิ์ขององค์กรสำหรับควบคุมฟีเจอร์เฉพาะผู้เช่า (tenant)
- ทรัพยากร API ระดับองค์กรสำหรับการเข้าถึงข้อมูลแบบหลายผู้เช่า (multi-tenant)
- การผสาน RBAC: บังคับใช้สิทธิ์และขอบเขต (Scopes) ตามบทบาท (RBAC) ใน endpoint ของ API ของคุณ
ข้อกำหนดเบื้องต้น
- ติดตั้ง Rust เวอร์ชันเสถียรล่าสุด
- มีความเข้าใจพื้นฐานเกี่ยวกับ Axum และการพัฒนาเว็บ API
- ตั้งค่าแอป Logto เรียบร้อยแล้ว (ดู เริ่มต้นอย่างรวดเร็ว หากยังไม่ได้ตั้งค่า)
ภาพรวมของโมเดลสิทธิ์ (Permission models overview)
ก่อนดำเนินการปกป้องทรัพยากร ให้เลือกโมเดลสิทธิ์ที่เหมาะสมกับสถาปัตยกรรมแอปพลิเคชันของคุณ ซึ่งสอดคล้องกับ สถานการณ์การอนุญาต (authorization scenarios) หลักสามแบบของ Logto:
- ทรัพยากร API ระดับโกลบอล (Global API resources)
- สิทธิ์ขององค์กร (ไม่ใช่ API) (Organization (non-API) permissions)
- ทรัพยากร API ระดับองค์กร (Organization-level API resources)
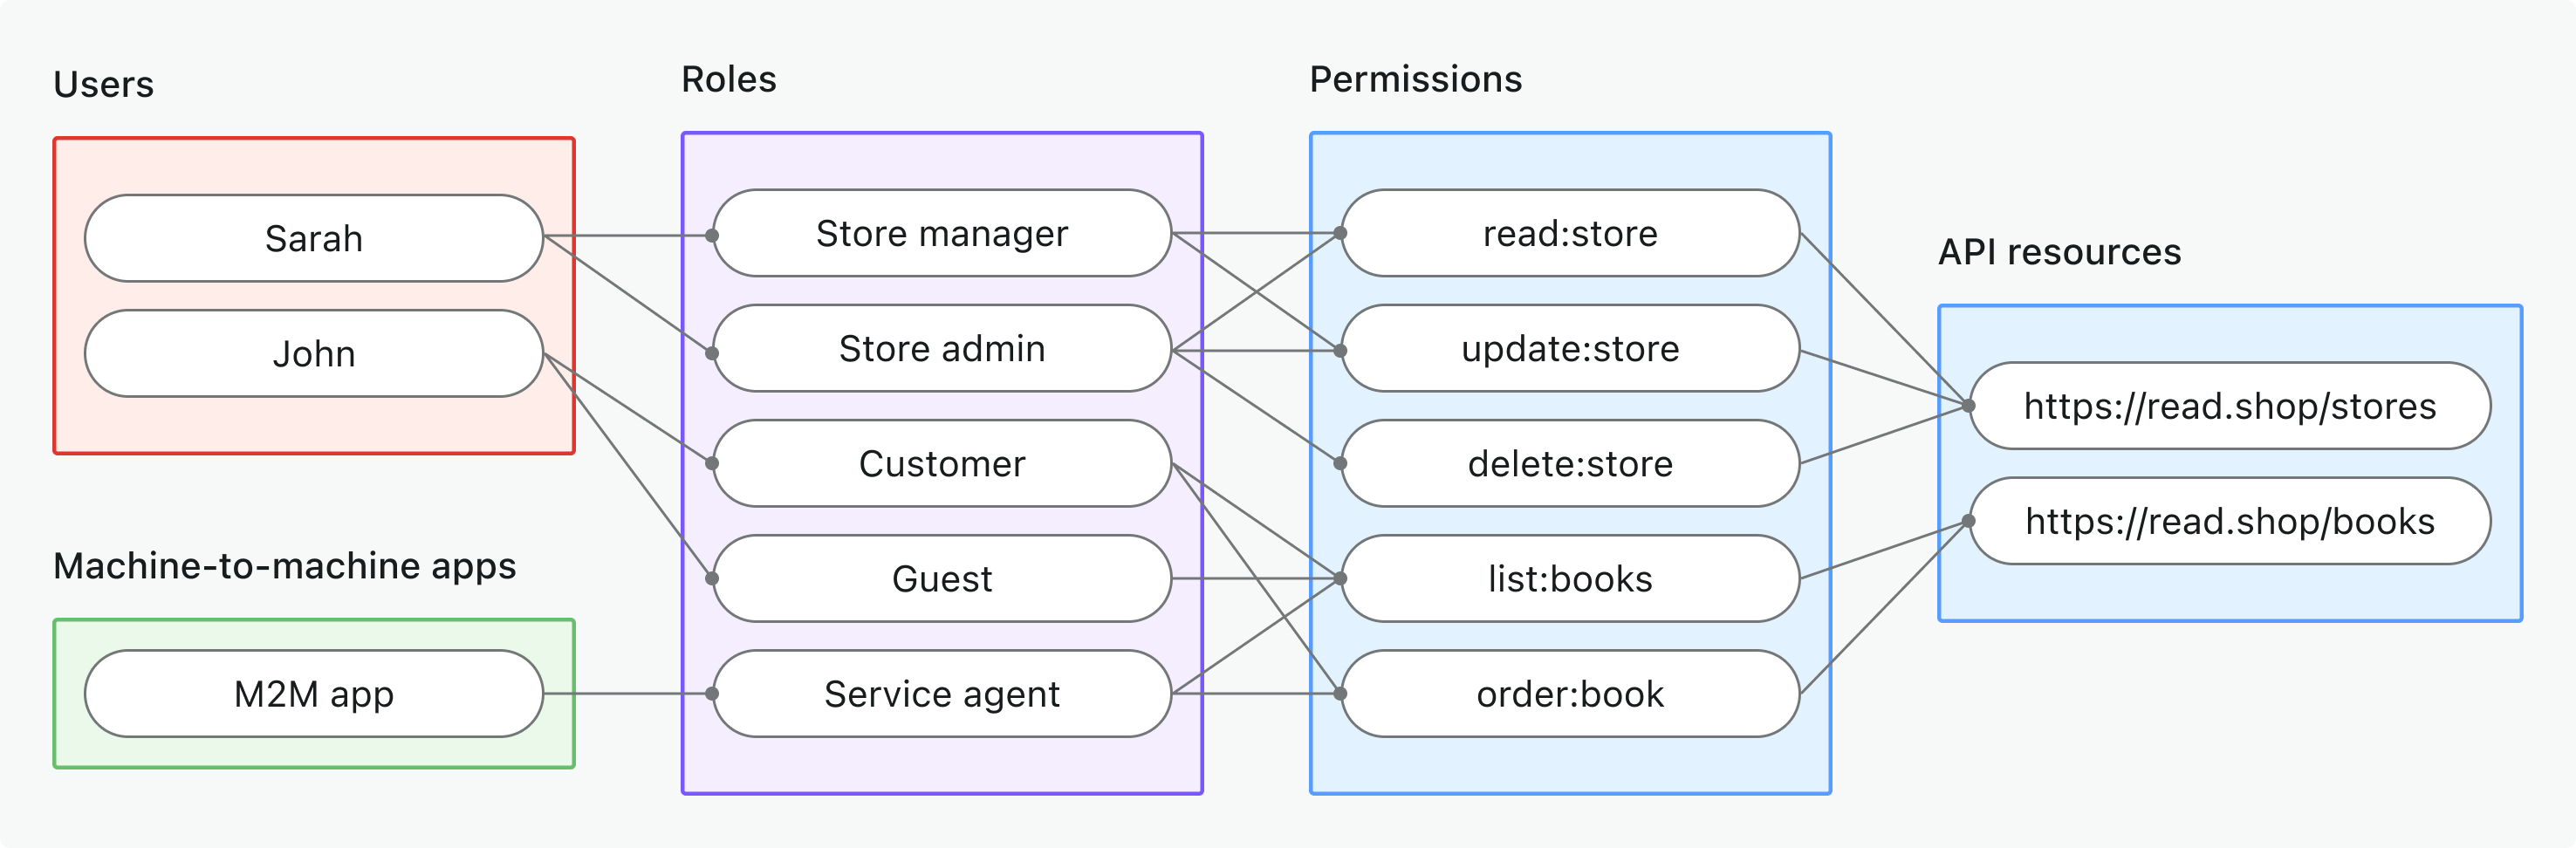
- กรณีการใช้งาน: ปกป้องทรัพยากร API ที่ใช้ร่วมกันทั่วทั้งแอปพลิเคชัน (ไม่เฉพาะองค์กร)
- ประเภทโทเค็น: โทเค็นการเข้าถึง (Access token) ที่มีผู้รับ (audience) ระดับโกลบอล
- ตัวอย่าง: Public APIs, บริการหลักของผลิตภัณฑ์, จุดเชื่อมต่อสำหรับผู้ดูแลระบบ
- เหมาะสำหรับ: ผลิตภัณฑ์ SaaS ที่มี API ใช้ร่วมกันโดยลูกค้าทุกคน, microservices ที่ไม่มีการแยก tenant
- เรียนรู้เพิ่มเติม: ปกป้องทรัพยากร API ระดับโกลบอล
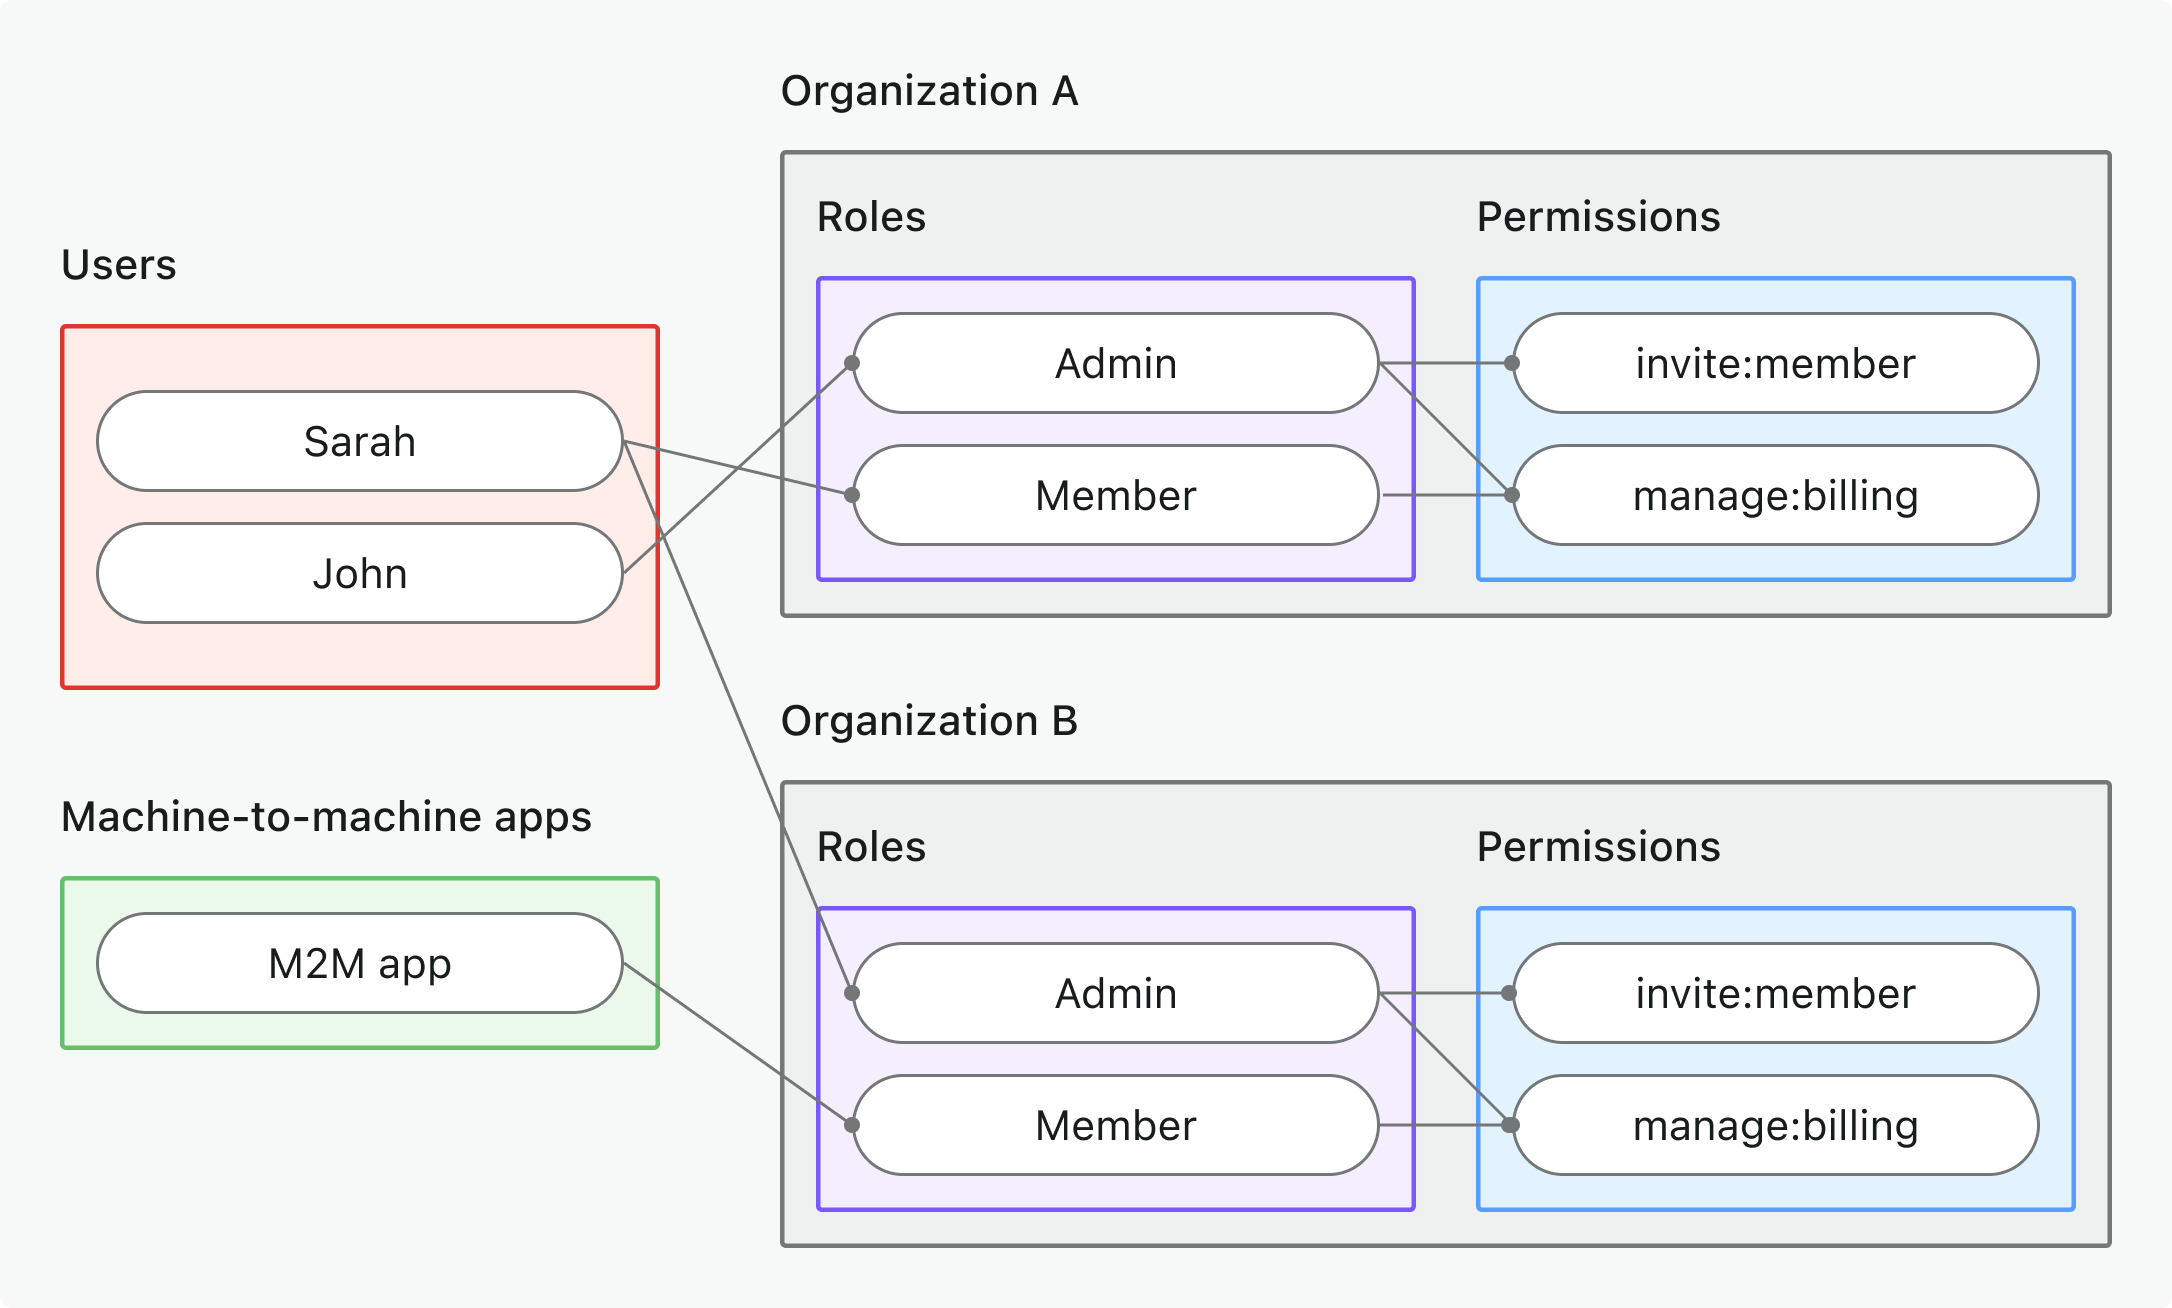
- กรณีการใช้งาน: ควบคุมการกระทำเฉพาะองค์กร, ฟีเจอร์ UI, หรือ business logic (ไม่ใช่ API)
- ประเภทโทเค็น: โทเค็นองค์กร (Organization token) ที่มีผู้รับ (audience) เฉพาะองค์กร
- ตัวอย่าง: การจำกัดฟีเจอร์, สิทธิ์แดชบอร์ด, การควบคุมการเชิญสมาชิก
- เหมาะสำหรับ: SaaS หลายผู้เช่า (multi-tenant) ที่มีฟีเจอร์และเวิร์กโฟลว์เฉพาะองค์กร
- เรียนรู้เพิ่มเติม: ปกป้องสิทธิ์ขององค์กร (ไม่ใช่ API)
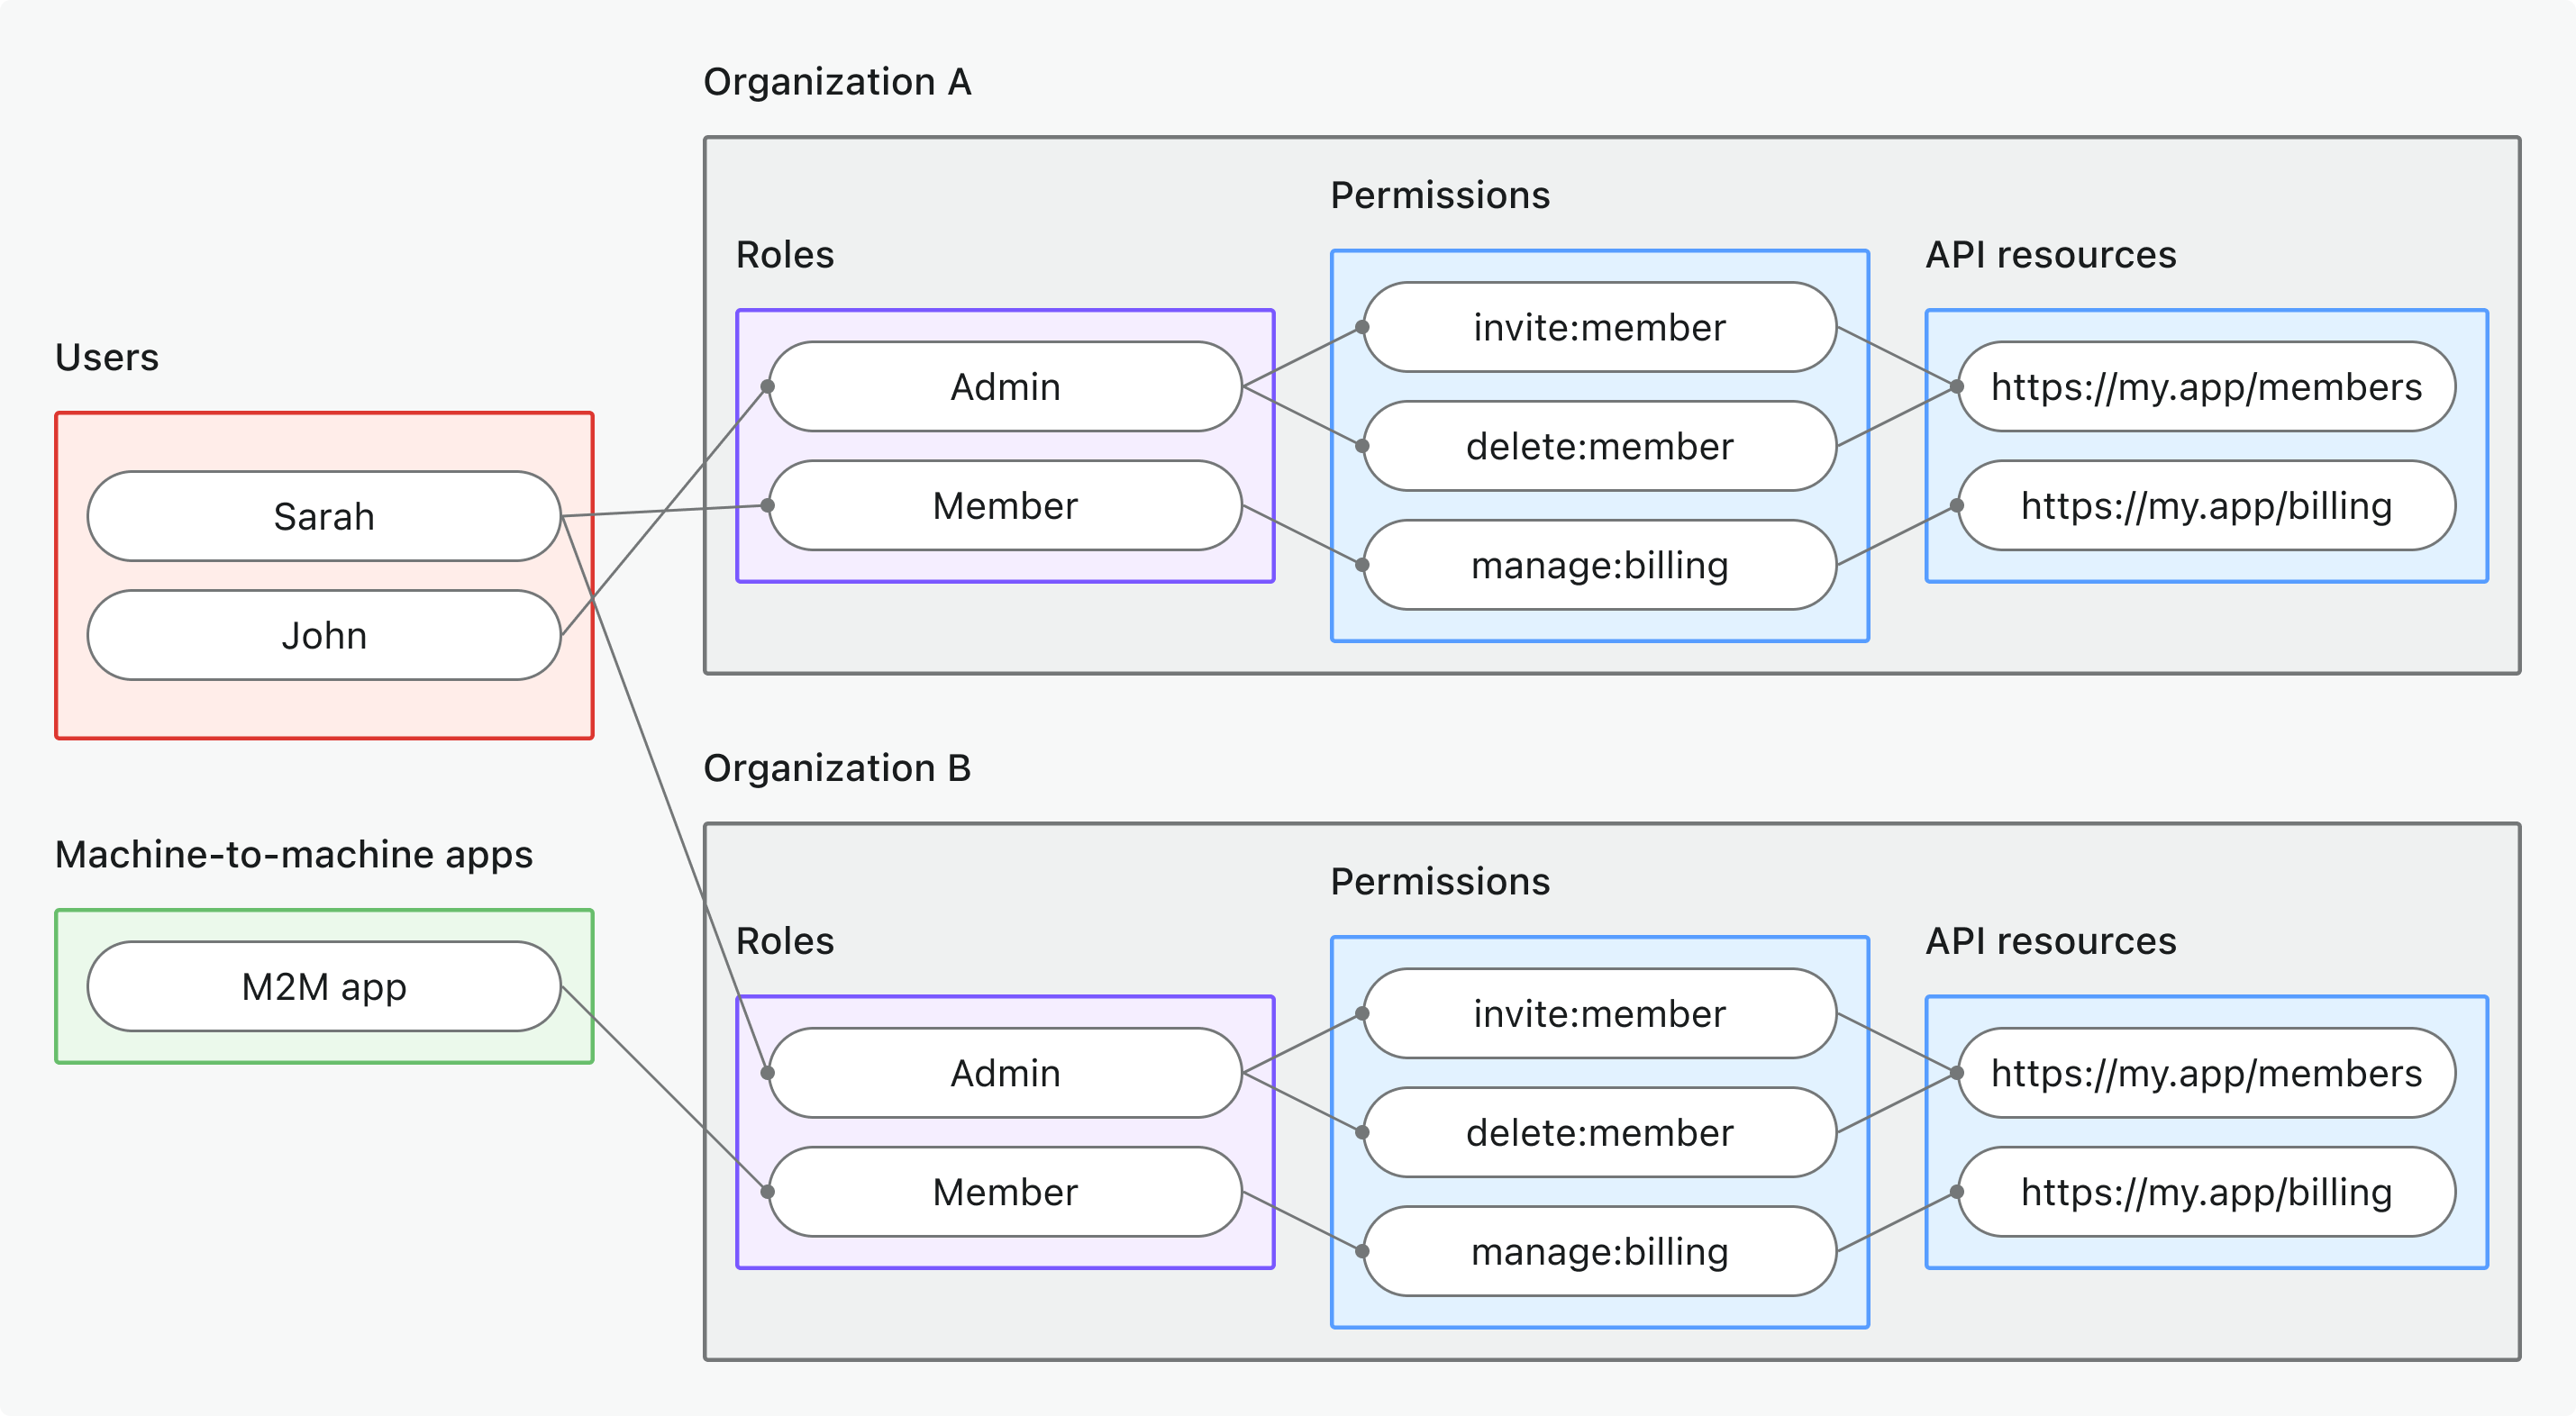
- กรณีการใช้งาน: ปกป้องทรัพยากร API ที่เข้าถึงได้ในบริบทขององค์กรเฉพาะ
- ประเภทโทเค็น: โทเค็นองค์กร (Organization token) ที่มีผู้รับเป็นทรัพยากร API + บริบทองค์กร
- ตัวอย่าง: API หลายผู้เช่า, จุดเชื่อมต่อข้อมูลที่จำกัดขอบเขตองค์กร, microservices เฉพาะ tenant
- เหมาะสำหรับ: SaaS หลายผู้เช่าที่ข้อมูล API ถูกจำกัดขอบเขตองค์กร
- เรียนรู้เพิ่มเติม: ปกป้องทรัพยากร API ระดับองค์กร
💡 เลือกโมเดลของคุณก่อนดำเนินการต่อ - การนำไปใช้จะอ้างอิงแนวทางที่คุณเลือกตลอดคู่มือนี้
ขั้นตอนเตรียมความพร้อมอย่างรวดเร็ว
กำหนดค่าทรัพยากรและสิทธิ์ของ Logto
- ทรัพยากร API ระดับโกลบอล
- สิทธิ์ขององค์กร (ไม่ใช่ API)
- ทรัพยากร API ระดับองค์กร
- สร้างทรัพยากร API: ไปที่ Console → ทรัพยากร API และลงทะเบียน API ของคุณ (เช่น
https://api.yourapp.com) - กำหนดสิทธิ์: เพิ่มขอบเขต (scopes) เช่น
read:products,write:orders– ดู กำหนดทรัพยากร API พร้อมสิทธิ์ - สร้างบทบาทระดับโกลบอล: ไปที่ Console → บทบาท และสร้างบทบาทที่รวมสิทธิ์ API ของคุณ – ดู กำหนดค่าบทบาทระดับโกลบอล
- กำหนดบทบาท: กำหนดบทบาทให้กับผู้ใช้หรือแอป M2M ที่ต้องการเข้าถึง API
- กำหนดสิทธิ์ขององค์กร: สร้างสิทธิ์ขององค์กรที่ไม่ใช่ API เช่น
invite:member,manage:billingในเทมเพลตขององค์กร - ตั้งค่าบทบาทขององค์กร: กำหนดค่าเทมเพลตขององค์กรด้วยบทบาทเฉพาะองค์กรและกำหนดสิทธิ์ให้กับบทบาทเหล่านั้น
- กำหนดบทบาทขององค์กร: กำหนดผู้ใช้ให้กับบทบาทขององค์กรในแต่ละบริบทขององค์กร
- สร้างทรัพยากร API: ลงทะเบียนทรัพยากร API ของคุณเช่นเดียวกับข้างต้น แต่จะใช้ในบริบทขององค์กร
- กำหนดสิทธิ์: เพิ่มขอบเขต (scopes) เช่น
read:data,write:settingsที่จำกัดในบริบทขององค์กร - กำหนดค่าเทมเพลตขององค์กร: ตั้งค่าบทบาทขององค์กรที่รวมสิทธิ์ของทรัพยากร API ของคุณ
- กำหนดบทบาทขององค์กร: กำหนดผู้ใช้หรือแอป M2M ให้กับบทบาทขององค์กรที่รวมสิทธิ์ API
- ตั้งค่าหลายผู้เช่า: ตรวจสอบให้แน่ใจว่า API ของคุณสามารถจัดการข้อมูลและการตรวจสอบที่จำกัดในแต่ละองค์กรได้
เริ่มต้นด้วย คู่มือการควบคุมการเข้าถึงตามบทบาท (RBAC) ของเรา สำหรับคำแนะนำการตั้งค่าแบบทีละขั้นตอน
อัปเดตแอปพลิเคชันฝั่งไคลเอนต์ของคุณ
ร้องขอขอบเขต (scopes) ที่เหมาะสมในไคลเอนต์ของคุณ:
- การยืนยันตัวตนผู้ใช้: อัปเดตแอปของคุณ → เพื่อร้องขอขอบเขต API และ/หรือบริบทขององค์กร
- เครื่องต่อเครื่อง: กำหนดค่า M2M scopes → สำหรับการเข้าถึงระหว่างเซิร์ฟเวอร์
กระบวนการนี้มักเกี่ยวข้องกับการอัปเดตการกำหนดค่าไคลเอนต์ของคุณเพื่อรวมหนึ่งหรือมากกว่ารายการต่อไปนี้:
- พารามิเตอร์
scopeในกระบวนการ OAuth - พารามิเตอร์
resourceสำหรับการเข้าถึงทรัพยากร API organization_idสำหรับบริบทขององค์กร
ตรวจสอบให้แน่ใจว่าผู้ใช้หรือแอป M2M ที่คุณทดสอบได้รับการกำหนดบทบาทหรือบทบาทขององค์กรที่มีสิทธิ์ที่จำเป็นสำหรับ API ของคุณแล้ว
เริ่มต้นโปรเจกต์ API ของคุณ
ในการเริ่มต้นโปรเจกต์ Axum ใหม่ ให้สร้างไดเรกทอรีและตั้งค่าโครงสร้างพื้นฐานดังนี้:
cargo new your-api-name
cd your-api-name
เพิ่ม dependencies ของ Axum ลงใน Cargo.toml ของคุณ:
[dependencies]
axum = "0.7"
tokio = { version = "1.0", features = ["full"] }
tower = "0.4"
serde = { version = "1.0", features = ["derive"] }
serde_json = "1.0"
สร้างแอปพลิเคชัน Axum พื้นฐาน:
use axum::{
    response::Json,
    routing::get,
    Router,
};
use serde_json::{json, Value};

#[tokio::main]
async fn main() {
    let app = Router::new()
        .route("/", get(hello_handler));

    let listener = tokio::net::TcpListener::bind("0.0.0.0:3000").await.unwrap();
    axum::serve(listener, app).await.unwrap();
}

async fn hello_handler() -> Json<Value> {
    Json(json!({ "message": "Hello from Axum" }))
}
เริ่มต้นเซิร์ฟเวอร์สำหรับพัฒนา:
cargo run
ดูเอกสารของ Axum สำหรับรายละเอียดเพิ่มเติมเกี่ยวกับการตั้งค่า route, middleware และฟีเจอร์อื่น ๆ
กำหนดค่าคงที่และยูทิลิตี้
กำหนดค่าคงที่และยูทิลิตี้ที่จำเป็นในโค้ดของคุณเพื่อจัดการการดึงและตรวจสอบโทเค็น คำขอที่ถูกต้องต้องมี header Authorization ในรูปแบบ Bearer <access_token>
use serde::{Deserialize, Serialize};
use std::fmt;

pub const JWKS_URI: &str = "https://your-tenant.logto.app/oidc/jwks";
pub const ISSUER: &str = "https://your-tenant.logto.app/oidc";

#[derive(Debug, Clone, Serialize, Deserialize)]
pub struct AuthInfo {
    pub sub: String,
    pub client_id: Option<String>,
    pub organization_id: Option<String>,
    pub scopes: Vec<String>,
    pub audience: Vec<String>,
}

impl AuthInfo {
    pub fn new(
        sub: String,
        client_id: Option<String>,
        organization_id: Option<String>,
        scopes: Vec<String>,
        audience: Vec<String>,
    ) -> Self {
        Self {
            sub,
            client_id,
            organization_id,
            scopes,
            audience,
        }
    }
}

#[derive(Debug)]
pub struct AuthorizationError {
    pub message: String,
    pub status_code: u16,
}

impl AuthorizationError {
    pub fn new(message: impl Into<String>) -> Self {
        Self {
            message: message.into(),
            status_code: 403,
        }
    }

    pub fn with_status(message: impl Into<String>, status_code: u16) -> Self {
        Self {
            message: message.into(),
            status_code,
        }
    }
}

impl fmt::Display for AuthorizationError {
    fn fmt(&self, f: &mut fmt::Formatter<'_>) -> fmt::Result {
        write!(f, "{}", self.message)
    }
}

impl std::error::Error for AuthorizationError {}

pub fn extract_bearer_token(authorization: Option<&str>) -> Result<&str, AuthorizationError> {
    let auth_header = authorization.ok_or_else(|| {
        AuthorizationError::with_status("ไม่มี header Authorization", 401)
    })?;

    if !auth_header.starts_with("Bearer ") {
        return Err(AuthorizationError::with_status(
            "header Authorization ต้องขึ้นต้นด้วย \"Bearer \"",
            401,
        ));
    }

    Ok(&auth_header[7..]) // ลบคำนำหน้า 'Bearer '
}
ดึงข้อมูลเกี่ยวกับ Logto tenant ของคุณ
คุณจะต้องใช้ค่าต่อไปนี้เพื่อยืนยันโทเค็นที่ออกโดย Logto:
- URI ของ JSON Web Key Set (JWKS): URL ไปยัง public keys ของ Logto ใช้สำหรับตรวจสอบลายเซ็นของ JWT
- ผู้ออก (Issuer): ค่าผู้ออกที่คาดหวัง (OIDC URL ของ Logto)
ขั้นแรก ให้ค้นหา endpoint ของ Logto tenant ของคุณ คุณสามารถหาได้จากหลายที่:
- ใน Logto Console ที่ Settings → Domains
- ในการตั้งค่าแอปพลิเคชันใด ๆ ที่คุณตั้งค่าใน Logto, Settings → Endpoints & Credentials
ดึงค่าจาก OpenID Connect discovery endpoint
ค่าทั้งหมดนี้สามารถดึงได้จาก OpenID Connect discovery endpoint ของ Logto:
https://<your-logto-endpoint>/oidc/.well-known/openid-configuration
ตัวอย่างการตอบกลับ (ละเว้นฟิลด์อื่นเพื่อความกระชับ):
{
  "jwks_uri": "https://your-tenant.logto.app/oidc/jwks",
  "issuer": "https://your-tenant.logto.app/oidc"
}
เขียนค่าคงที่ในโค้ดของคุณ (ไม่แนะนำ)
เนื่องจาก Logto ไม่อนุญาตให้ปรับแต่ง JWKS URI หรือผู้ออก (issuer) คุณสามารถเขียนค่าคงที่เหล่านี้ไว้ในโค้ดของคุณได้ อย่างไรก็ตาม ไม่แนะนำให้ใช้วิธีนี้ในแอปพลิเคชัน production เพราะอาจเพิ่มภาระในการดูแลรักษาหากมีการเปลี่ยนแปลงค่าคอนฟิกในอนาคต
- JWKS URI:
https://<your-logto-endpoint>/oidc/jwks - ผู้ออก (Issuer):
https://<your-logto-endpoint>/oidc
ตรวจสอบโทเค็นและสิทธิ์ (permissions)
หลังจากดึงโทเค็นและดึงข้อมูล OIDC config แล้ว ให้ตรวจสอบสิ่งต่อไปนี้:
- ลายเซ็น (Signature): JWT ต้องถูกต้องและลงนามโดย Logto (ผ่าน JWKS)
- ผู้ออก (Issuer): ต้องตรงกับผู้ออกของ Logto tenant ของคุณ
- ผู้รับ (Audience): ต้องตรงกับตัวบ่งชี้ทรัพยากร API ที่ลงทะเบียนใน Logto หรือบริบทขององค์กรหากเกี่ยวข้อง
- วันหมดอายุ (Expiration): โทเค็นต้องไม่หมดอายุ
- สิทธิ์ (ขอบเขต) (Permissions (scopes)): โทเค็นต้องมีขอบเขตที่จำเป็นสำหรับ API / การกระทำของคุณ ขอบเขตจะเป็นสตริงที่คั่นด้วยช่องว่างใน
scopeการอ้างสิทธิ์ (claim) - บริบทองค์กร (Organization context): หากปกป้องทรัพยากร API ระดับองค์กร ให้ตรวจสอบการอ้างสิทธิ์
organization_id
ดู JSON Web Token เพื่อเรียนรู้เพิ่มเติมเกี่ยวกับโครงสร้างและการอ้างสิทธิ์ของ JWT
สิ่งที่ต้องตรวจสอบสำหรับแต่ละโมเดลสิทธิ์ (What to check for each permission model)
การอ้างสิทธิ์ (claims) และกฎการตรวจสอบจะแตกต่างกันไปตามโมเดลสิทธิ์:
- ทรัพยากร API ระดับโกลบอล (Global API resources)
- สิทธิ์ขององค์กร (ไม่ใช่ API) (Organization (non-API) permissions)
- ทรัพยากร API ระดับองค์กร (Organization-level API resources)
- การอ้างสิทธิ์ผู้รับ (
aud): ตัวบ่งชี้ทรัพยากร API - การอ้างสิทธิ์องค์กร (
organization_id): ไม่มี - ขอบเขต (สิทธิ์) ที่ต้องตรวจสอบ (
scope): สิทธิ์ของทรัพยากร API
- การอ้างสิทธิ์ผู้รับ (
aud):urn:logto:organization:<id>(บริบทองค์กรอยู่ในการอ้างสิทธิ์aud) - การอ้างสิทธิ์องค์กร (
organization_id): ไม่มี - ขอบเขต (สิทธิ์) ที่ต้องตรวจสอบ (
scope): สิทธิ์ขององค์กร
- การอ้างสิทธิ์ผู้รับ (
aud): ตัวบ่งชี้ทรัพยากร API - การอ้างสิทธิ์องค์กร (
organization_id): รหัสองค์กร (ต้องตรงกับคำขอ) - ขอบเขต (สิทธิ์) ที่ต้องตรวจสอบ (
scope): สิทธิ์ของทรัพยากร API
สำหรับสิทธิ์ขององค์กรที่ไม่ใช่ API บริบทขององค์กรจะแสดงโดยการอ้างสิทธิ์ aud (เช่น
urn:logto:organization:abc123) การอ้างสิทธิ์ organization_id จะมีเฉพาะในโทเค็นทรัพยากร API
ระดับองค์กรเท่านั้น
ควรตรวจสอบทั้งสิทธิ์ (ขอบเขต) และบริบท (ผู้รับ, องค์กร) เสมอ เพื่อความปลอดภัยของ API แบบหลายผู้เช่า
เพิ่มตรรกะการตรวจสอบ
เราใช้ jsonwebtoken สำหรับตรวจสอบความถูกต้องของ JWT เพิ่ม dependencies ที่จำเป็นลงใน Cargo.toml ของคุณ:
[dependencies]
jsonwebtoken = "9.0"
serde = { version = "1.0", features = ["derive"] }
serde_json = "1.0"
reqwest = { version = "0.11", features = ["json"] }
tokio = { version = "1.0", features = ["full"] }
ก่อนอื่น เพิ่ม utilities ที่ใช้ร่วมกันเหล่านี้เพื่อจัดการการตรวจสอบ JWT:
use crate::{AuthInfo, AuthorizationError, ISSUER, JWKS_URI};
use jsonwebtoken::{decode, decode_header, Algorithm, DecodingKey, Validation};
use serde_json::Value;
use std::collections::HashMap;

// โครงสร้างสำหรับตรวจสอบ JWT
pub struct JwtValidator {
    jwks: HashMap<String, DecodingKey>,
}

impl JwtValidator {
    pub async fn new() -> Result<Self, AuthorizationError> {
        let jwks = Self::fetch_jwks().await?;
        Ok(Self { jwks })
    }

    async fn fetch_jwks() -> Result<HashMap<String, DecodingKey>, AuthorizationError> {
        let response = reqwest::get(JWKS_URI).await.map_err(|e| {
            AuthorizationError::with_status(format!("ไม่สามารถดึง JWKS: {}", e), 401)
        })?;

        let jwks: Value = response.json().await.map_err(|e| {
            AuthorizationError::with_status(format!("ไม่สามารถแปลง JWKS: {}", e), 401)
        })?;

        let mut keys = HashMap::new();

        if let Some(keys_array) = jwks["keys"].as_array() {
            for key in keys_array {
                if let (Some(kid), Some(kty), Some(n), Some(e)) = (
                    key["kid"].as_str(),
                    key["kty"].as_str(),
                    key["n"].as_str(),
                    key["e"].as_str(),
                ) {
                    if kty == "RSA" {
                        if let Ok(decoding_key) = DecodingKey::from_rsa_components(n, e) {
                            keys.insert(kid.to_string(), decoding_key);
                        }
                    }
                }
            }
        }

        if keys.is_empty() {
            return Err(AuthorizationError::with_status("ไม่พบคีย์ที่ถูกต้องใน JWKS", 401));
        }

        Ok(keys)
    }

    pub fn validate_jwt(&self, token: &str) -> Result<AuthInfo, AuthorizationError> {
        let header = decode_header(token).map_err(|e| {
            AuthorizationError::with_status(format!("ส่วนหัวของโทเค็นไม่ถูกต้อง: {}", e), 401)
        })?;

        let kid = header.kid.ok_or_else(|| {
            AuthorizationError::with_status("โทเค็นไม่มี kid claim", 401)
        })?;

        let key = self.jwks.get(&kid).ok_or_else(|| {
            AuthorizationError::with_status("ไม่รู้จัก key ID", 401)
        })?;

        let mut validation = Validation::new(Algorithm::RS256);
        validation.set_issuer(&[ISSUER]);
        validation.validate_aud = false; // เราจะตรวจสอบ audience ด้วยตนเอง

        let token_data = decode::<Value>(token, key, &validation).map_err(|e| {
            AuthorizationError::with_status(format!("โทเค็นไม่ถูกต้อง: {}", e), 401)
        })?;

        let claims = token_data.claims;
        self.verify_payload(&claims)?;

        Ok(self.create_auth_info(claims))
    }

    fn verify_payload(&self, claims: &Value) -> Result<(), AuthorizationError> {
        // เพิ่มตรรกะการตรวจสอบของคุณที่นี่ตามโมเดลสิทธิ์
        // ตัวอย่างจะอยู่ในส่วน permission models ด้านล่าง
        Ok(())
    }

    fn create_auth_info(&self, claims: Value) -> AuthInfo {
        let scopes = claims["scope"]
            .as_str()
            .map(|s| s.split(' ').map(|s| s.to_string()).collect())
            .unwrap_or_default();

        let audience = match &claims["aud"] {
            Value::Array(arr) => arr.iter().filter_map(|v| v.as_str().map(|s| s.to_string())).collect(),
            Value::String(s) => vec![s.clone()],
            _ => vec![],
        };

        AuthInfo::new(
            claims["sub"].as_str().unwrap_or_default().to_string(),
            claims["client_id"].as_str().map(|s| s.to_string()),
            claims["organization_id"].as_str().map(|s| s.to_string()),
            scopes,
            audience,
        )
    }
}
จากนั้น สร้าง middleware เพื่อตรวจสอบโทเค็นการเข้าถึง (access token):
use crate::{AuthInfo, AuthorizationError, extract_bearer_token};
use crate::jwt_validator::JwtValidator;
use axum::{
    extract::Request,
    http::{HeaderMap, StatusCode},
    middleware::Next,
    response::{IntoResponse, Response},
    Extension, Json,
};
use serde_json::json;
use std::sync::Arc;

// มิดเดิลแวร์สำหรับตรวจสอบ JWT ในแต่ละคำขอ
pub async fn jwt_middleware(
    Extension(validator): Extension<Arc<JwtValidator>>,
    headers: HeaderMap,
    mut request: Request,
    next: Next,
) -> Result<Response, AuthorizationError> {
    let authorization = headers
        .get("authorization")
        .and_then(|h| h.to_str().ok());

    let token = extract_bearer_token(authorization)?;
    let auth_info = validator.validate_jwt(token)?;

    // เก็บข้อมูลการยืนยันตัวตน (auth info) ลงใน extensions ของ request เพื่อใช้งานทั่วไป
    request.extensions_mut().insert(auth_info);

    Ok(next.run(request).await)
}

// แปลงข้อผิดพลาด AuthorizationError เป็น HTTP response
impl IntoResponse for AuthorizationError {
    fn into_response(self) -> Response {
        let status = StatusCode::from_u16(self.status_code).unwrap_or(StatusCode::FORBIDDEN);
        (status, Json(json!({ "error": self.message }))).into_response()
    }
}
ตามโมเดลสิทธิ์ของคุณ ให้เพิ่มตรรกะการตรวจสอบที่เหมาะสมใน JwtValidator:
- ทรัพยากร API ระดับโกลบอล
- สิทธิ์ขององค์กร (ไม่ใช่ API)
- ทรัพยากร API ระดับองค์กร
fn verify_payload(&self, claims: &Value) -> Result<(), AuthorizationError> {
    // ตรวจสอบว่า audience claim ตรงกับตัวบ่งชี้ทรัพยากร API ของคุณ
    let audiences = match &claims["aud"] {
        Value::Array(arr) => arr.iter().filter_map(|v| v.as_str()).collect::<Vec<_>>(),
        Value::String(s) => vec![s.as_str()],
        _ => vec![],
    };

    if !audiences.contains(&"https://your-api-resource-indicator") {
        return Err(AuthorizationError::new("audience ไม่ถูกต้อง"));
    }

    // ตรวจสอบ scope ที่จำเป็นสำหรับทรัพยากร API ระดับโกลบอล
    let required_scopes = vec!["api:read", "api:write"]; // แทนที่ด้วย scope ที่คุณต้องการจริง
    let scopes = claims["scope"]
        .as_str()
        .map(|s| s.split(' ').collect::<Vec<_>>())
        .unwrap_or_default();

    for required_scope in &required_scopes {
        if !scopes.contains(required_scope) {
            return Err(AuthorizationError::new("scope ไม่เพียงพอ"));
        }
    }

    Ok(())
}
fn verify_payload(&self, claims: &Value) -> Result<(), AuthorizationError> {
    // ตรวจสอบว่า audience claim อยู่ในรูปแบบขององค์กร
    let audiences = match &claims["aud"] {
        Value::Array(arr) => arr.iter().filter_map(|v| v.as_str()).collect::<Vec<_>>(),
        Value::String(s) => vec![s.as_str()],
        _ => vec![],
    };

    let has_org_audience = audiences.iter().any(|aud| aud.starts_with("urn:logto:organization:"));
    if !has_org_audience {
        return Err(AuthorizationError::new("audience สำหรับสิทธิ์องค์กรไม่ถูกต้อง"));
    }

    // ตรวจสอบว่า organization ID ตรงกับ context (คุณอาจต้องดึงจาก request context)
    let expected_org_id = "your-organization-id"; // ดึงจาก request context
    let expected_aud = format!("urn:logto:organization:{}", expected_org_id);
    if !audiences.contains(&expected_aud.as_str()) {
        return Err(AuthorizationError::new("Organization ID ไม่ตรงกัน"));
    }

    // ตรวจสอบ scope ที่จำเป็นสำหรับองค์กร
    let required_scopes = vec!["invite:users", "manage:settings"]; // แทนที่ด้วย scope ที่คุณต้องการจริง
    let scopes = claims["scope"]
        .as_str()
        .map(|s| s.split(' ').collect::<Vec<_>>())
        .unwrap_or_default();

    for required_scope in &required_scopes {
        if !scopes.contains(required_scope) {
            return Err(AuthorizationError::new("scope ขององค์กรไม่เพียงพอ"));
        }
    }

    Ok(())
}
fn verify_payload(&self, claims: &Value) -> Result<(), AuthorizationError> {
    // ตรวจสอบว่า audience claim ตรงกับตัวบ่งชี้ทรัพยากร API ของคุณ
    let audiences = match &claims["aud"] {
        Value::Array(arr) => arr.iter().filter_map(|v| v.as_str()).collect::<Vec<_>>(),
        Value::String(s) => vec![s.as_str()],
        _ => vec![],
    };

    if !audiences.contains(&"https://your-api-resource-indicator") {
        return Err(AuthorizationError::new("audience ไม่ถูกต้องสำหรับทรัพยากร API ระดับองค์กร"));
    }

    // ตรวจสอบว่า organization ID ตรงกับ context (คุณอาจต้องดึงจาก request context)
    let expected_org_id = "your-organization-id"; // ดึงจาก request context
    let org_id = claims["organization_id"].as_str().unwrap_or_default();
    if expected_org_id != org_id {
        return Err(AuthorizationError::new("Organization ID ไม่ตรงกัน"));
    }

    // ตรวจสอบ scope ที่จำเป็นสำหรับทรัพยากร API ระดับองค์กร
    let required_scopes = vec!["api:read", "api:write"]; // แทนที่ด้วย scope ที่คุณต้องการจริง
    let scopes = claims["scope"]
        .as_str()
        .map(|s| s.split(' ').collect::<Vec<_>>())
        .unwrap_or_default();

    for required_scope in &required_scopes {
        if !scopes.contains(required_scope) {
            return Err(AuthorizationError::new("scope สำหรับทรัพยากร API ระดับองค์กรไม่เพียงพอ"));
        }
    }

    Ok(())
}
นำ middleware ไปใช้กับ API ของคุณ
ตอนนี้ ให้นำ middleware ไปใช้กับเส้นทาง API ที่ต้องการป้องกันของคุณ
use axum::{
    extract::Extension,
    http::StatusCode,
    middleware,
    response::Json,
    routing::get,
    Router,
};
use serde_json::{json, Value};
use std::sync::Arc;
use tower_http::cors::CorsLayer;

mod lib;
mod jwt_validator;
mod middleware as jwt_middleware;

use lib::AuthInfo;
use jwt_validator::JwtValidator;

#[tokio::main]
async fn main() {
    let validator = Arc::new(JwtValidator::new().await.expect("ไม่สามารถเริ่มต้น JWT validator ได้ (Failed to initialize JWT validator)"));

    let app = Router::new()
        .route("/api/protected", get(protected_handler))
        .layer(middleware::from_fn(jwt_middleware::jwt_middleware))
        .layer(Extension(validator))
        .layer(CorsLayer::permissive());

    let listener = tokio::net::TcpListener::bind("0.0.0.0:3000").await.unwrap();
    axum::serve(listener, app).await.unwrap();
}

async fn protected_handler(Extension(auth): Extension<AuthInfo>) -> Json<Value> {
    // เข้าถึงข้อมูล auth ได้โดยตรงจาก Extension (Access auth information directly from Extension)
    Json(json!({ "auth": auth }))
}
ทดสอบ API ที่ได้รับการป้องกันของคุณ
รับโทเค็นการเข้าถึง (Access tokens)
จากแอปพลิเคชันไคลเอนต์ของคุณ: หากคุณได้ตั้งค่าการเชื่อมต่อไคลเอนต์แล้ว แอปของคุณจะสามารถรับโทเค็นได้โดยอัตโนมัติ ดึงโทเค็นการเข้าถึงและนำไปใช้ในคำขอ API
สำหรับการทดสอบด้วย curl / Postman:
-
โทเค็นผู้ใช้: ใช้เครื่องมือสำหรับนักพัฒนาของแอปไคลเอนต์ของคุณเพื่อคัดลอกโทเค็นการเข้าถึงจาก localStorage หรือแท็บ network
-
โทเค็นเครื่องต่อเครื่อง: ใช้ client credentials flow ตัวอย่างที่ไม่เป็นทางการโดยใช้ curl:
curl -X POST https://your-tenant.logto.app/oidc/token \-H "Content-Type: application/x-www-form-urlencoded" \-d "grant_type=client_credentials" \-d "client_id=your-m2m-client-id" \-d "client_secret=your-m2m-client-secret" \-d "resource=https://your-api-resource-indicator" \-d "scope=api:read api:write"คุณอาจต้องปรับพารามิเตอร์
resourceและscopeให้ตรงกับทรัพยากร API และสิทธิ์ของคุณ; อาจต้องใช้พารามิเตอร์organization_idหาก API ของคุณอยู่ในขอบเขตองค์กร
ต้องการตรวจสอบเนื้อหาโทเค็นใช่ไหม? ใช้ JWT decoder ของเราเพื่อถอดรหัสและตรวจสอบ JWT ของคุณ
ทดสอบ endpoint ที่ได้รับการป้องกัน
คำขอที่มีโทเค็นถูกต้อง
curl -H "Authorization: Bearer eyJhbGciOiJSUzI1NiIsInR5cCI6IkpXVCJ9..." \
  http://localhost:3000/api/protected
ผลลัพธ์ที่คาดหวัง:
{
  "auth": {
    "sub": "user123",
    "clientId": "app456",
    "organizationId": "org789",
    "scopes": ["api:read", "api:write"],
    "audience": ["https://your-api-resource-indicator"]
  }
}
ไม่มีโทเค็น
curl http://localhost:3000/api/protected
ผลลัพธ์ที่คาดหวัง (401):
{
  "error": "Authorization header is missing"
}
โทเค็นไม่ถูกต้อง
curl -H "Authorization: Bearer invalid-token" \
  http://localhost:3000/api/protected
ผลลัพธ์ที่คาดหวัง (401):
{
  "error": "Invalid token"
}
การทดสอบเฉพาะโมเดลสิทธิ์ (Permission model-specific testing)
- ทรัพยากร API ระดับโกลบอล (Global API resources)
- สิทธิ์ขององค์กร (ไม่ใช่ API) (Organization (non-API) permissions)
- ทรัพยากร API ระดับองค์กร (Organization-level API resources)
กรณีทดสอบสำหรับ API ที่ได้รับการป้องกันด้วย global scopes:
- ขอบเขตถูกต้อง: ทดสอบด้วยโทเค็นที่มีขอบเขต API ที่ต้องการ (เช่น
api:read,api:write) - ขาดขอบเขต: คาดหวัง 403 Forbidden เมื่อโทเค็นไม่มีขอบเขตที่จำเป็น
- audience ไม่ถูกต้อง: คาดหวัง 403 Forbidden เมื่อ audience ไม่ตรงกับทรัพยากร API
# โทเค็นที่ขาดขอบเขต - คาดหวัง 403
curl -H "Authorization: Bearer token-without-required-scopes" \
  http://localhost:3000/api/protected
กรณีทดสอบสำหรับการควบคุมการเข้าถึงเฉพาะองค์กร:
- โทเค็นองค์กรถูกต้อง: ทดสอบด้วยโทเค็นที่มี context ขององค์กรที่ถูกต้อง (organization ID และ scopes)
- ขาดขอบเขต: คาดหวัง 403 Forbidden เมื่อผู้ใช้ไม่มีสิทธิ์สำหรับการกระทำที่ร้องขอ
- องค์กรไม่ถูกต้อง: คาดหวัง 403 Forbidden เมื่อ audience ไม่ตรงกับ context ขององค์กร (
urn:logto:organization:<organization_id>)
# โทเค็นสำหรับองค์กรผิด - คาดหวัง 403
curl -H "Authorization: Bearer token-for-different-organization" \
  http://localhost:3000/api/protected
กรณีทดสอบที่ผสมผสานการตรวจสอบทรัพยากร API กับ context ขององค์กร:
- องค์กร + ขอบเขต API ถูกต้อง: ทดสอบด้วยโทเค็นที่มีทั้ง context ขององค์กรและขอบเขต API ที่ต้องการ
- ขาดขอบเขต API: คาดหวัง 403 Forbidden เมื่อโทเค็นองค์กรไม่มีสิทธิ์ API ที่จำเป็น
- องค์กรไม่ถูกต้อง: คาดหวัง 403 Forbidden เมื่อเข้าถึง API ด้วยโทเค็นจากองค์กรอื่น
- audience ไม่ถูกต้อง: คาดหวัง 403 Forbidden เมื่อ audience ไม่ตรงกับทรัพยากร API ระดับองค์กร
# โทเค็นองค์กรที่ไม่มีขอบเขต API - คาดหวัง 403
curl -H "Authorization: Bearer organization-token-without-api-scopes" \
  http://localhost:3000/api/protected
อ่านเพิ่มเติม
RBAC ในทางปฏิบัติ: การนำการอนุญาต (Authorization) ที่ปลอดภัยมาใช้กับแอปพลิเคชันของคุณ
สร้างแอปพลิเคชัน SaaS แบบหลายผู้เช่า: คู่มือฉบับสมบูรณ์ตั้งแต่การออกแบบจนถึงการนำไปใช้