Protect global API resources
Protect product-wide APIs using role-based access control (RBAC) in Logto. Assign global roles and permissions to control access for all users and clients across your application.
What are global API resources?
Global API resources are endpoints or services in your application that are accessible to all users, regardless of organization or tenant. These are typically public-facing APIs, core product services, or any endpoint that is not scoped to a specific organization.
Use cases include
- Public APIs or endpoints shared across your user base.
- Microservices that are not tied to multi-tenancy.
- Core application APIs (e.g.,
/api/users,/api/products) used by all customers.
Logto allows you to secure these APIs using OAuth 2.1, combined with flexible, role-based access control.
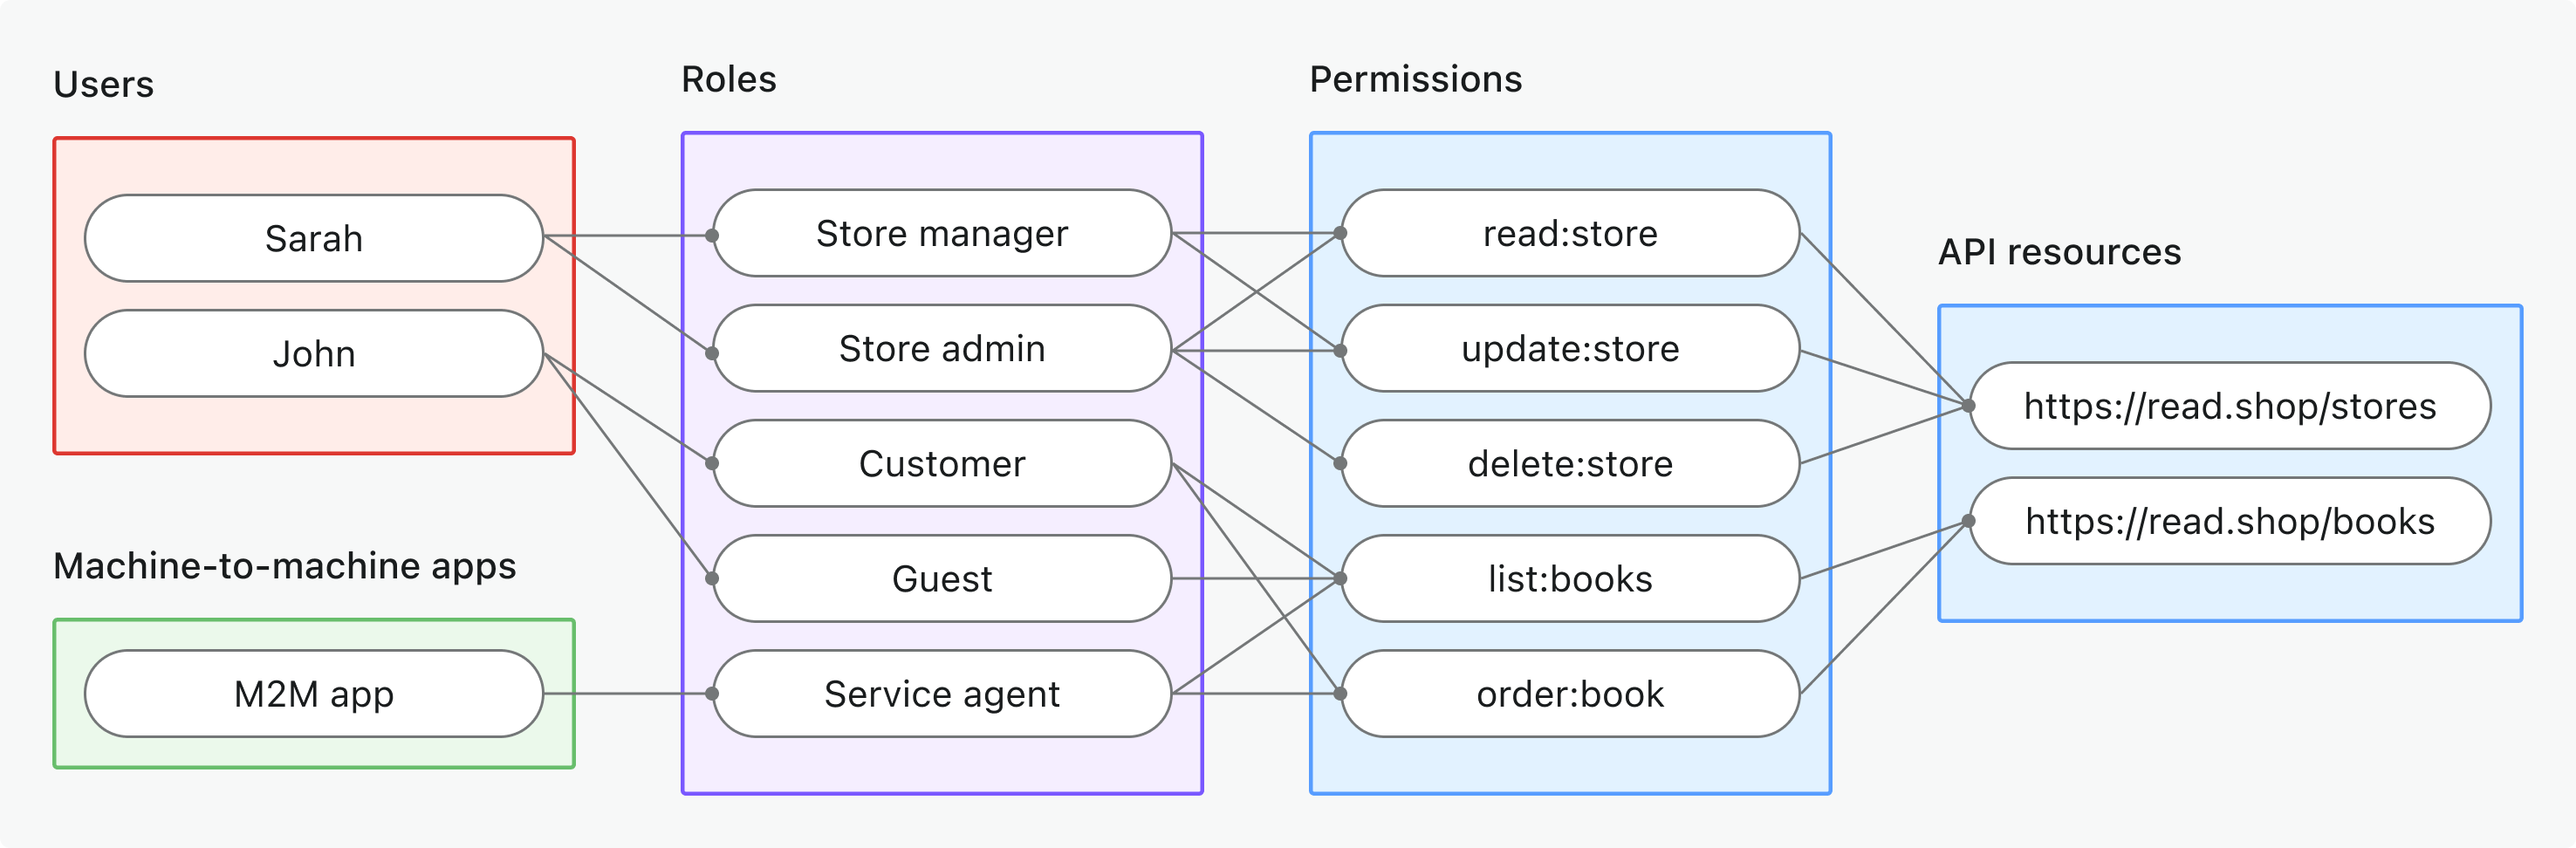
How it works in Logto
- API resources and permissions are registered globally: Each API you want to protect is defined with a unique resource indicator (URI) with a set of permissions (scopes) that control access.
- Access is controlled by global roles: You can assign permissions to roles, which are then assigned to users or clients.
- Separate from organization-level permissions: Global API resources have no organization context. However, they may be used in conjunction with organization roles to provide an additional layer of context if needed. To protect organization-level APIs, see Protect organization-level API resources.
Implementation overview
- Register your API resource and define its permissions in Logto.
- Define roles with the necessary permissions for accessing the API.
- Assign roles to users or clients.
- Use OAuth 2.0 authorization flows to obtain access tokens for the API (resource parameter must match the registered API identifier).
- Validate access tokens in your API to enforce permissions.
Understanding resource indicators
Logto models API resources according to RFC 8707: Resource Indicators for OAuth 2.0. A resource indicator is a URI that uniquely identifies the target API or service being requested.
Key points
- Resource indicators must be absolute URIs (e.g.,
https://api.example.com) - No fragment component; avoid using query strings when possible.
- Resource indicators enable audience-restricted tokens and support for multi-API architectures.
Example
- Management API:
https://my-tenant.logto.app/api - Custom global API:
https://api.yourapp.com
Authorization flow: authenticating and securing your API
The flow below applies to both interactive user authentication (browser/app) and backend machine-to-machine (M2M) scenarios.
Please note that the flow does not include exhaustive details about the required parameters or headers, but focuses on the key steps involved. Continue reading to see how the flow works in practice.
User authentication = browser/app. M2M = backend service or script using client credentials.
The resource parameter must exactly match the API identifier (resource indicator) you registered in Logto.
Implementation steps
Register your API resources
- Go to Console → API resources.
- Create a new API resource (e.g.,
https://api.yourapp.com/org) and define its permissions (scopes).
For full configuration steps, see Define API resources with permissions.
Set up global roles
- Go to Console → Roles.
- Create roles that map to your API permissions (e.g.,
read:products,write:products). - Assign these roles to users or clients that need access to the API.
For full configuration steps, see Use global roles.
Obtain access tokens for global API resources
Before accessing a global API resource, your client must obtain an access token. Logto issues JSON Web Tokens (JWTs) as access tokens for global API resources. This is typically done using the OAuth 2.0 authorization code flow, refresh token flow, or the client credentials flow.
Authorization code or refresh token flow
All Logto official SDKs support obtaining access tokens for global API resources using the refresh token flow out of the box. A standard OAuth 2.0 / OIDC client library can also be used to implement this flow.
- Logto SDK
- OAuth 2.0 / OIDC client library
When initializing the Logto client, add the resource indicator to the resources parameter (array), then add desired permissions (scopes) to the scopes parameter.
Once the user is authenticated, pass the resource indicator in the resource parameter or similarly named parameter when requesting the access token (e.g., calling getAccessToken()).
For details on each SDK, see the Quick starts.
When configuring your OAuth 2.0 client or initializing the authorization code flow, ensure you include the resource parameter and the desired scopes in the authorization request.
Some libraries may not support the resource parameter natively, but usually allow you to pass additional parameters in the authorization request. Check your library's documentation for details.
Here's a non-normative example of the authorization request with the resource and scope parameters:
GET /oidc/auth?response_type=code
&client_id=your-client-id
&redirect_uri=https://your-app.com/callback
&scope=openid profile offline_access read:products write:products
&resource=https://api.your-app.com
&code_challenge=abc123
&code_challenge_method=S256
&state=xyz
HTTP/1.1
Host: your.logto.endpoint
Once the user is authenticated, you will receive an authorization code. Exchange this code for an access token by making a POST request to Logto's /oidc/token endpoint, including the resource parameter in the request body.
Here's a non-normative example of the token request using the authorization code grant type:
POST /oidc/token HTTP/1.1
Host: your.logto.endpoint
Content-Type: application/x-www-form-urlencoded
Authorization: Basic base64(client_id:client_secret)

grant_type=authorization_code
&code=authorization-code-received
&redirect_uri=https://your-app.com/callback
&resource=https://api.your-app.com
You can also use the refresh_token grant type to obtain a new access token without user interaction, as long as the resource parameter is included in the request.
Here's a non-normative example of the token request using the refresh token grant type:
POST /oidc/token HTTP/1.1
Host: your.logto.endpoint
Content-Type: application/x-www-form-urlencoded
Authorization: Basic base64(client_id:client_secret)

grant_type=refresh_token
&refresh_token=your-refresh-token
&resource=https://api.your-app.com
Client credentials flow
For machine-to-machine (M2M) scenarios, you can use the client credentials flow to obtain an access token for your global API resource. By making a POST request to Logto's /oidc/token endpoint, you can request an access token using your client ID and secret.
There are two key parameters to include in the request:
resource: The resource indicator URI of the API you want to access (e.g.,https://api.yourapp.com).scope: The permissions you want to request for the API (e.g.,read:products write:products).
Here's a non-normative example of the token request using the client credentials grant type:
POST /oidc/token HTTP/1.1
Host: your.logto.endpoint
Content-Type: application/x-www-form-urlencoded
Authorization: Basic base64(client_id:client_secret)

grant_type=client_credentials
&resource=https://api.yourapp.com
&scope=read:products write:products
Validating JWT access tokens in your API
Logto-issued JWTs contain claims that your API can use to enforce authorization.
When your API receives a request with a Logto-issued access token, you should:
- Verify the token signature (using Logto's JWKs).
- Confirm the token is not expired (
expclaim). - Check that the
iss(issuer) matches your Logto endpoint. - Ensure the
aud(audience) matches the API resource identifier you registered (e.g.,https://api.yourapp.com). - Split the
scopeclaim (space-separated) and check for required permissions.
For step-by-step and language-specific guides, see How to validate access tokens.
Optional: Handle user permission change
👷 Work in progress. 🚧
Best practices and security tips
- Keep permissions business-driven: Use clear names that map to real actions.
- Keep token expiration short: Reduces risk if a token is leaked.
- Limit granted scopes: Only give tokens the permissions they actually need.
- Use audience restriction: Always verify the
audclaim to prevent misuse.
FAQs
What if my client doesn't support the resource parameter?
Set a default API resource in Logto Console. Tokens will default to this audience when no resource parameter is specified in the token request.
Why do I get 401 Unauthorized from my API?
Check the following common issues:
- Token signature: Verify your backend is fetching the correct JWKs from Logto
- Token expiration: Ensure the token hasn't expired (
expclaim) - Audience: Confirm the
audclaim matches your registered API resource indicator - Required scopes: Verify the token contains the necessary permissions in the
scopeclaim
How do I test without a full client?
Use a personal access token to simulate authenticated calls. This allows you to test your API endpoints without implementing a complete OAuth flow in your client application.
Further reading
How to validate access tokensRBAC in practice: Implementing secure authorization for your application
Customizing token claims RFC 8707: Resource Indicators