Logto は、モダンなアプリや SaaS 製品向けに設計された Auth0 の代替です。 Cloud と オープンソース の両方のサービスを提供し、アイデンティティと管理 (IAM) システムを迅速に立ち上げるのに役立ちます。認証 (Authentication)、認可 (Authorization)、マルチテナント管理を すべて一つに まとめて楽しんでください。
Logto Cloud で無料の開発テナントから始めることをお勧めします。これにより、すべての機能を簡単に探索できます。
この記事では、Android (Kotlin / Java) と Logto を使用して、Okta enterprise SSO サインイン体験(ユーザー認証 (Authentication))を迅速に構築する手順を説明します。
前提条件
- 稼働中の Logto インスタンス。紹介ページ をチェックして始めてください。
- Android (Kotlin / Java) の基本的な知識。
- 使用可能な Okta enterprise SSO アカウント。
Create an application in Logto
Logto は OpenID Connect (OIDC) 認証 (Authentication) と OAuth 2.0 認可 (Authorization) に基づいています。これは、複数のアプリケーション間でのフェデレーテッドアイデンティティ管理をサポートし、一般的にシングルサインオン (SSO) と呼ばれます。
あなたの ネイティブアプリ アプリケーションを作成するには、次の手順に従ってください:
- Logto コンソール を開きます。「Get started」セクションで、「View all」リンクをクリックしてアプリケーションフレームワークのリストを開きます。あるいは、Logto Console > Applications に移動し、「Create application」ボタンをクリックします。
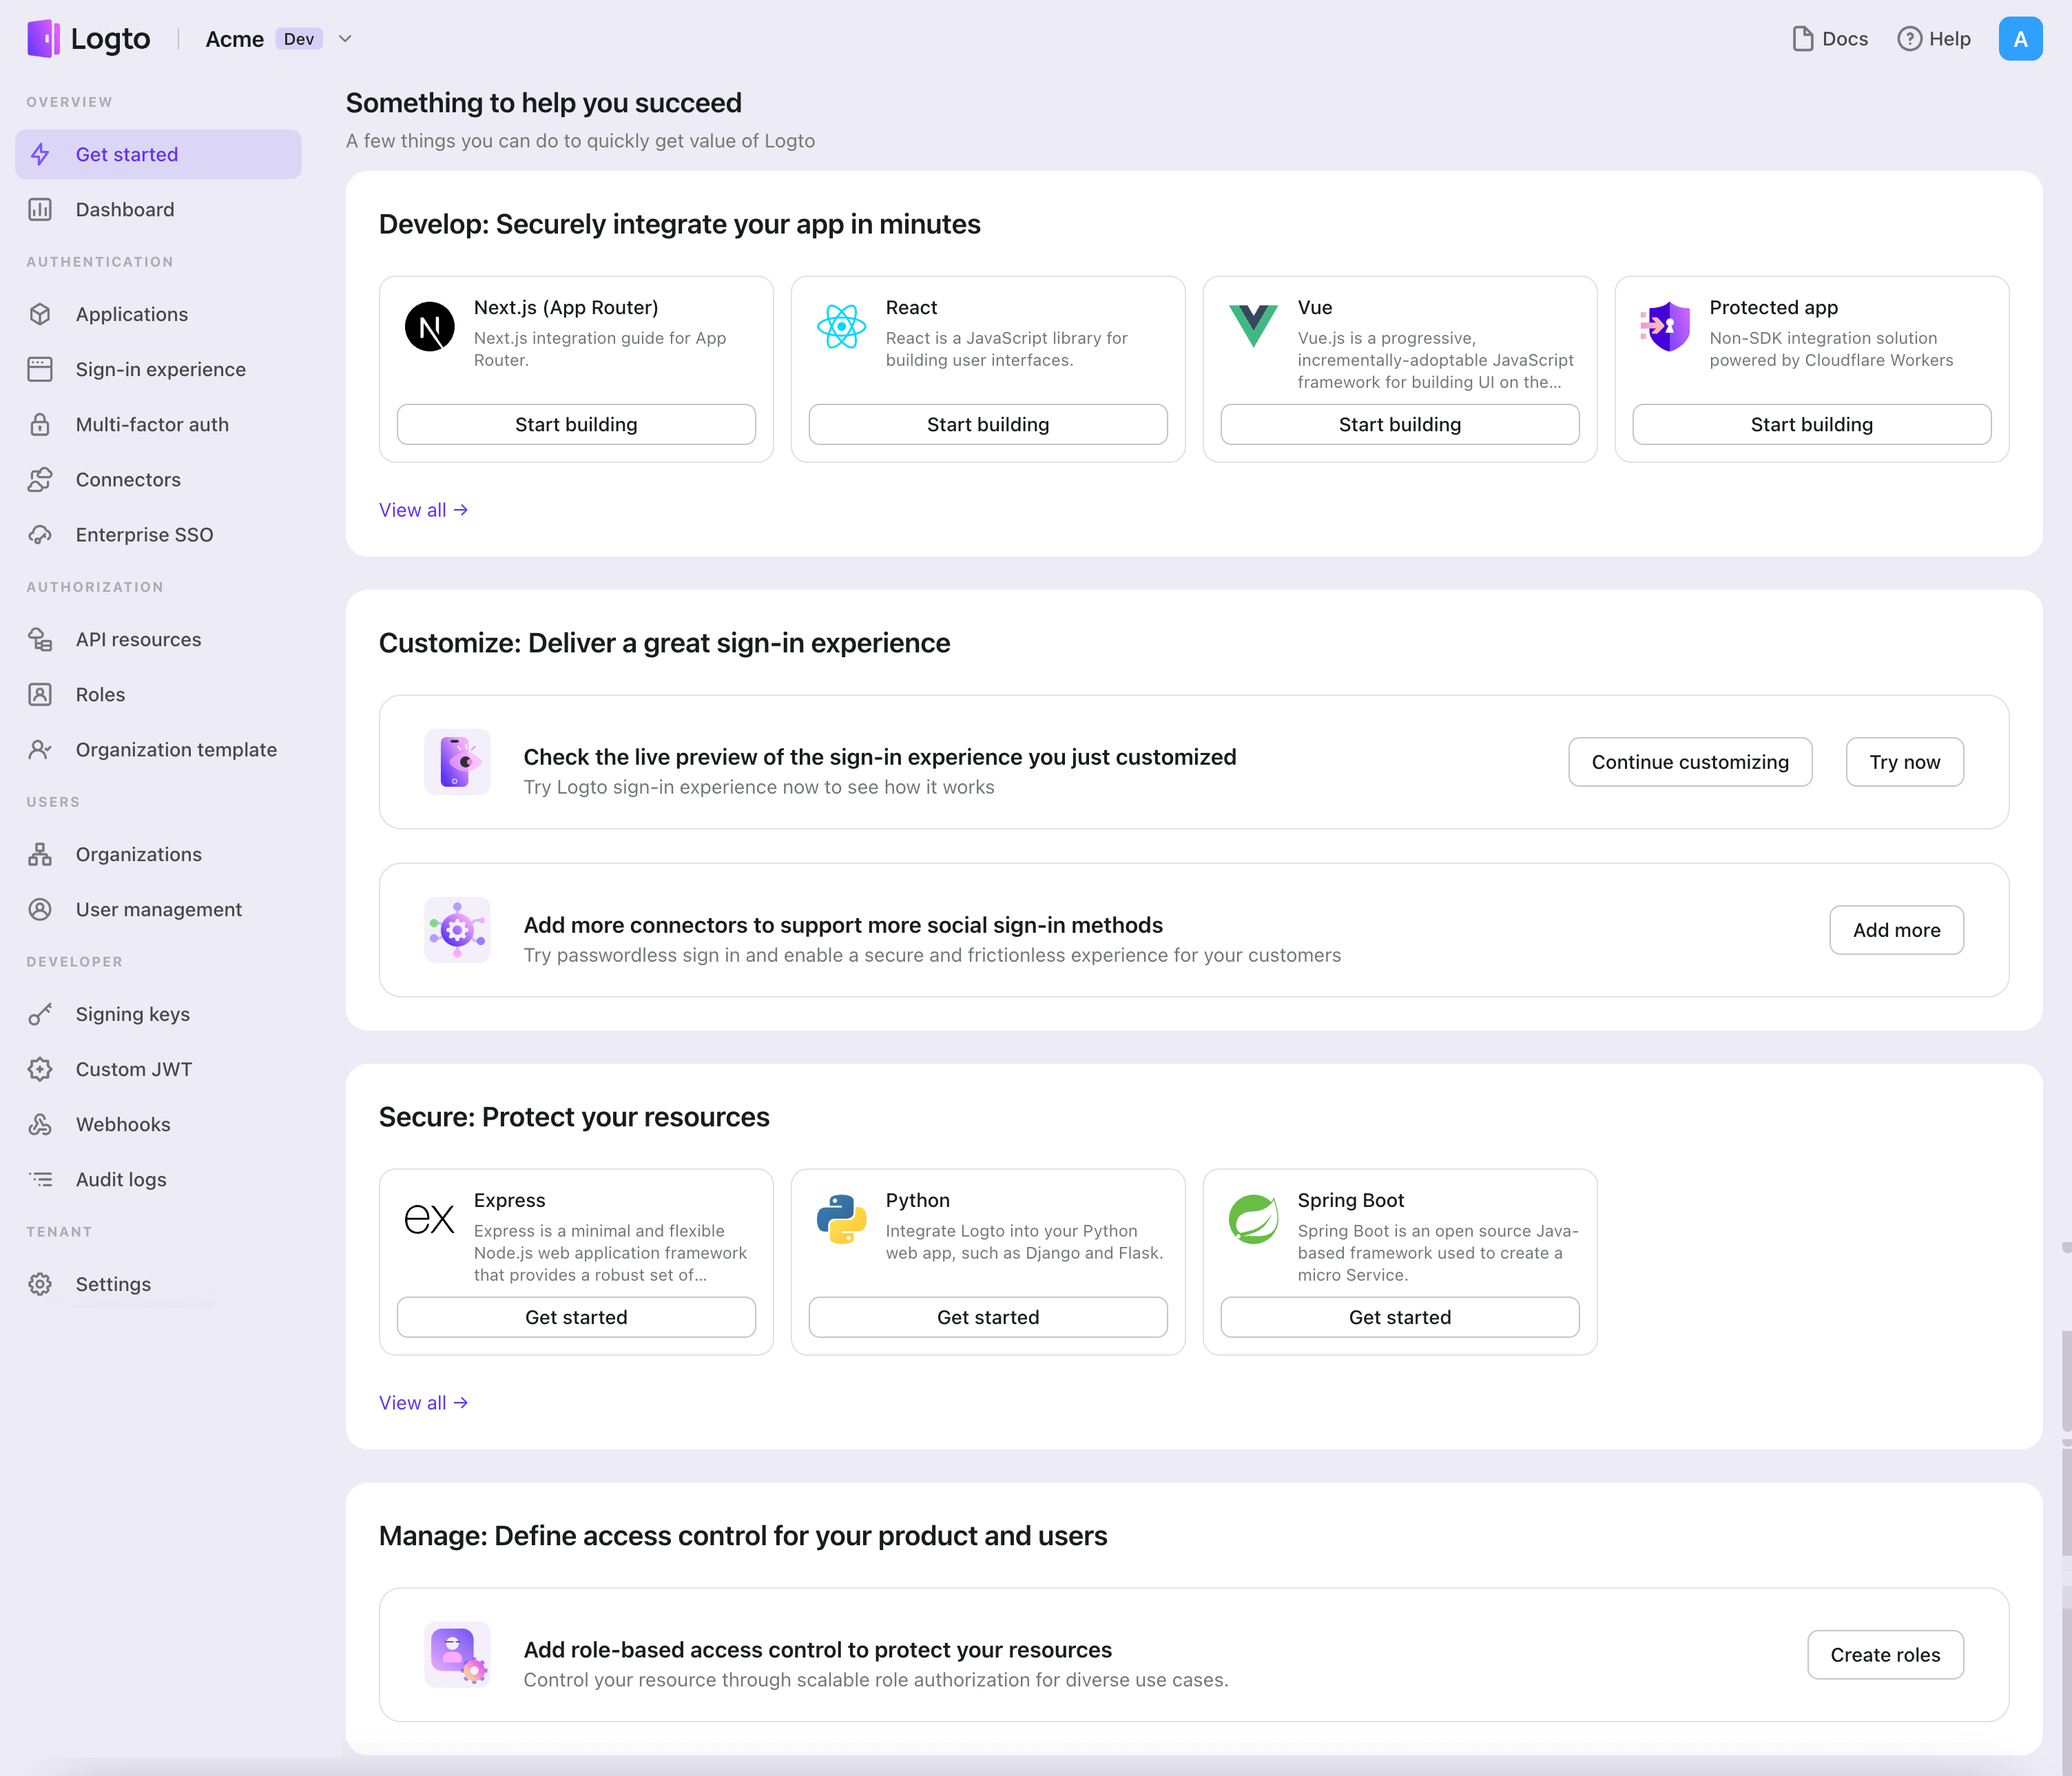
- 開いたモーダルで、左側のクイックフィルターチェックボックスを使用して、利用可能なすべての "ネイティブアプリ" フレームワークをフィルタリングするか、"ネイティブアプリ" セクションをクリックします。"Android" フレームワークカードをクリックして、アプリケーションの作成を開始します。
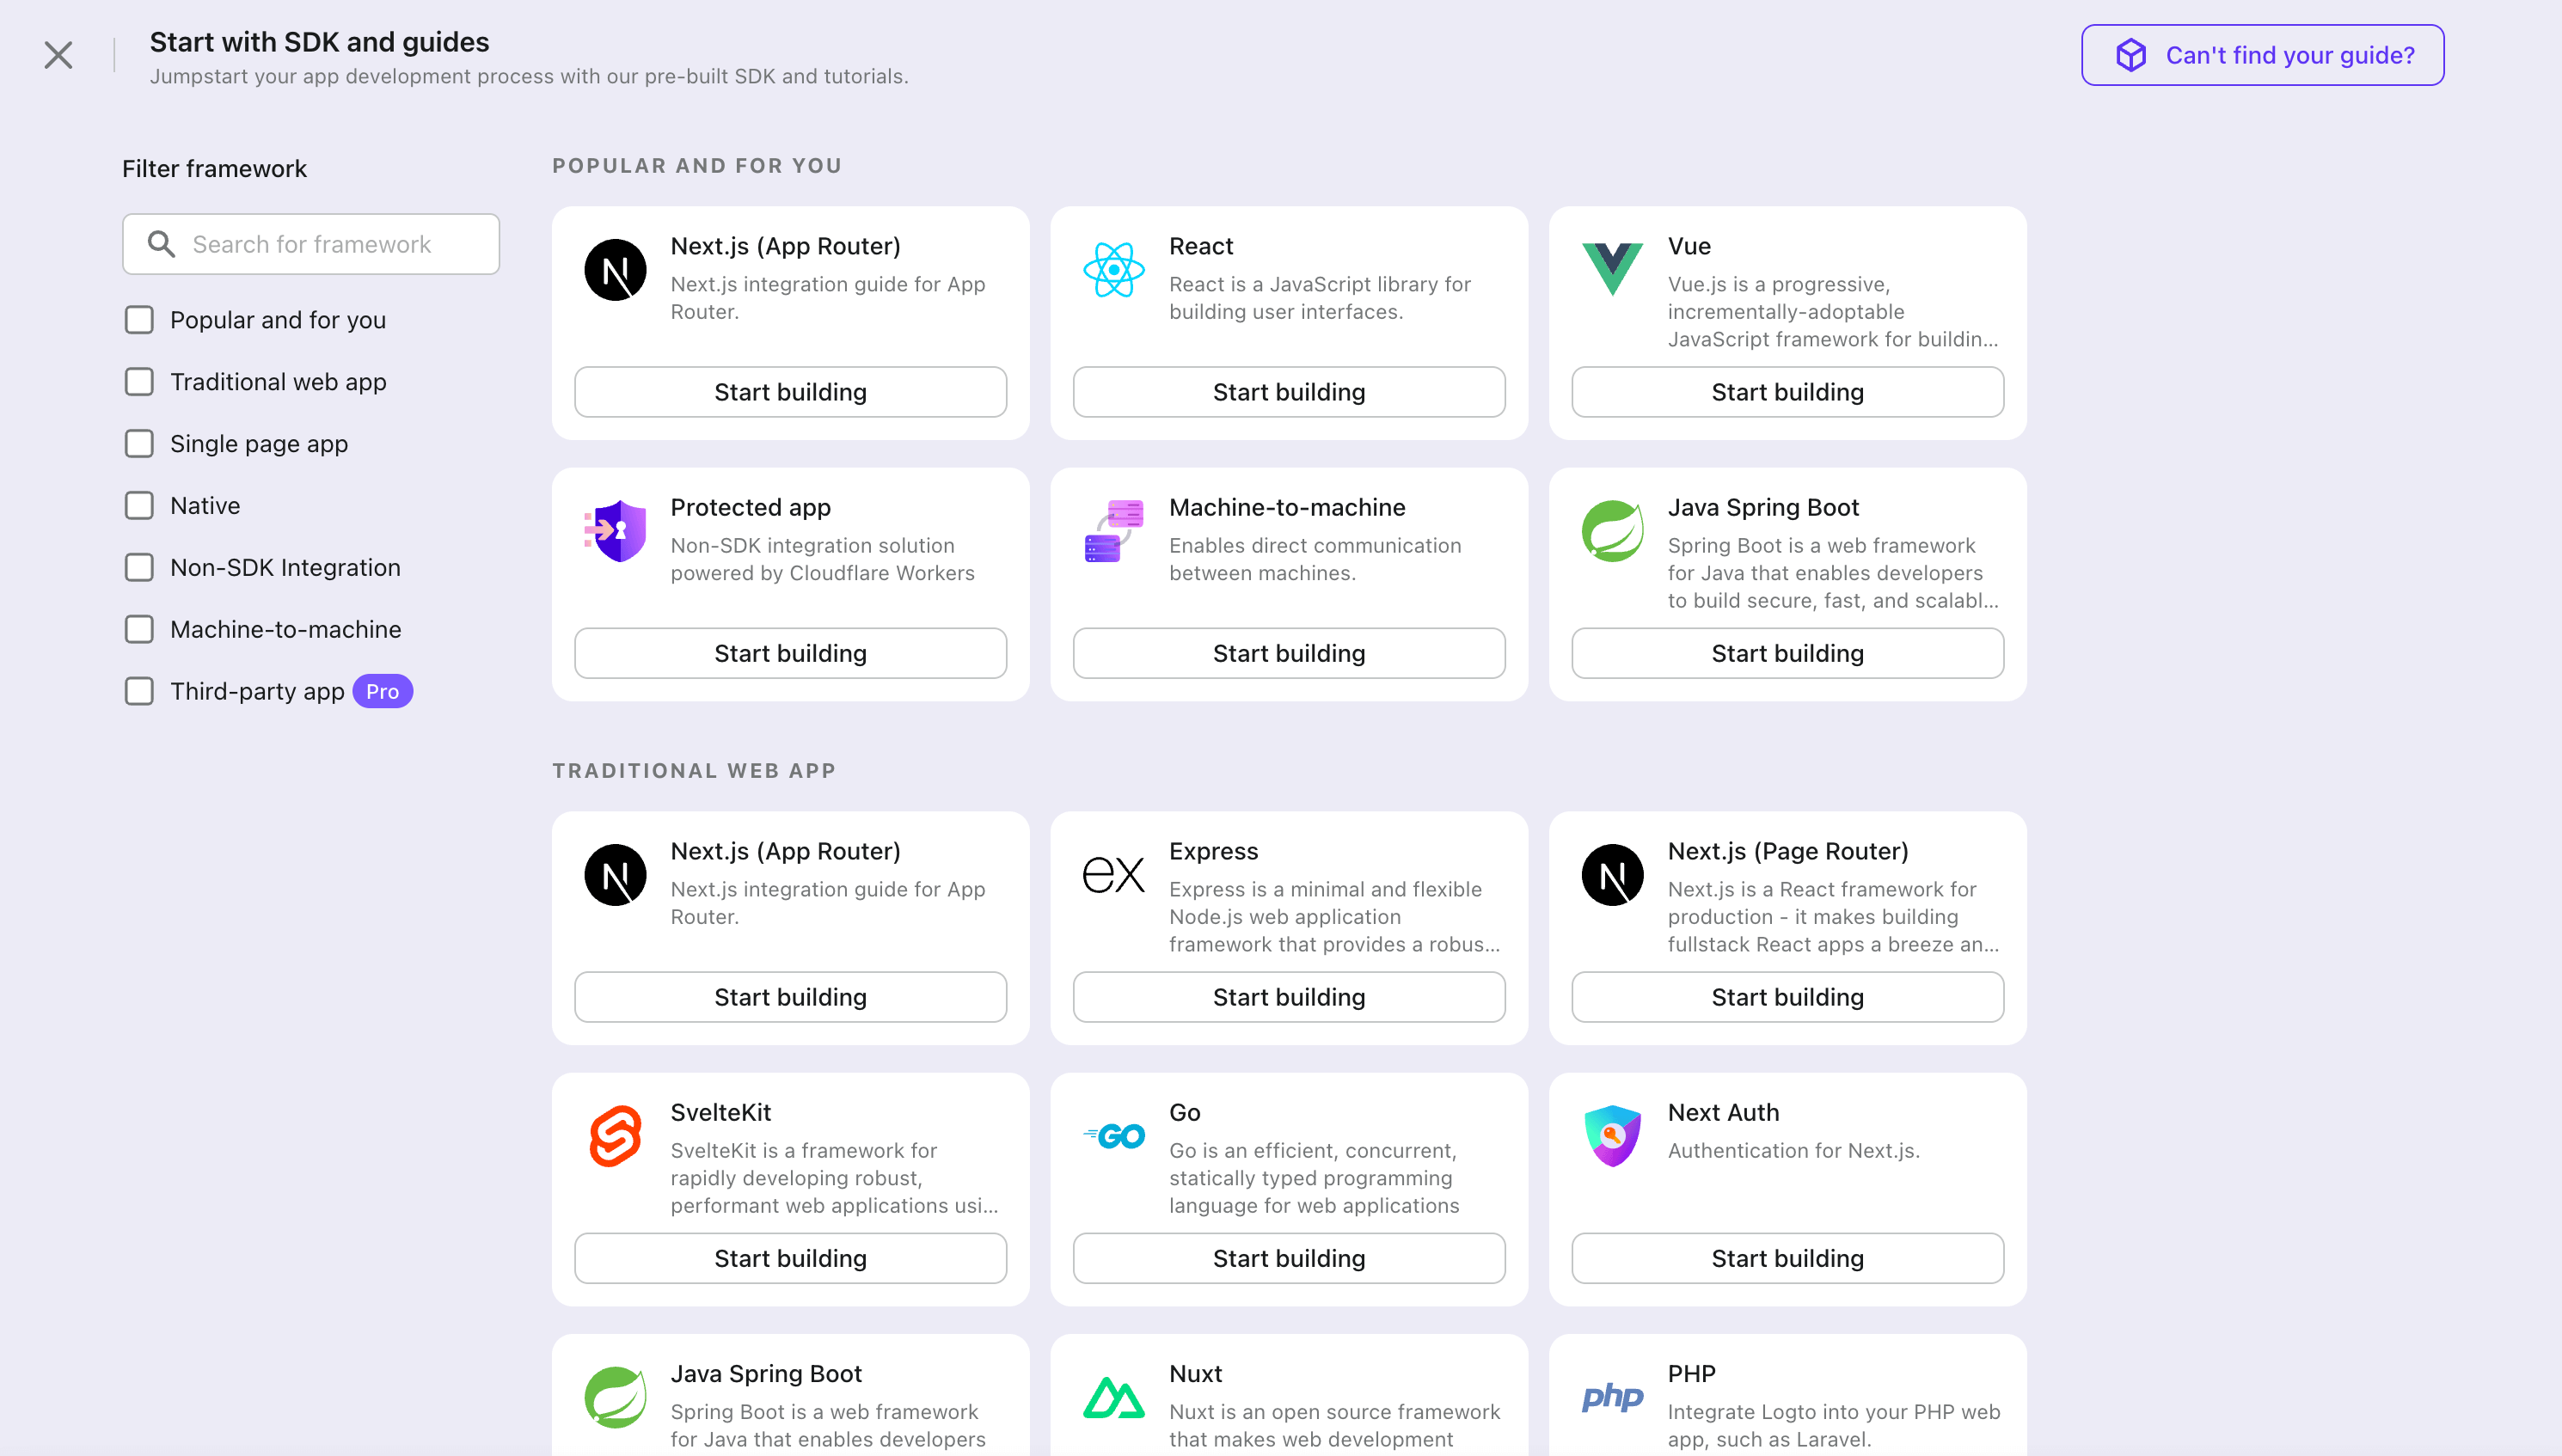
- アプリケーション名を入力します。例:「Bookstore」と入力し、「Create application」をクリックします。
🎉 タダーン!Logto で最初のアプリケーションを作成しました。詳細な統合ガイドを含むお祝いページが表示されます。ガイドに従って、アプリケーションでの体験を確認してください。
Integrate Android SDK
- この例は View システム と View Model に基づいていますが、Jetpack Compose を使用する場合でも概念は同じです。
- この例は Kotlin で書かれていますが、Java でも概念は同じです。
- Kotlin と Java のサンプルプロジェクトは、私たちの SDK リポジトリ で利用可能です。
- チュートリアルビデオは、私たちの YouTube チャンネル で視聴できます。
インストール
Logto Android SDK のサポートされている最小 Android API レベルはレベル 24 です。
Logto Android SDK をインストールする前に、Gradle プロジェクトのビルドファイルで mavenCentral() がリポジトリ設定に追加されていることを確認してください:
dependencyResolutionManagement {
  repositories {
    mavenCentral()
  }
}
Logto Android SDK を依存関係に追加します:
- Kotlin
- Groovy
dependencies {
  implementation("io.logto.sdk:android:1.1.3")
}
dependencies {
  implementation 'io.logto.sdk:android:1.1.3'
}
SDK はインターネットアクセスが必要なため、次の権限を AndroidManifest.xml ファイルに追加する必要があります:
<?xml version="1.0" encoding="utf-8"?>
<manifest xmlns:android="http://schemas.android.com/apk/res/android"
  xmlns:tools="http://schemas.android.com/tools">

  <!-- インターネット権限を追加 -->
  <uses-permission android:name="android.permission.INTERNET" />

  <!-- その他の設定... -->
</manifest>
LogtoClient の初期化
LogtoViewModel.kt を作成し、このビューモデルで LogtoClient を初期化します:
//...他のインポート
import io.logto.sdk.android.LogtoClient
import io.logto.sdk.android.type.LogtoConfig

class LogtoViewModel(application: Application) : AndroidViewModel(application) {
    private val logtoConfig = LogtoConfig(
          endpoint = "<your-logto-endpoint>",
          appId = "<your-app-id>",
          scopes = null,
          resources = null,
          usingPersistStorage = true,
    )

    private val logtoClient = LogtoClient(logtoConfig, application)

    companion object {
        val Factory: ViewModelProvider.Factory = object : ViewModelProvider.Factory {
            @Suppress("UNCHECKED_CAST")
            override fun <T : ViewModel> create(
                modelClass: Class<T>,
                extras: CreationExtras
            ): T {
                // extras から Application オブジェクトを取得
                val application = checkNotNull(extras[APPLICATION_KEY])
                return LogtoViewModel(application) as T
            }
        }
    }
}
次に、MainActivity.kt のために LogtoViewModel を作成します:
//...他のインポート
class MainActivity : AppCompatActivity() {
    private val logtoViewModel: LogtoViewModel by viewModels { LogtoViewModel.Factory }
    //...他のコード
}
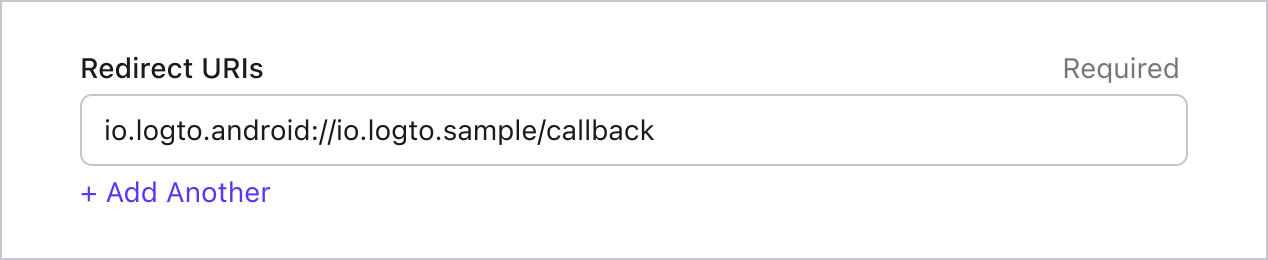
リダイレクト URI の設定
Logto コンソールのアプリケーション詳細ページに切り替えましょう。リダイレクト URI io.logto.android://io.logto.sample/callback を追加し、「変更を保存」をクリックします。
サインインとサインアウトの実装
logtoClient.signIn を呼び出す前に、Admin Console でリダイレクト URI
が正しく設定されていることを確認してください。 :::
logtoClient.signIn を使用してユーザーをサインインし、logtoClient.signOut を使用してユーザーをサインアウトできます。
例えば、Android アプリでは次のようにします:
//...他のインポートと共に
class LogtoViewModel(application: Application) : AndroidViewModel(application) {
    // ...他のコード

    // 認証 (Authentication) 状態を監視するライブデータを追加
    private val _authenticated = MutableLiveData(logtoClient.isAuthenticated)
    val authenticated: LiveData<Boolean>
        get() = _authenticated

    fun signIn(context: Activity) {
        logtoClient.signIn(context, "io.logto.android://io.logto.sample/callback") { logtoException ->
            logtoException?.let { println(it) }
            // ライブデータを更新
            _authenticated.postValue(logtoClient.isAuthenticated)
        }
    }

    fun signOut() {
        logtoClient.signOut { logtoException ->
            logtoException?.let { println(it) }
            // ライブデータを更新
            _authenticated.postValue(logtoClient.isAuthenticated)
        }
    }
}
次に、アクティビティ内で signIn と signOut メソッドを呼び出します:
class MainActivity : AppCompatActivity() {
    override fun onCreate(savedInstanceState: Bundle?) {
        //...他のコード

        // レイアウトに id "sign_in_button" を持つボタンがあると仮定
        val signInButton = findViewById<Button>(R.id.sign_in_button)
        signInButton.setOnClickListener {
            logtoViewModel.signIn(this)
        }

        // レイアウトに id "sign_out_button" を持つボタンがあると仮定
        val signOutButton = findViewById<Button>(R.id.sign_out_button)
        signOutButton.setOnClickListener {
            if (logtoViewModel.authenticated) { // ユーザーが認証 (Authentication) されているか確認
                logtoViewModel.signOut()
            }
        }

        // 認証 (Authentication) 状態を監視して UI を更新
        logtoViewModel.authenticated.observe(this) { authenticated ->
            if (authenticated) {
                // ユーザーは認証 (Authentication) されています
                signInButton.visibility = View.GONE
                signOutButton.visibility = View.VISIBLE
            } else {
                // ユーザーは認証 (Authentication) されていません
                signInButton.visibility = View.VISIBLE
                signOutButton.visibility = View.GONE
            }
        }

    }
}
チェックポイント: アプリケーションをテストする
これで、アプリケーションをテストできます:
- アプリケーションを実行すると、サインインボタンが表示されます。
- サインインボタンをクリックすると、SDK がサインインプロセスを初期化し、Logto のサインインページにリダイレクトされます。
- サインインすると、アプリケーションに戻り、サインアウトボタンが表示されます。
- サインアウトボタンをクリックして、トークンストレージをクリアし、サインアウトします。
Add Okta enterprise SSO connector
アクセス管理を簡素化し、大規模なクライアント向けにエンタープライズレベルの保護を得るために、Android をフェデレーテッドアイデンティティプロバイダーとして接続します。Logto エンタープライズシングルサインオン (SSO) コネクターは、いくつかのパラメーター入力を許可することで、この接続を数分で確立するのに役立ちます。
エンタープライズ SSO コネクターを追加するには、次の手順に従ってください:
- Logto コンソール > エンタープライズ SSO に移動します。
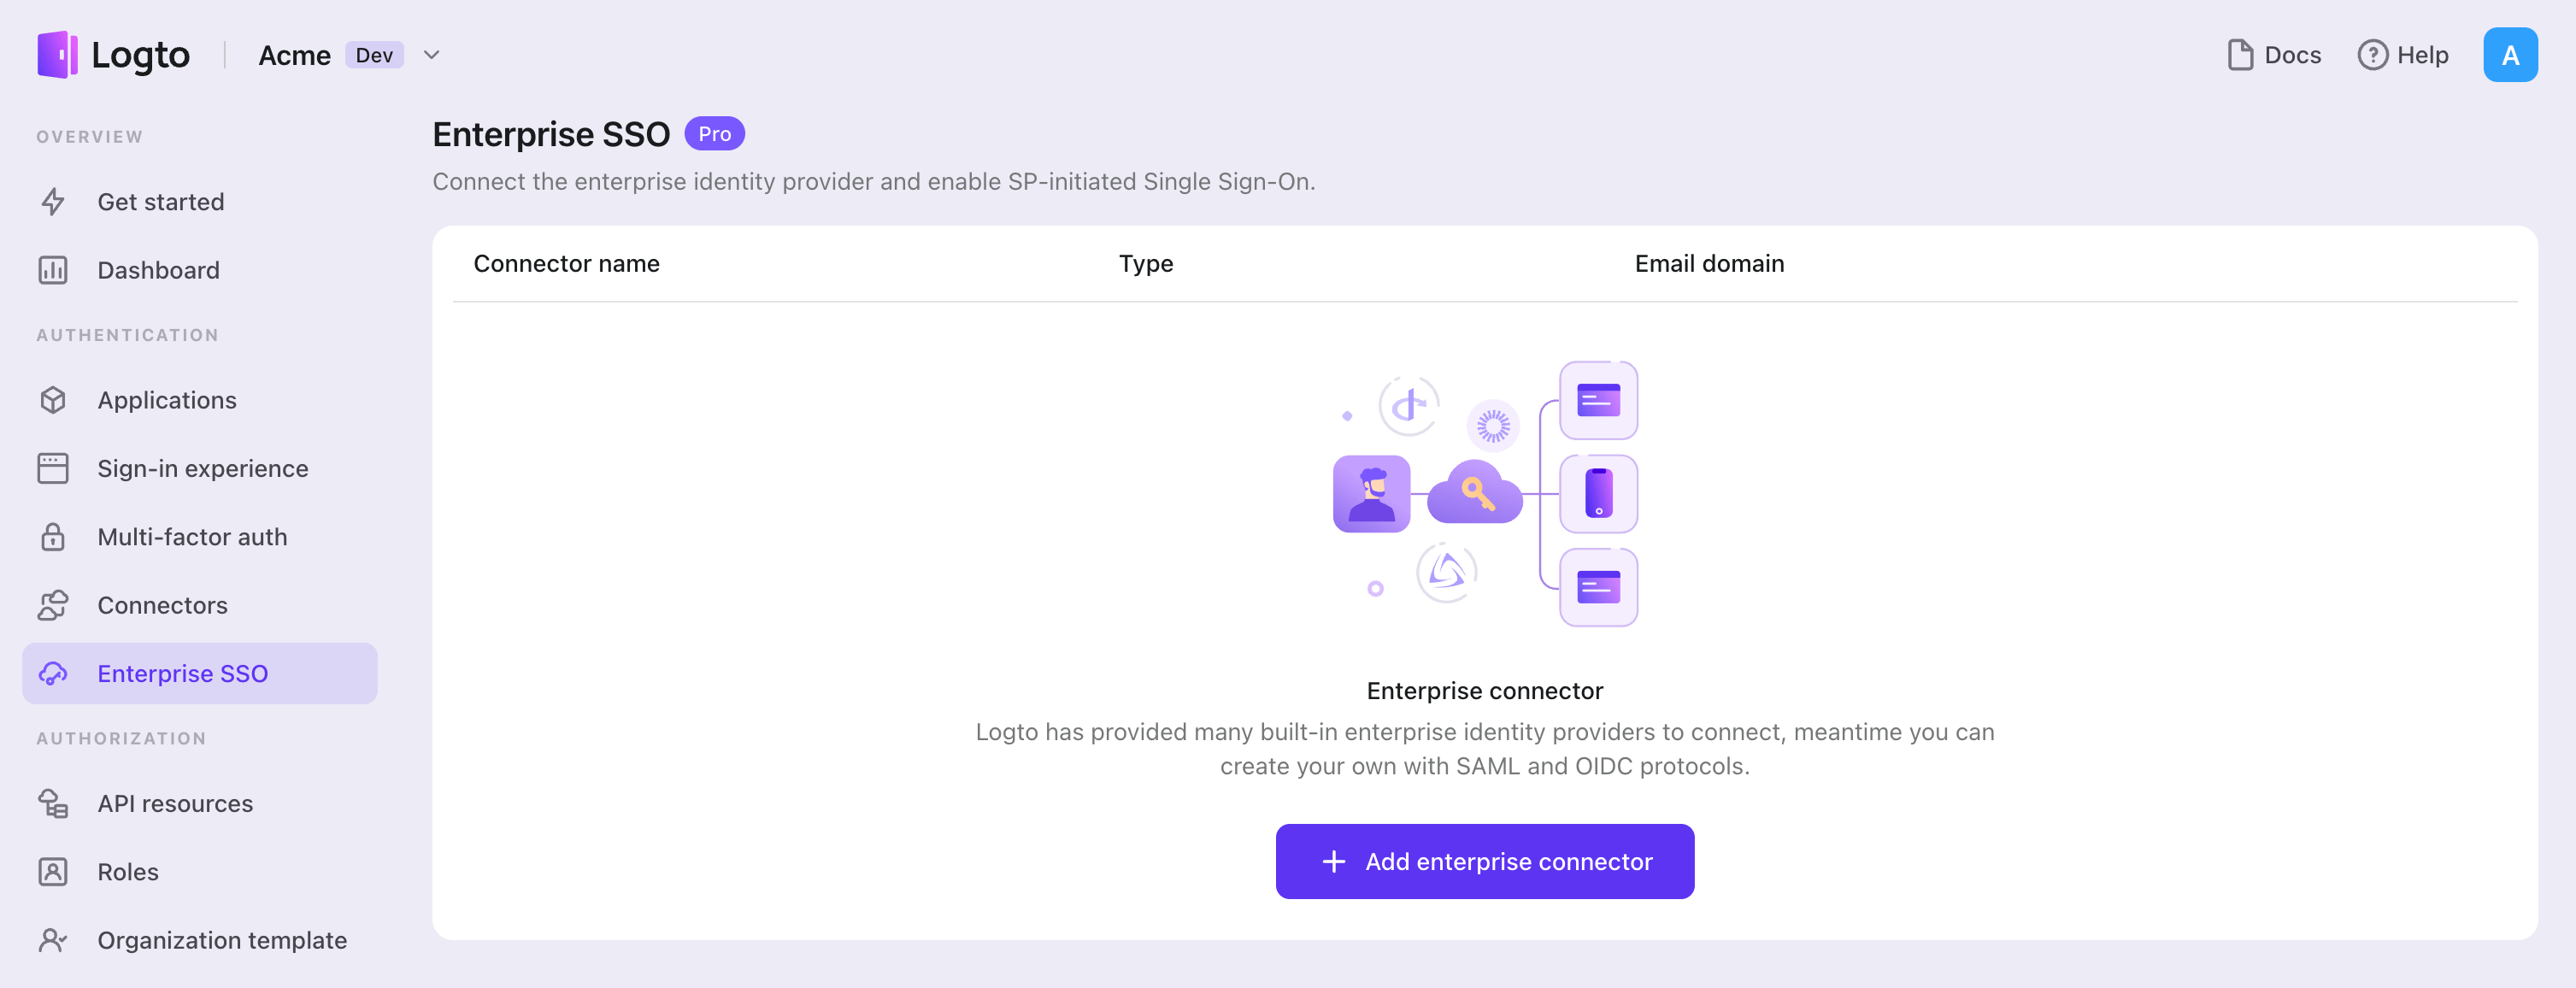
- 「エンタープライズコネクターを追加」ボタンをクリックし、SSO プロバイダーのタイプを選択します。Microsoft Entra ID (Azure AD)、Google Workspace、Okta の事前構築されたコネクターから選択するか、標準の OpenID Connect (OIDC) または SAML プロトコルを使用してカスタム SSO 接続を作成します。
- 一意の名前を指定します(例:Acme Company の SSO サインイン)。
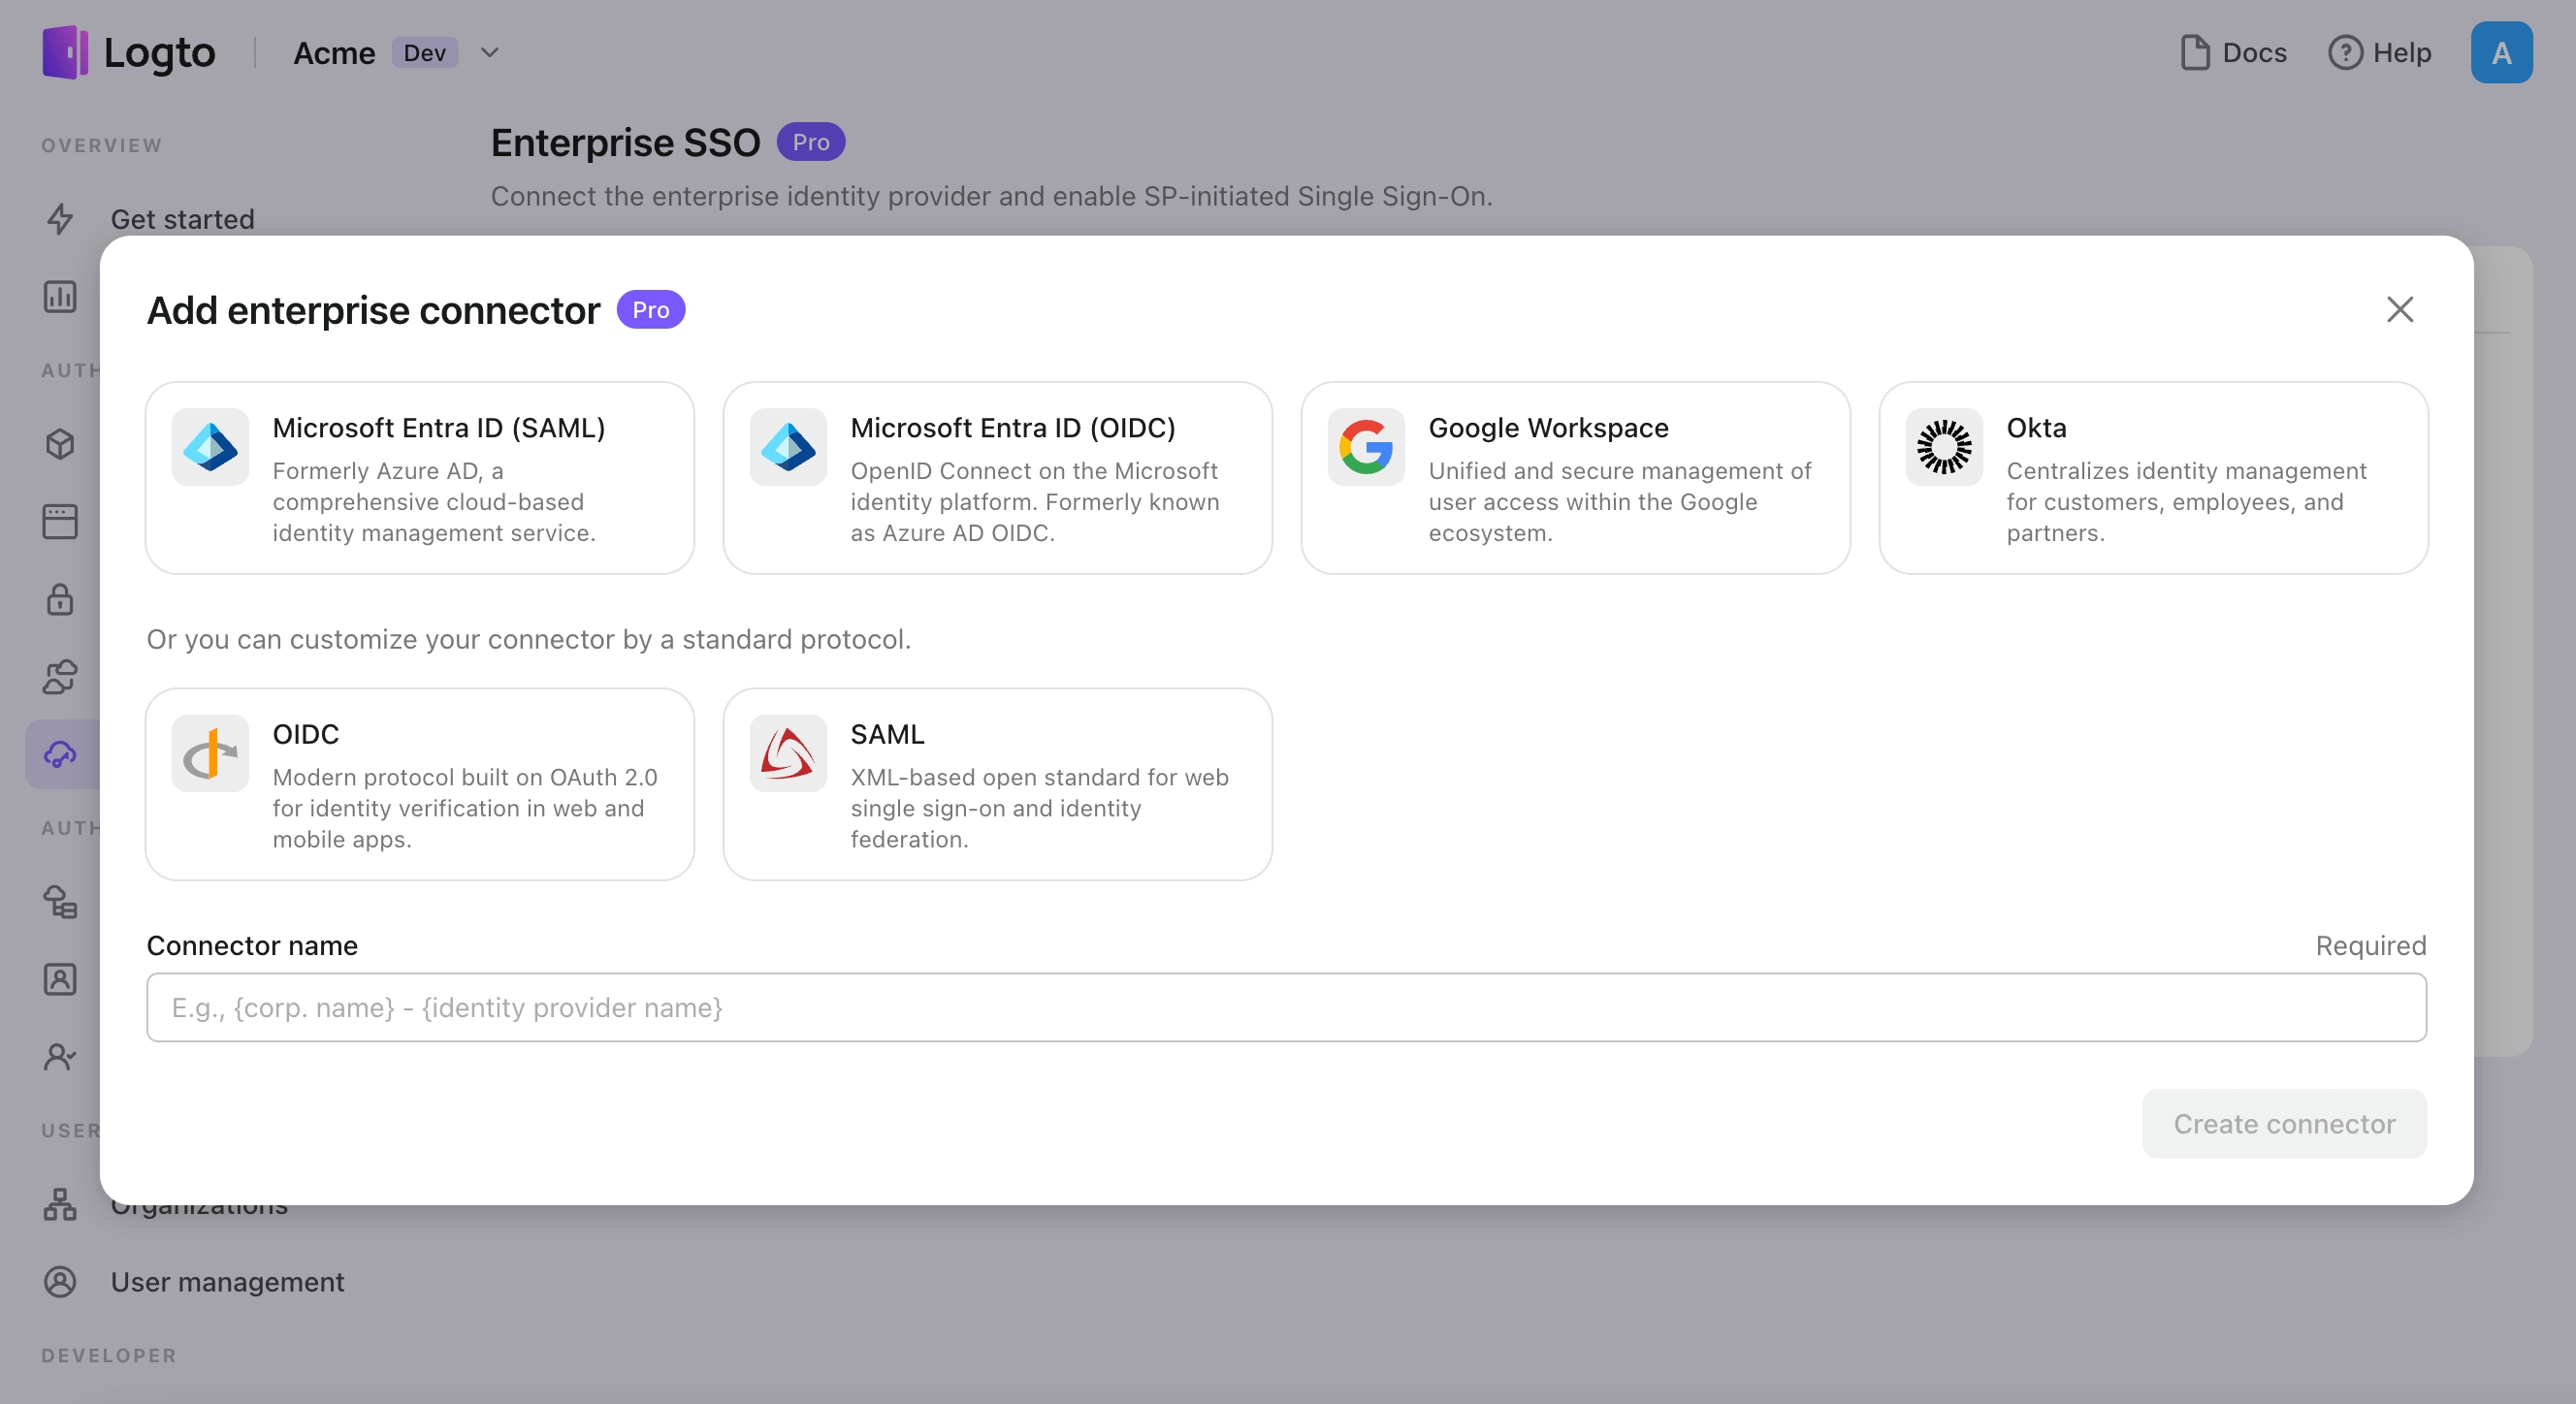
- 「接続」タブで IdP と接続を構成します。各コネクタータイプのガイドを上記で確認してください。
- 「体験 (Experience)」タブで SSO 体験と企業の メールドメイン をカスタマイズします。SSO 対応のメールドメインでサインインするユーザーは、SSO 認証にリダイレクトされます。

- 変更を保存します。
Set up Okta 管理ポータルでの OIDC アプリケーション
ステップ 1: Okta 管理ポータルで OIDC アプリケーションを作成する {#step-1-create-an-oidc-application-on-okta-admin-portal}
- Okta 管理ポータルにアクセスし、管理者としてサインインします。
- サイドメニューを使用して
Applications/Applicationsページに移動します。 Create App Integrationボタンをクリックして、新しい OIDC アプリケーションを作成します。Sign-in methodとしてOIDC - OpenID Connectオプションを選択します。Application typeとしてWeb Applicationオプションを選択します。
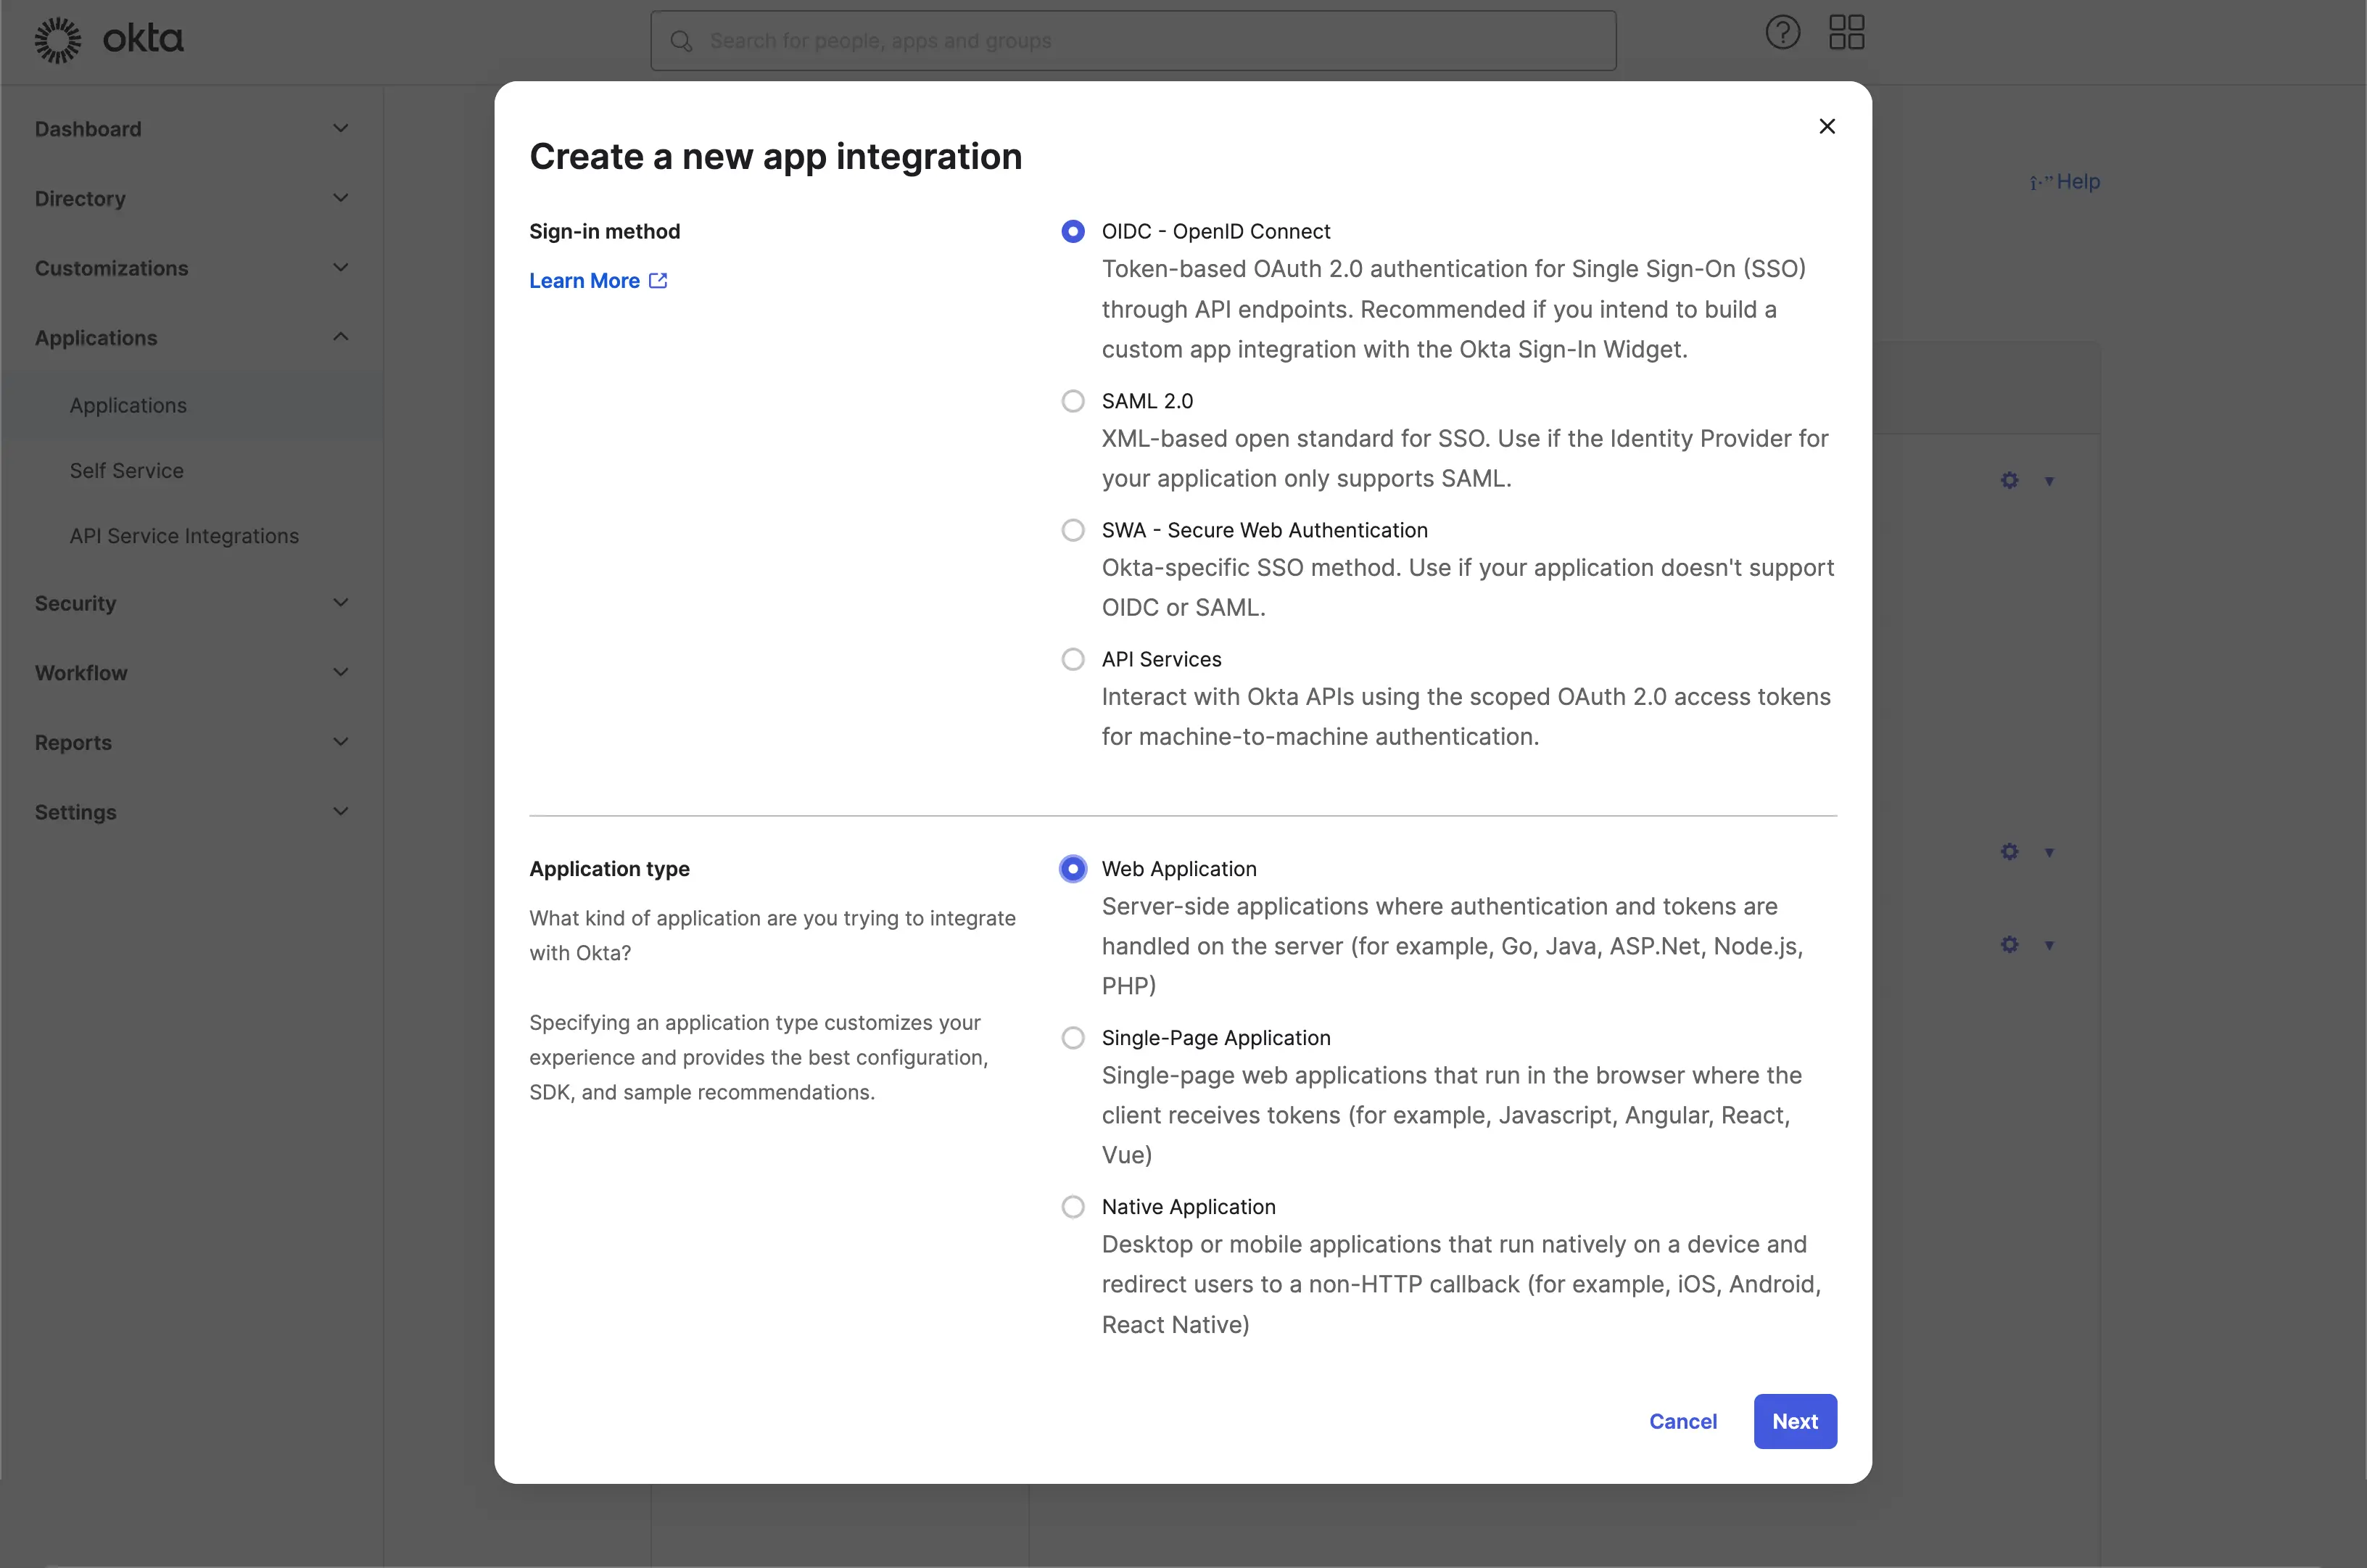
Next ボタンをクリックして続行します。
ステップ 2: アプリケーション設定を構成する
App integration nameを提供します。これは、あなたの OIDC アプリケーションの識別子として使用されます。- Logto SSO コネクターのコールバック URL を使用して、新しい
Sign-in redirect URIsを追加します。
これは、Okta が認証 (Authentication) に成功した後にユーザーのブラウザをリダイレクトする URI です。ユーザーが IdP での認証 (Authentication) に成功すると、IdP はユーザーのブラウザをこの指定された URI に認可 (Authorization) コードと共にリダイレクトします。Logto は、この URI から受け取った認可 (Authorization) コードに基づいて認証 (Authentication) プロセスを完了します。
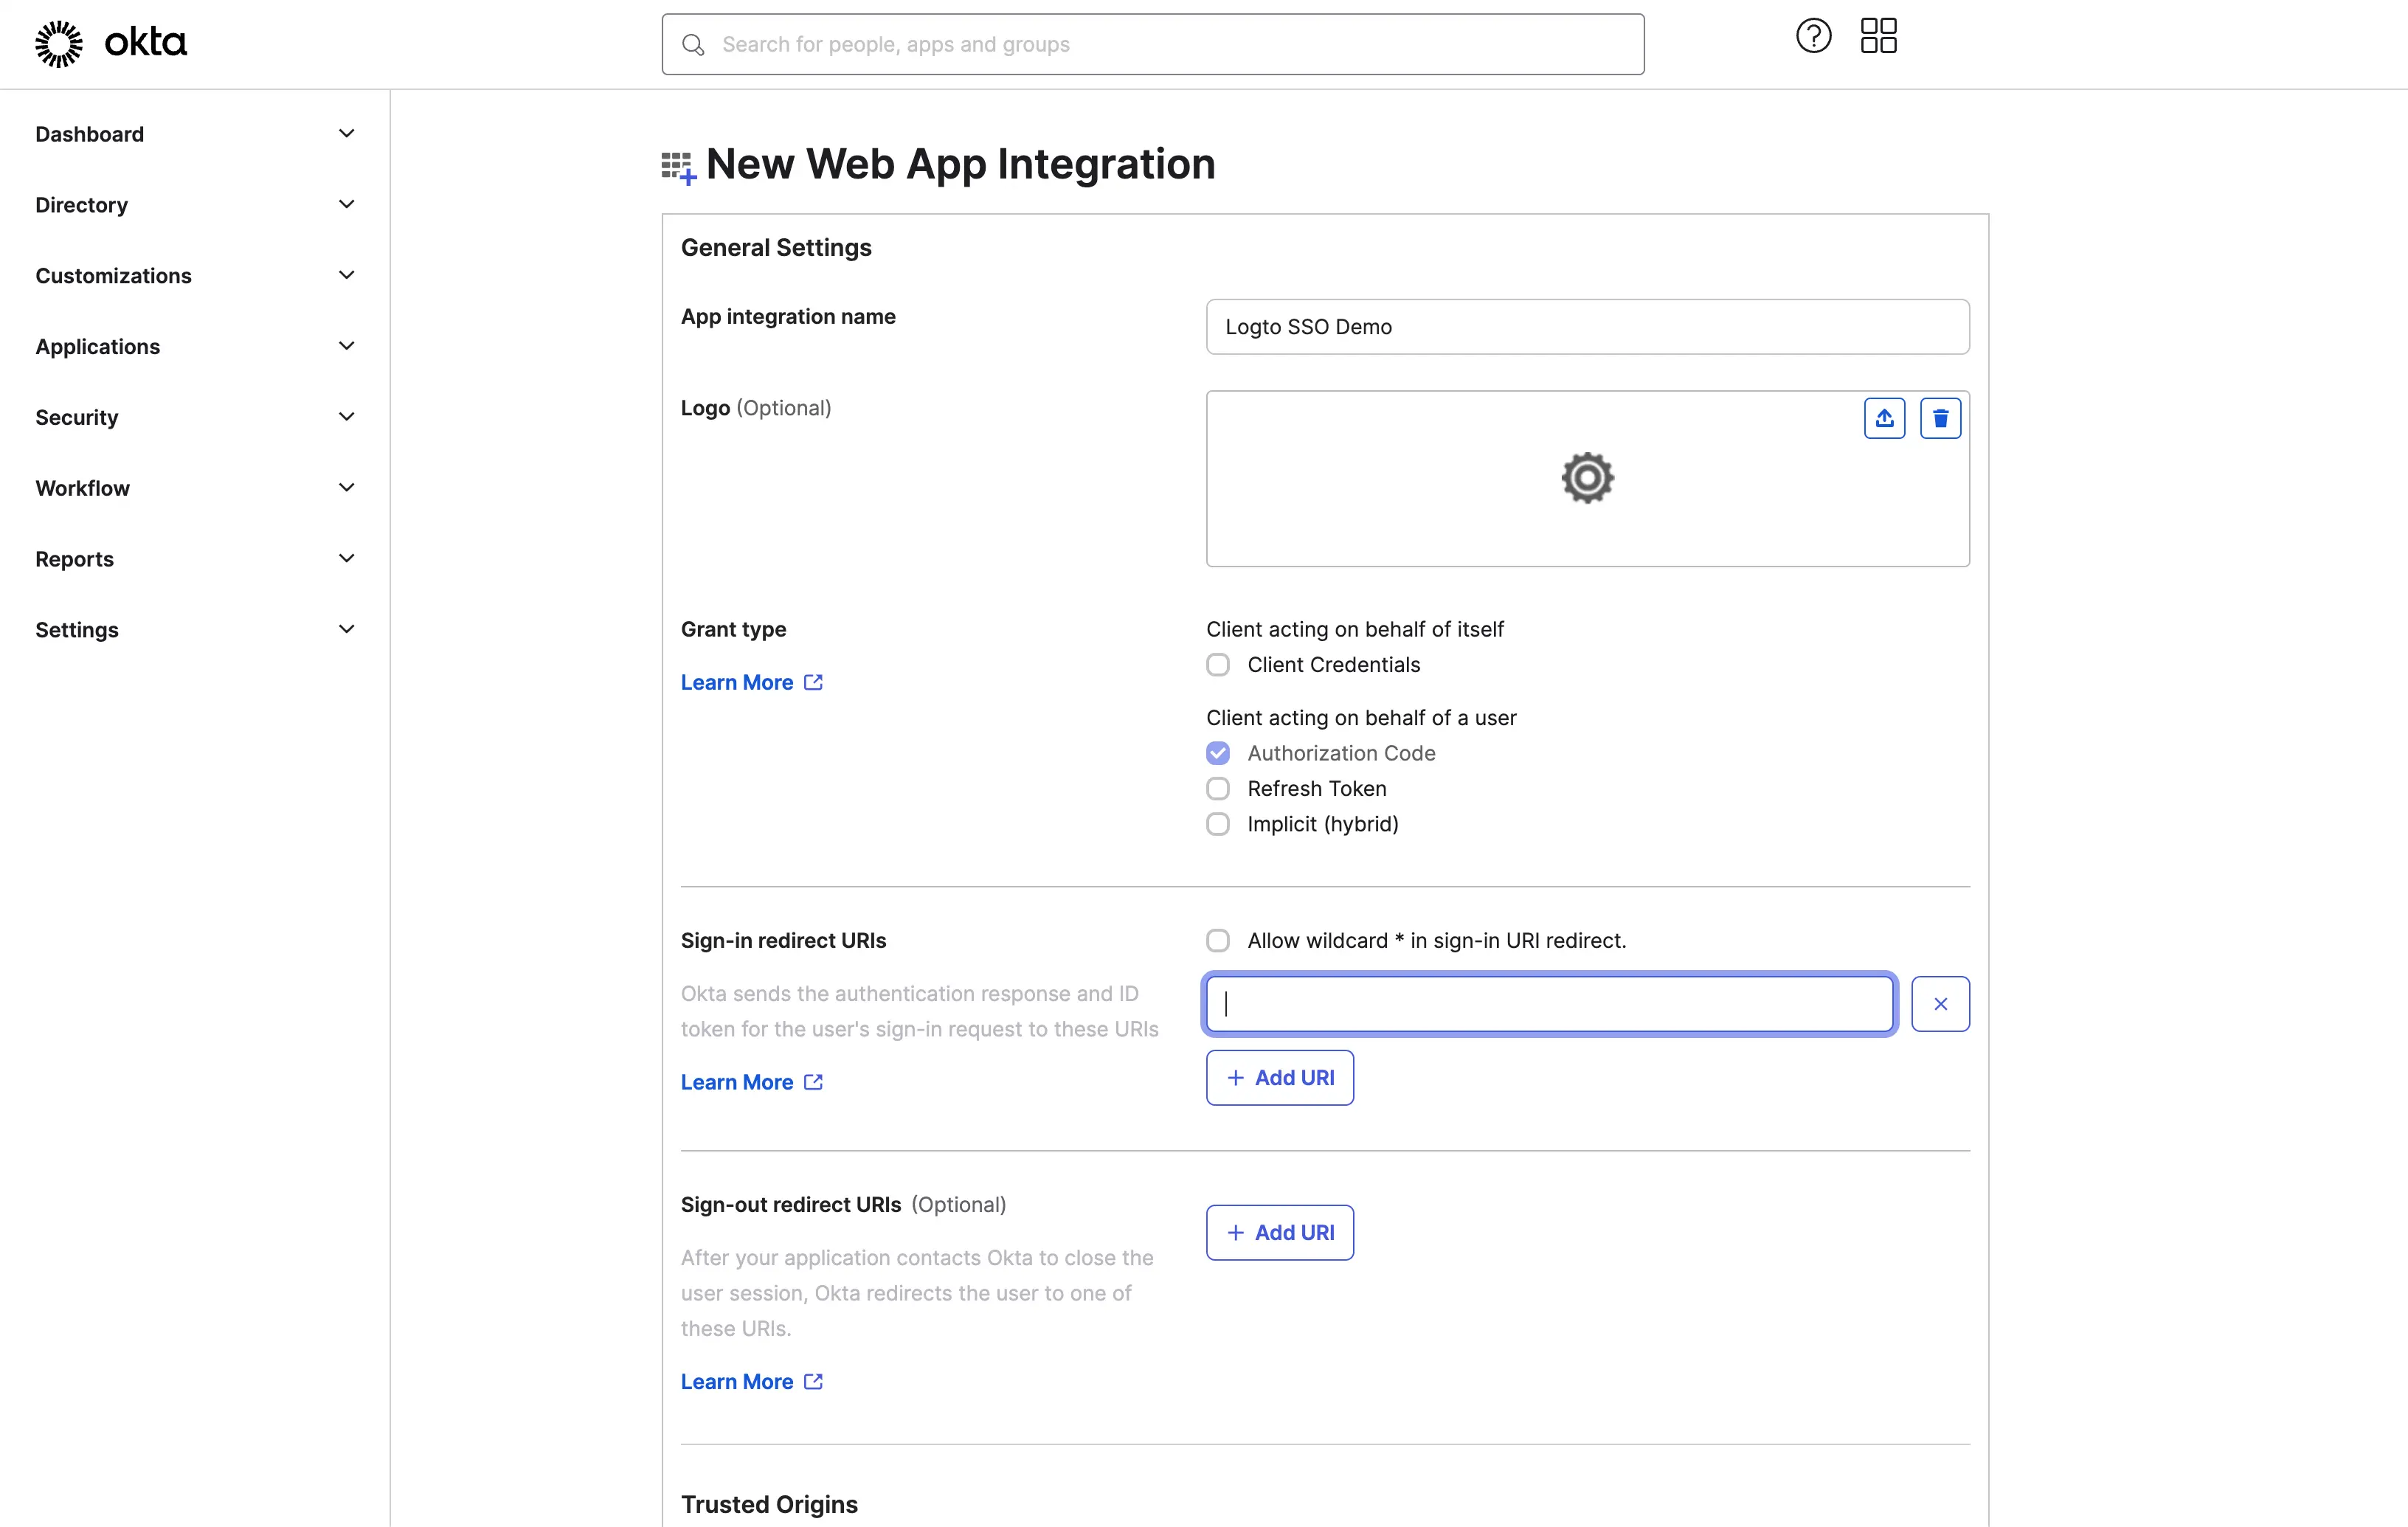
- アプリケーションにユーザーを割り当てます。
Assignments 設定に基づいて、アプリケーションをすべてのユーザーまたは特定のユーザー / グループに割り当てることができます。

Save ボタンをクリックしてアプリケーション設定を保存します。
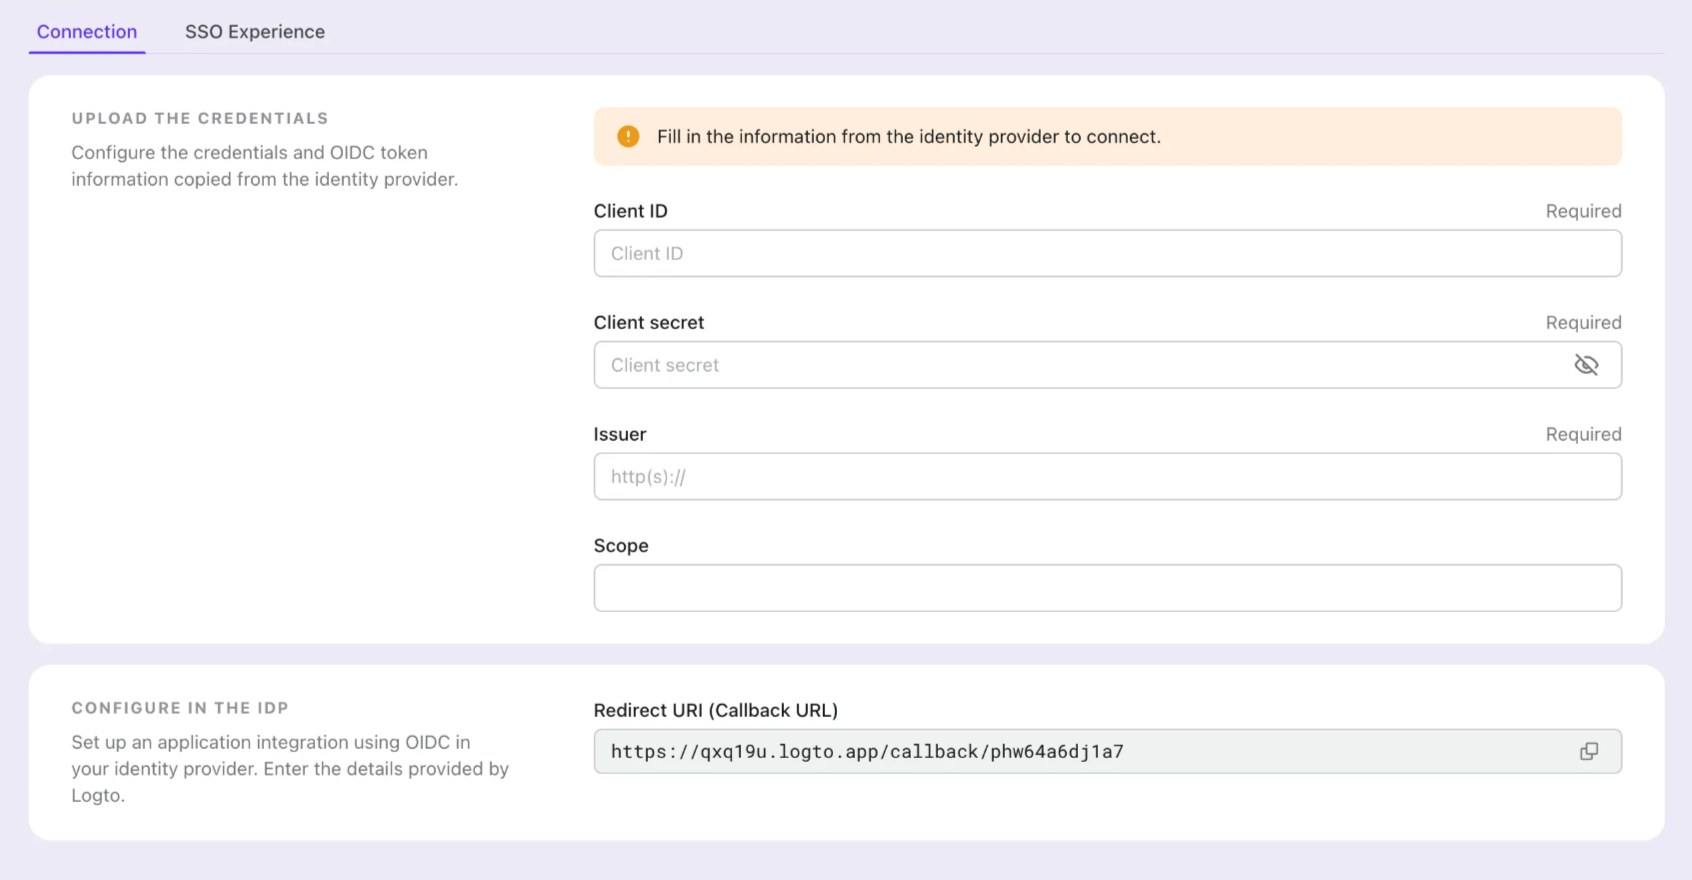
ステップ 3: クライアント資格情報で Logto コネクターを設定する
OIDC アプリケーションの作成に成功すると、アプリケーションの詳細ページにリダイレクトされます。
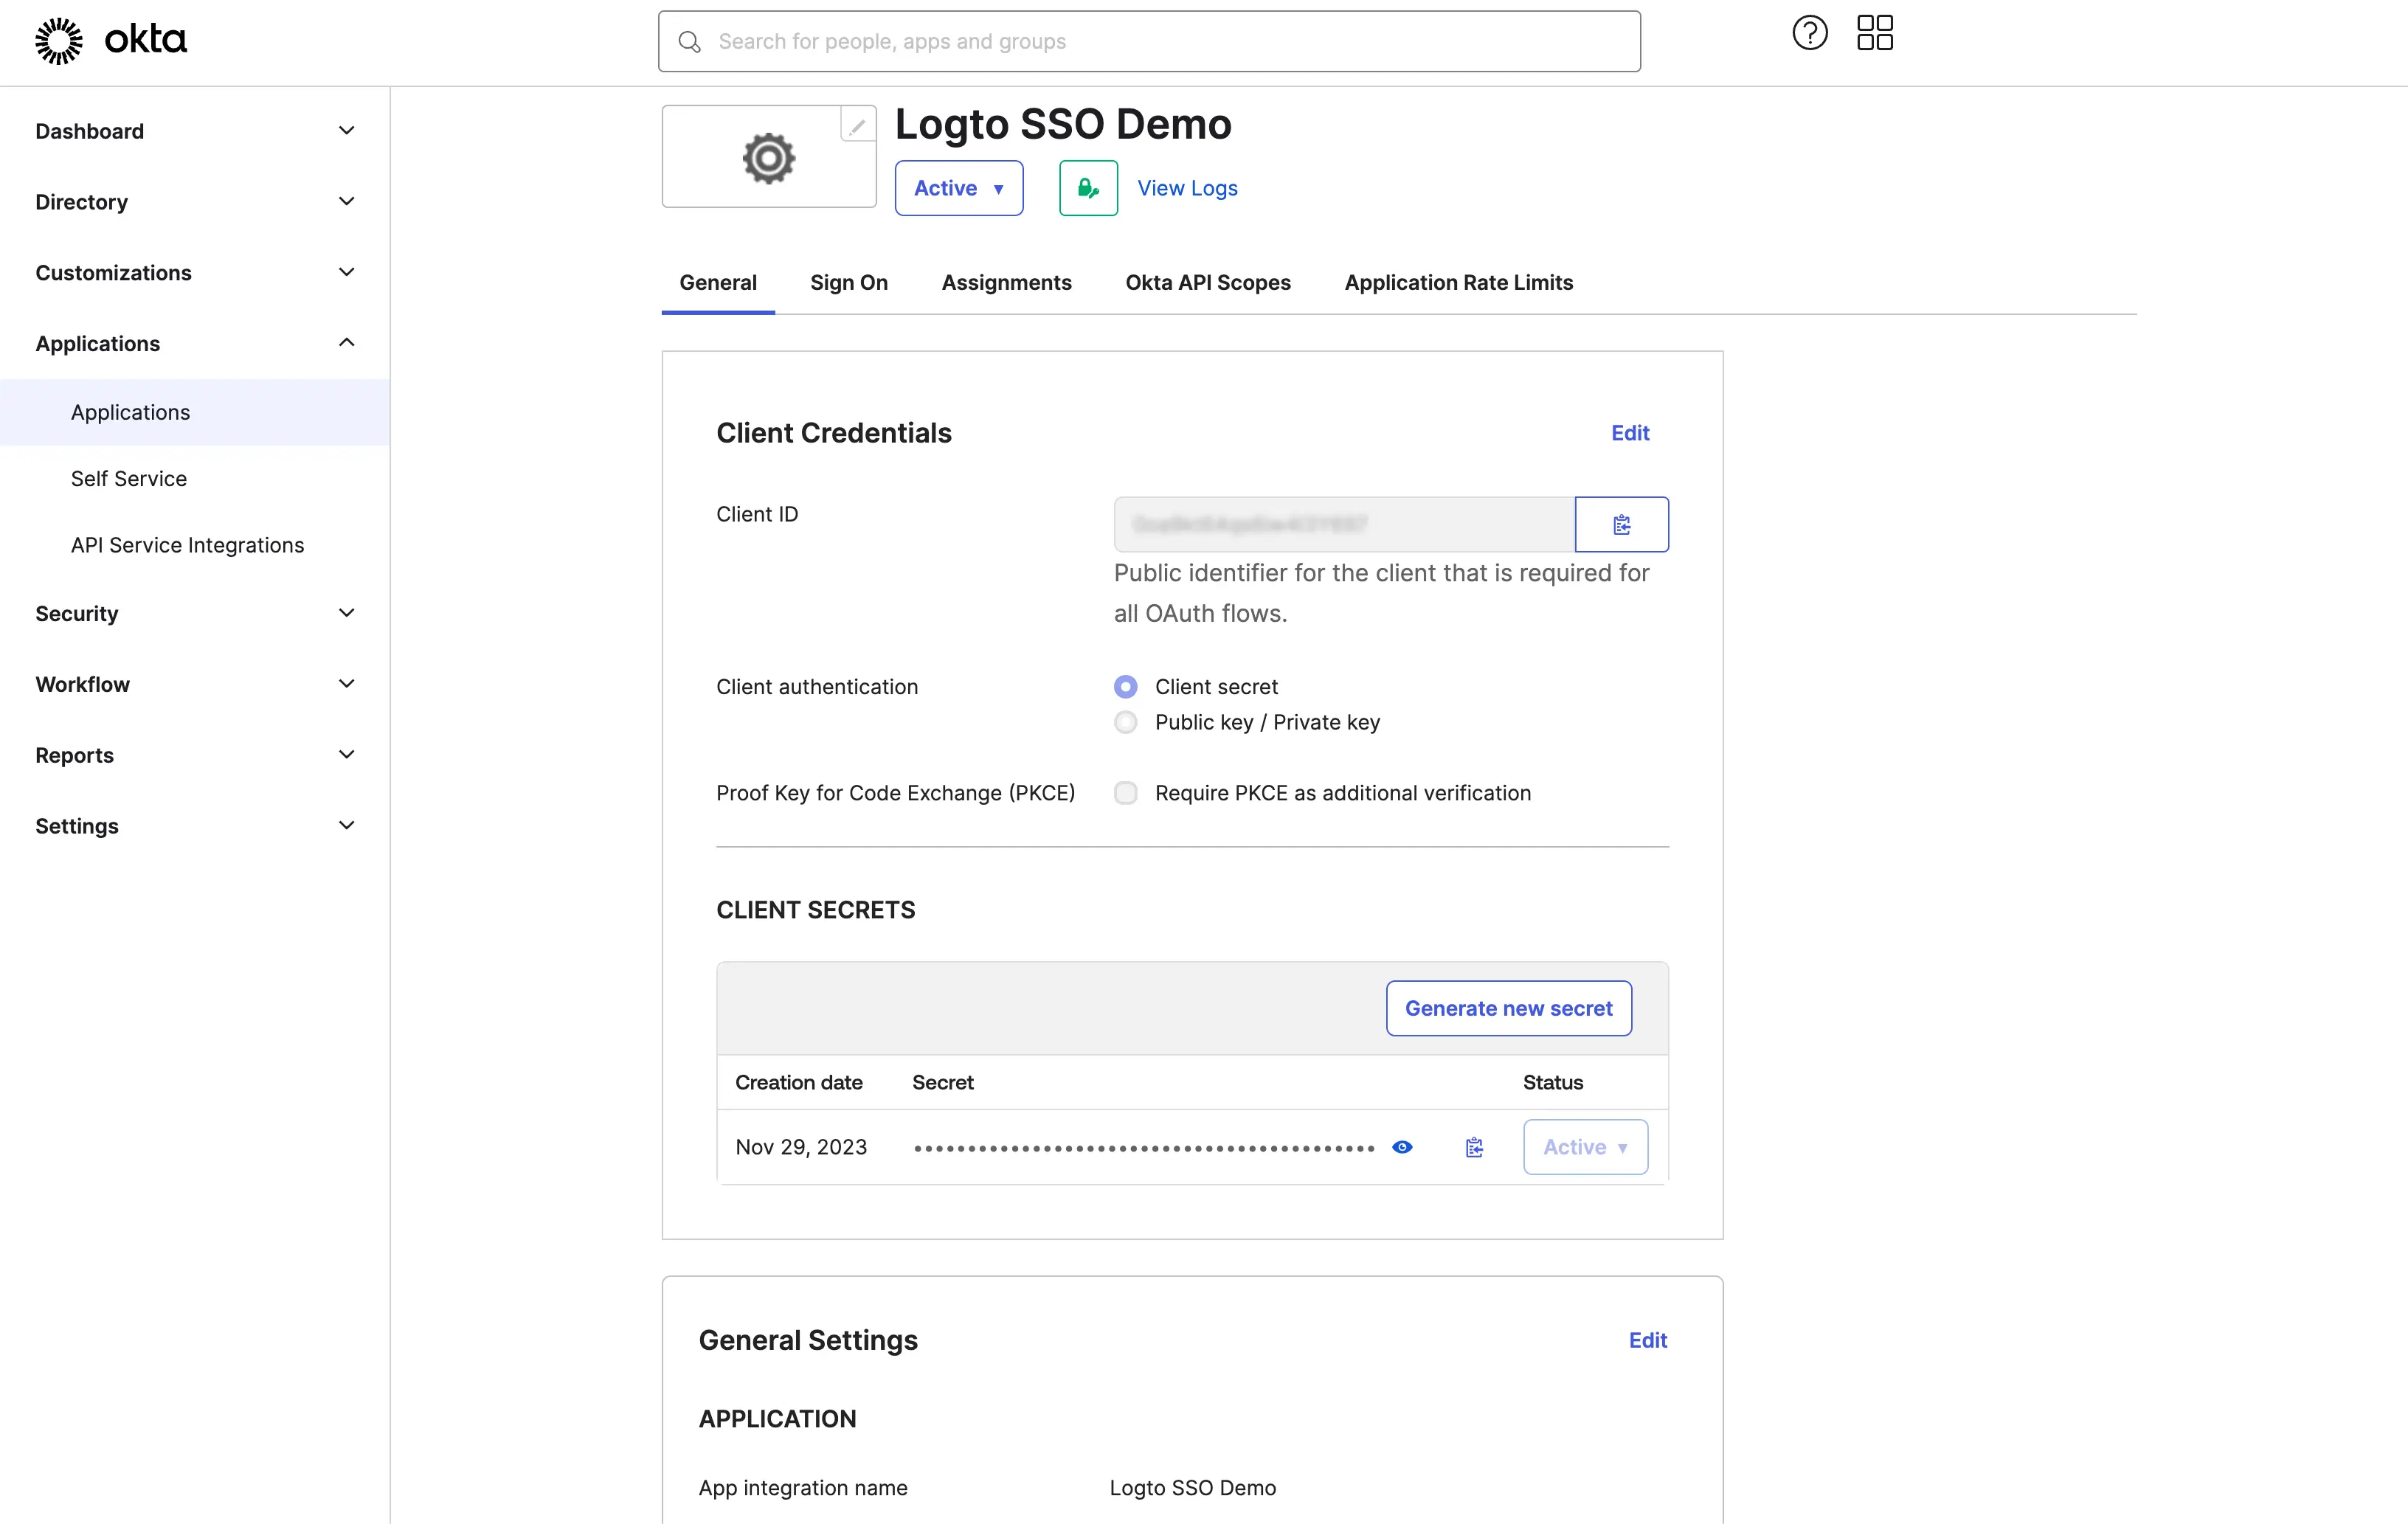
client ID と client secret をコピーし、Logto SSO コネクターの Connection タブの対応するフィールドに入力します。
Okta ドメインを 発行者 (Issuer) として使用します。例:https://dev-12345678.okta.com。すべてのフィールドに入力したら、Save ボタンをクリックしてコネクター設定を保存します。
提供した 発行者 (Issuer) リンクが有効であれば、発行者 (Issuer) フィールドの下に Okta IdP 設定の解析された完全なリストが表示されます。
ステップ 4: 追加のスコープ (オプション)
Scope フィールドを使用して、OAuth リクエストに追加のスコープを追加します。これにより、Okta OAuth サーバーからより多くの情報を要求できます。利用可能なスコープの詳細については、 Okta ドキュメント を参照してください。
カスタムスコープ設定に関係なく、Logto は常に openid、profile、および email スコープを IdP に送信します。これは、Logto がユーザーのアイデンティティ情報とメールアドレスを適切に取得できるようにするためです。
ステップ 5: メールドメインを設定し、SSO コネクターを有効にする
Logto のコネクターの SSO 体験 タブで、組織の メールドメイン を提供してください。これにより、SSO コネクターがそのユーザーの認証 (Authentication) 方法として有効になります。
指定されたドメインのメールアドレスを持つユーザーは、唯一の認証 (Authentication) 方法として SSO コネクターを使用するようにリダイレクトされます。
Okta との OIDC 統合の作成に関する詳細については、Create OIDC App Integrations をご確認ください。
Save your configuration
Logto コネクター設定エリアで必要な値をすべて記入したことを確認してください。「保存して完了」または「変更を保存」をクリックすると、Okta enterprise SSO コネクターが利用可能になります。
Enable Okta enterprise SSO connector in Sign-in Experience
エンタープライズコネクターを個別に設定する必要はありません。Logto は、ワンクリックでアプリケーションに SSO 統合を簡素化します。
- 移動先: Console > サインイン体験 > サインアップとサインイン。
- 「エンタープライズシングルサインオン (SSO)」トグルを有効にします。
- 変更を保存します。
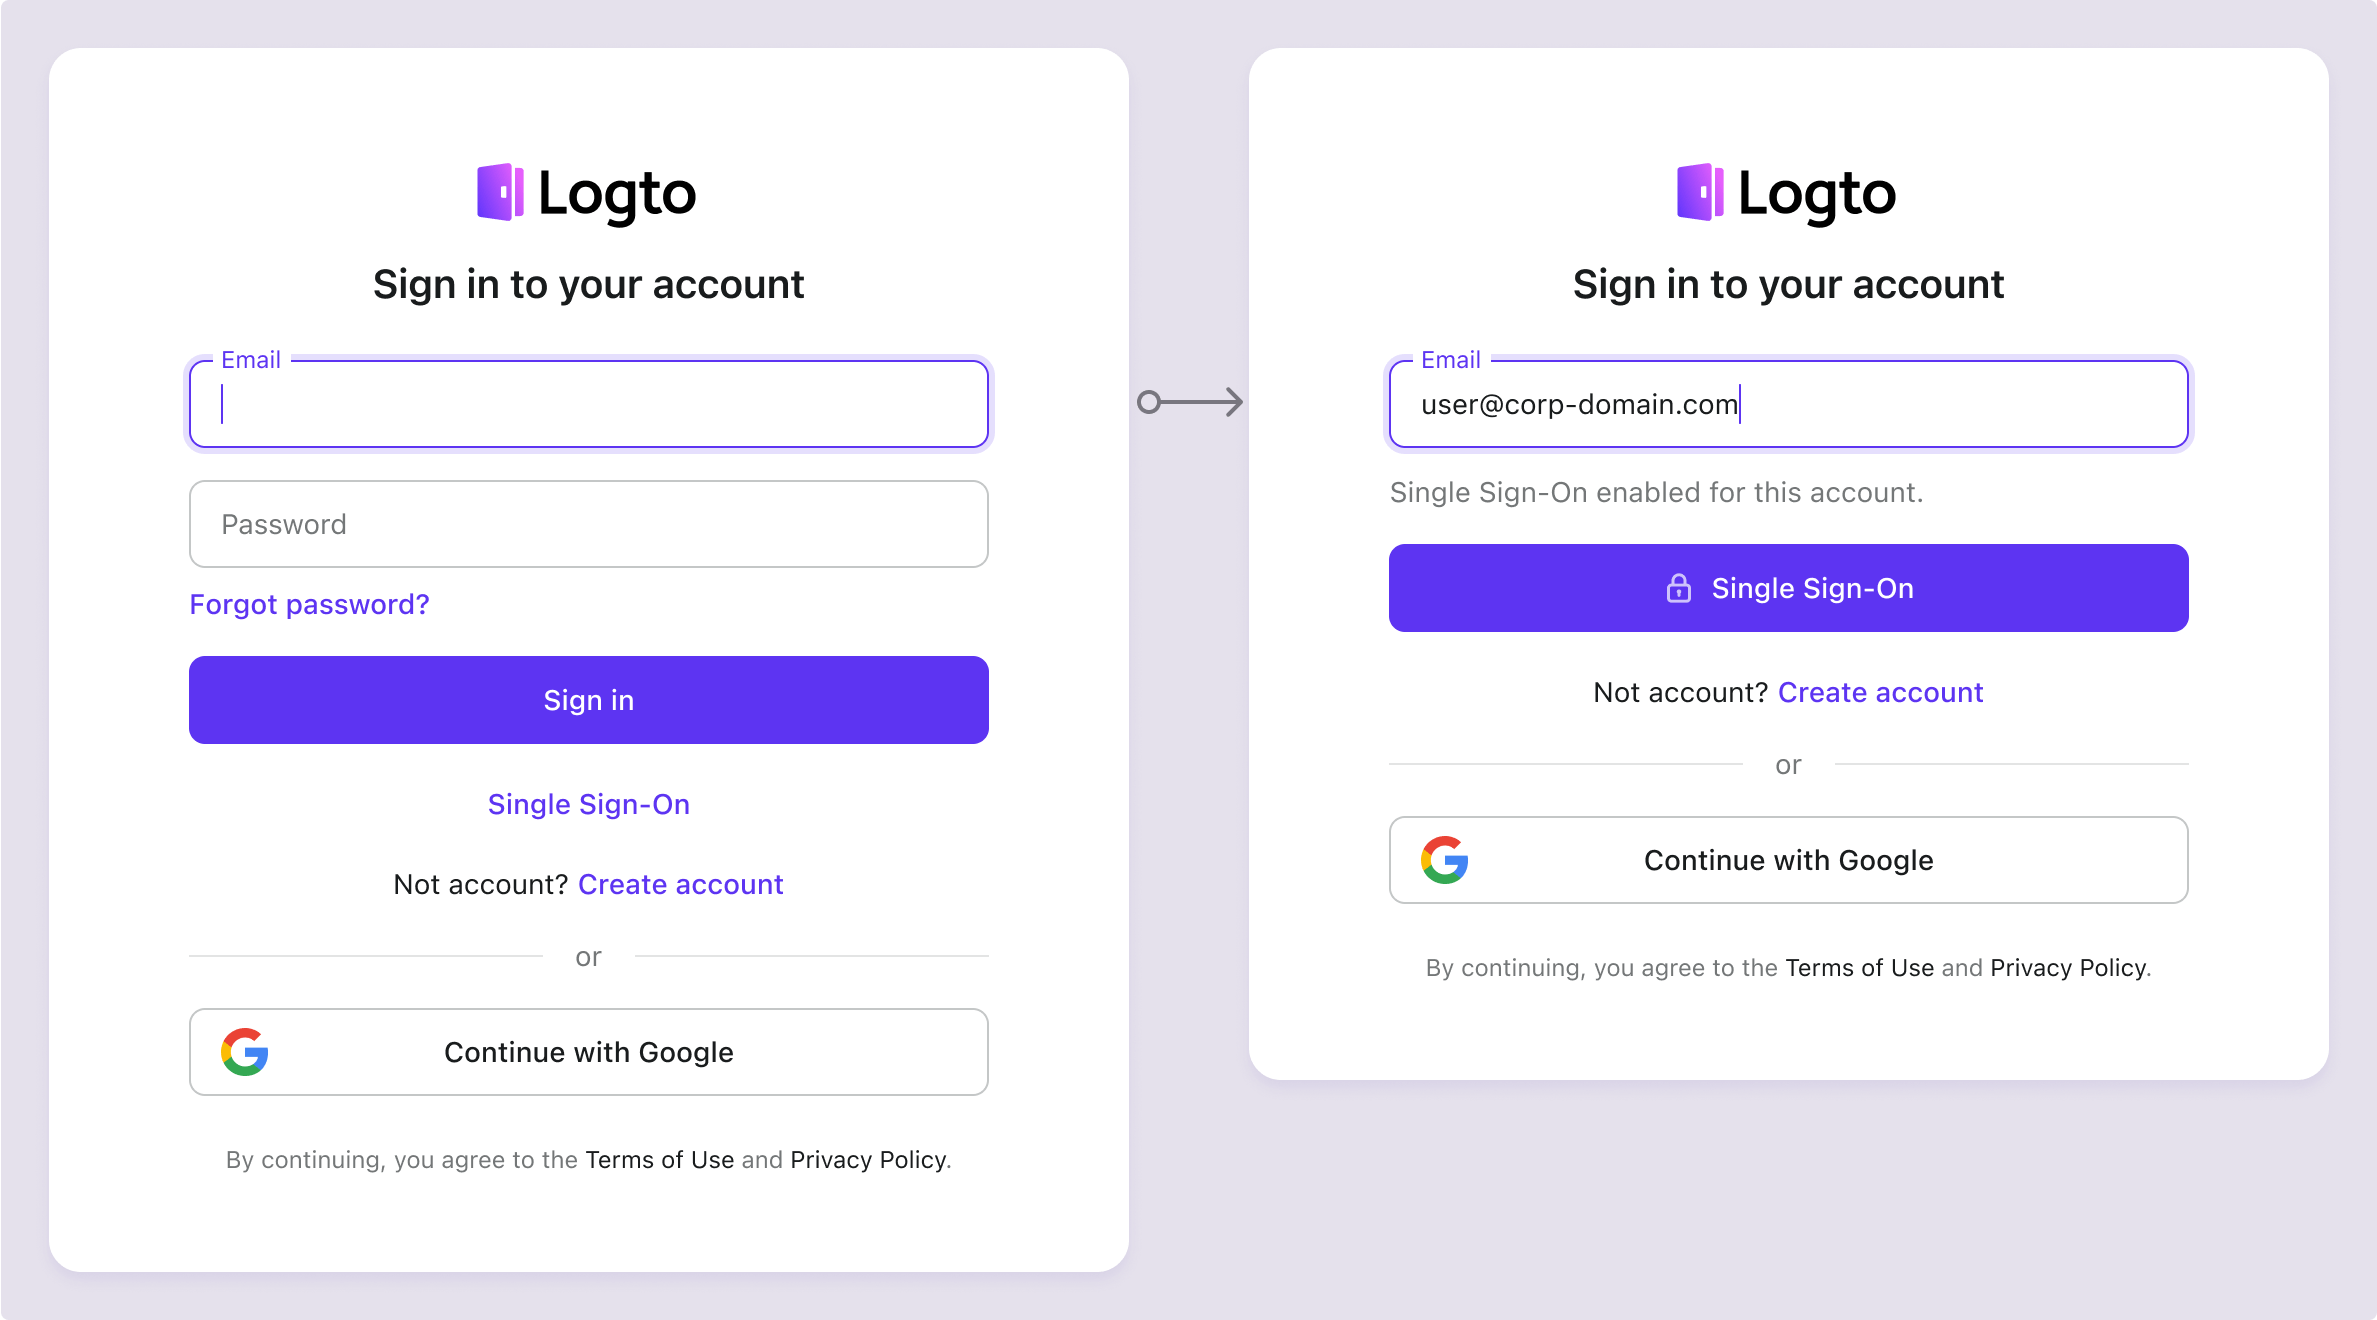
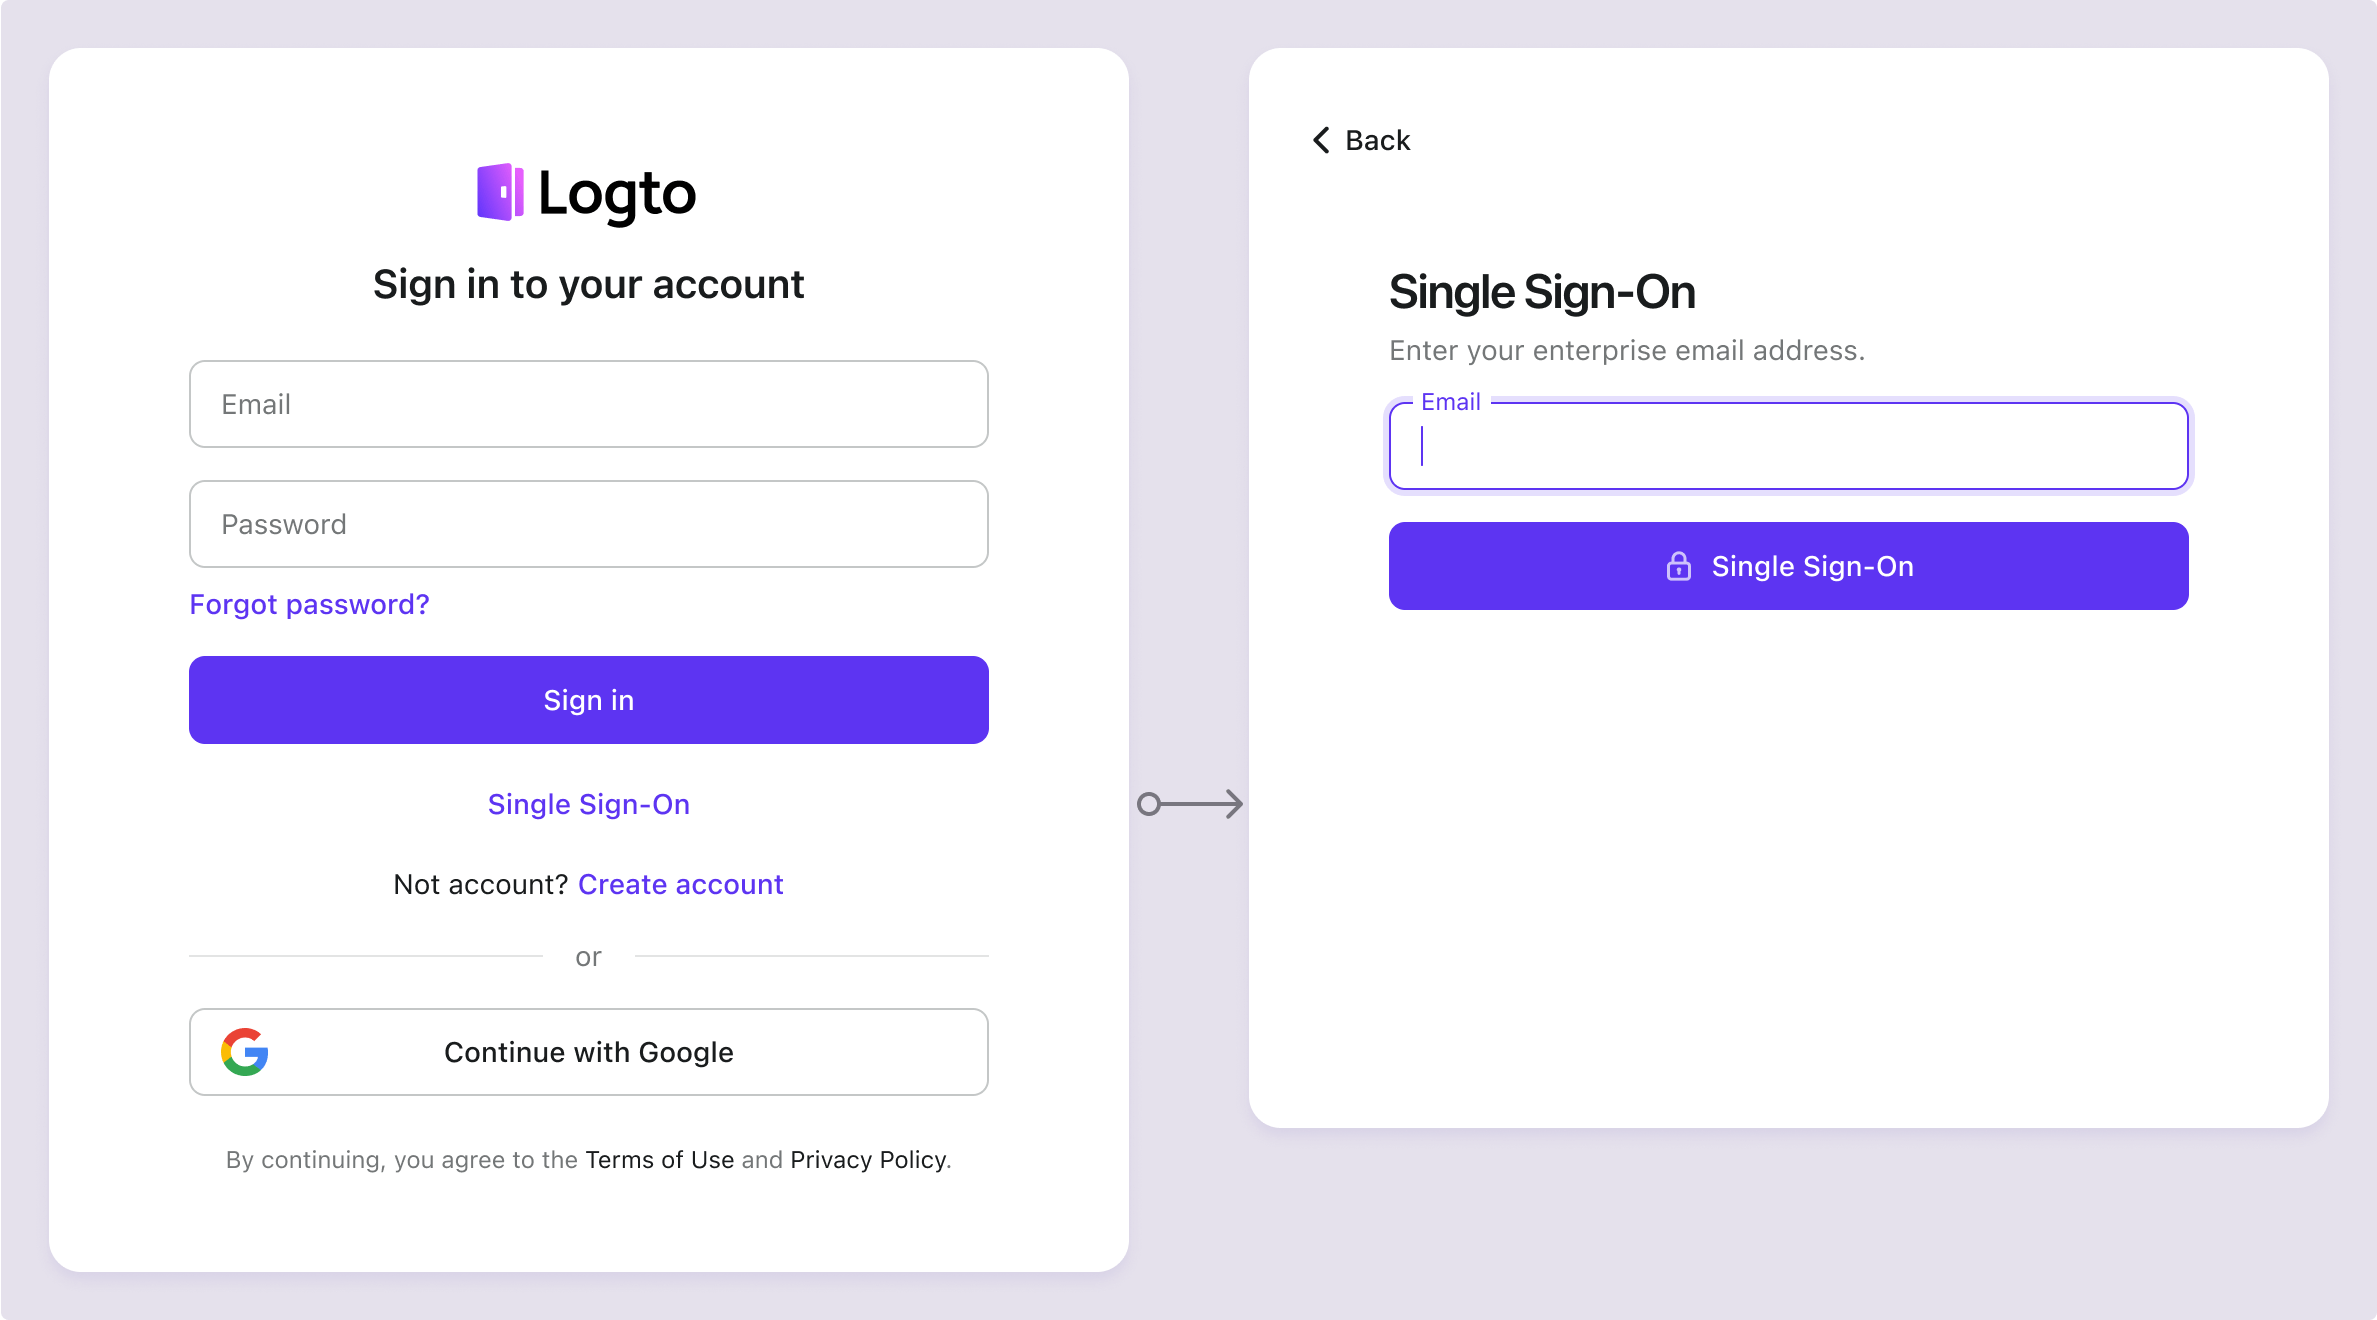
有効にすると、サインインページに「シングルサインオン (SSO)」ボタンが表示されます。SSO が有効なメールドメインを持つエンタープライズユーザーは、エンタープライズアイデンティティプロバイダー (IdP) を使用してサービスにアクセスできます。
SP 主導の SSO や IdP 主導の SSO を含む SSO ユーザー体験について詳しくは、ユーザーフロー: エンタープライズシングルサインオン (SSO) を参照してください。
Testing and Validation
Android (Kotlin / Java) アプリに戻ります。これで Okta enterprise SSO を使用してサインインできるはずです。お楽しみください!
Further readings
エンドユーザーフロー:Logto は、MFA やエンタープライズシングルサインオン (SSO) を含む即時使用可能な認証 (Authentication) フローを提供し、アカウント設定、セキュリティ検証、マルチテナント体験の柔軟な実装のための強力な API を備えています。
認可 (Authorization):認可 (Authorization) は、ユーザーが認証 (Authentication) された後に行えるアクションやアクセスできるリソースを定義します。ネイティブおよびシングルページアプリケーションの API を保護し、ロールベースのアクセス制御 (RBAC) を実装する方法を探ります。
組織 (Organizations):特にマルチテナント SaaS や B2B アプリで効果的な組織機能は、テナントの作成、メンバー管理、組織レベルの RBAC、およびジャストインタイムプロビジョニングを可能にします。
顧客 IAM シリーズ:顧客(または消費者)アイデンティティとアクセス管理に関する連続ブログ投稿で、101 から高度なトピックまでを網羅しています。