Logto is an Auth0 alternative designed for modern apps and SaaS products. It offers both Cloud and Open-source services to help you quickly launch your identity and management (IAM) system. Enjoy authentication, authorization, and multi-tenant management all in one.
We recommend starting with a free development tenant on Logto Cloud. This allows you to explore all the features easily.
In this article, we will go through the steps to quickly build the Google Workspace enterprise SSO sign-in experience (user authentication) with Go and Logto.
Prerequisites
- A running Logto instance. Check out the introduction page to get started.
- Basic knowledge of Go.
- A usable Google Workspace enterprise SSO account.
Create an application in Logto
Logto is based on OpenID Connect (OIDC) authentication and OAuth 2.0 authorization. It supports federated identity management across multiple applications, commonly called Single Sign-On (SSO).
To create your Traditional web application, simply follow these steps:
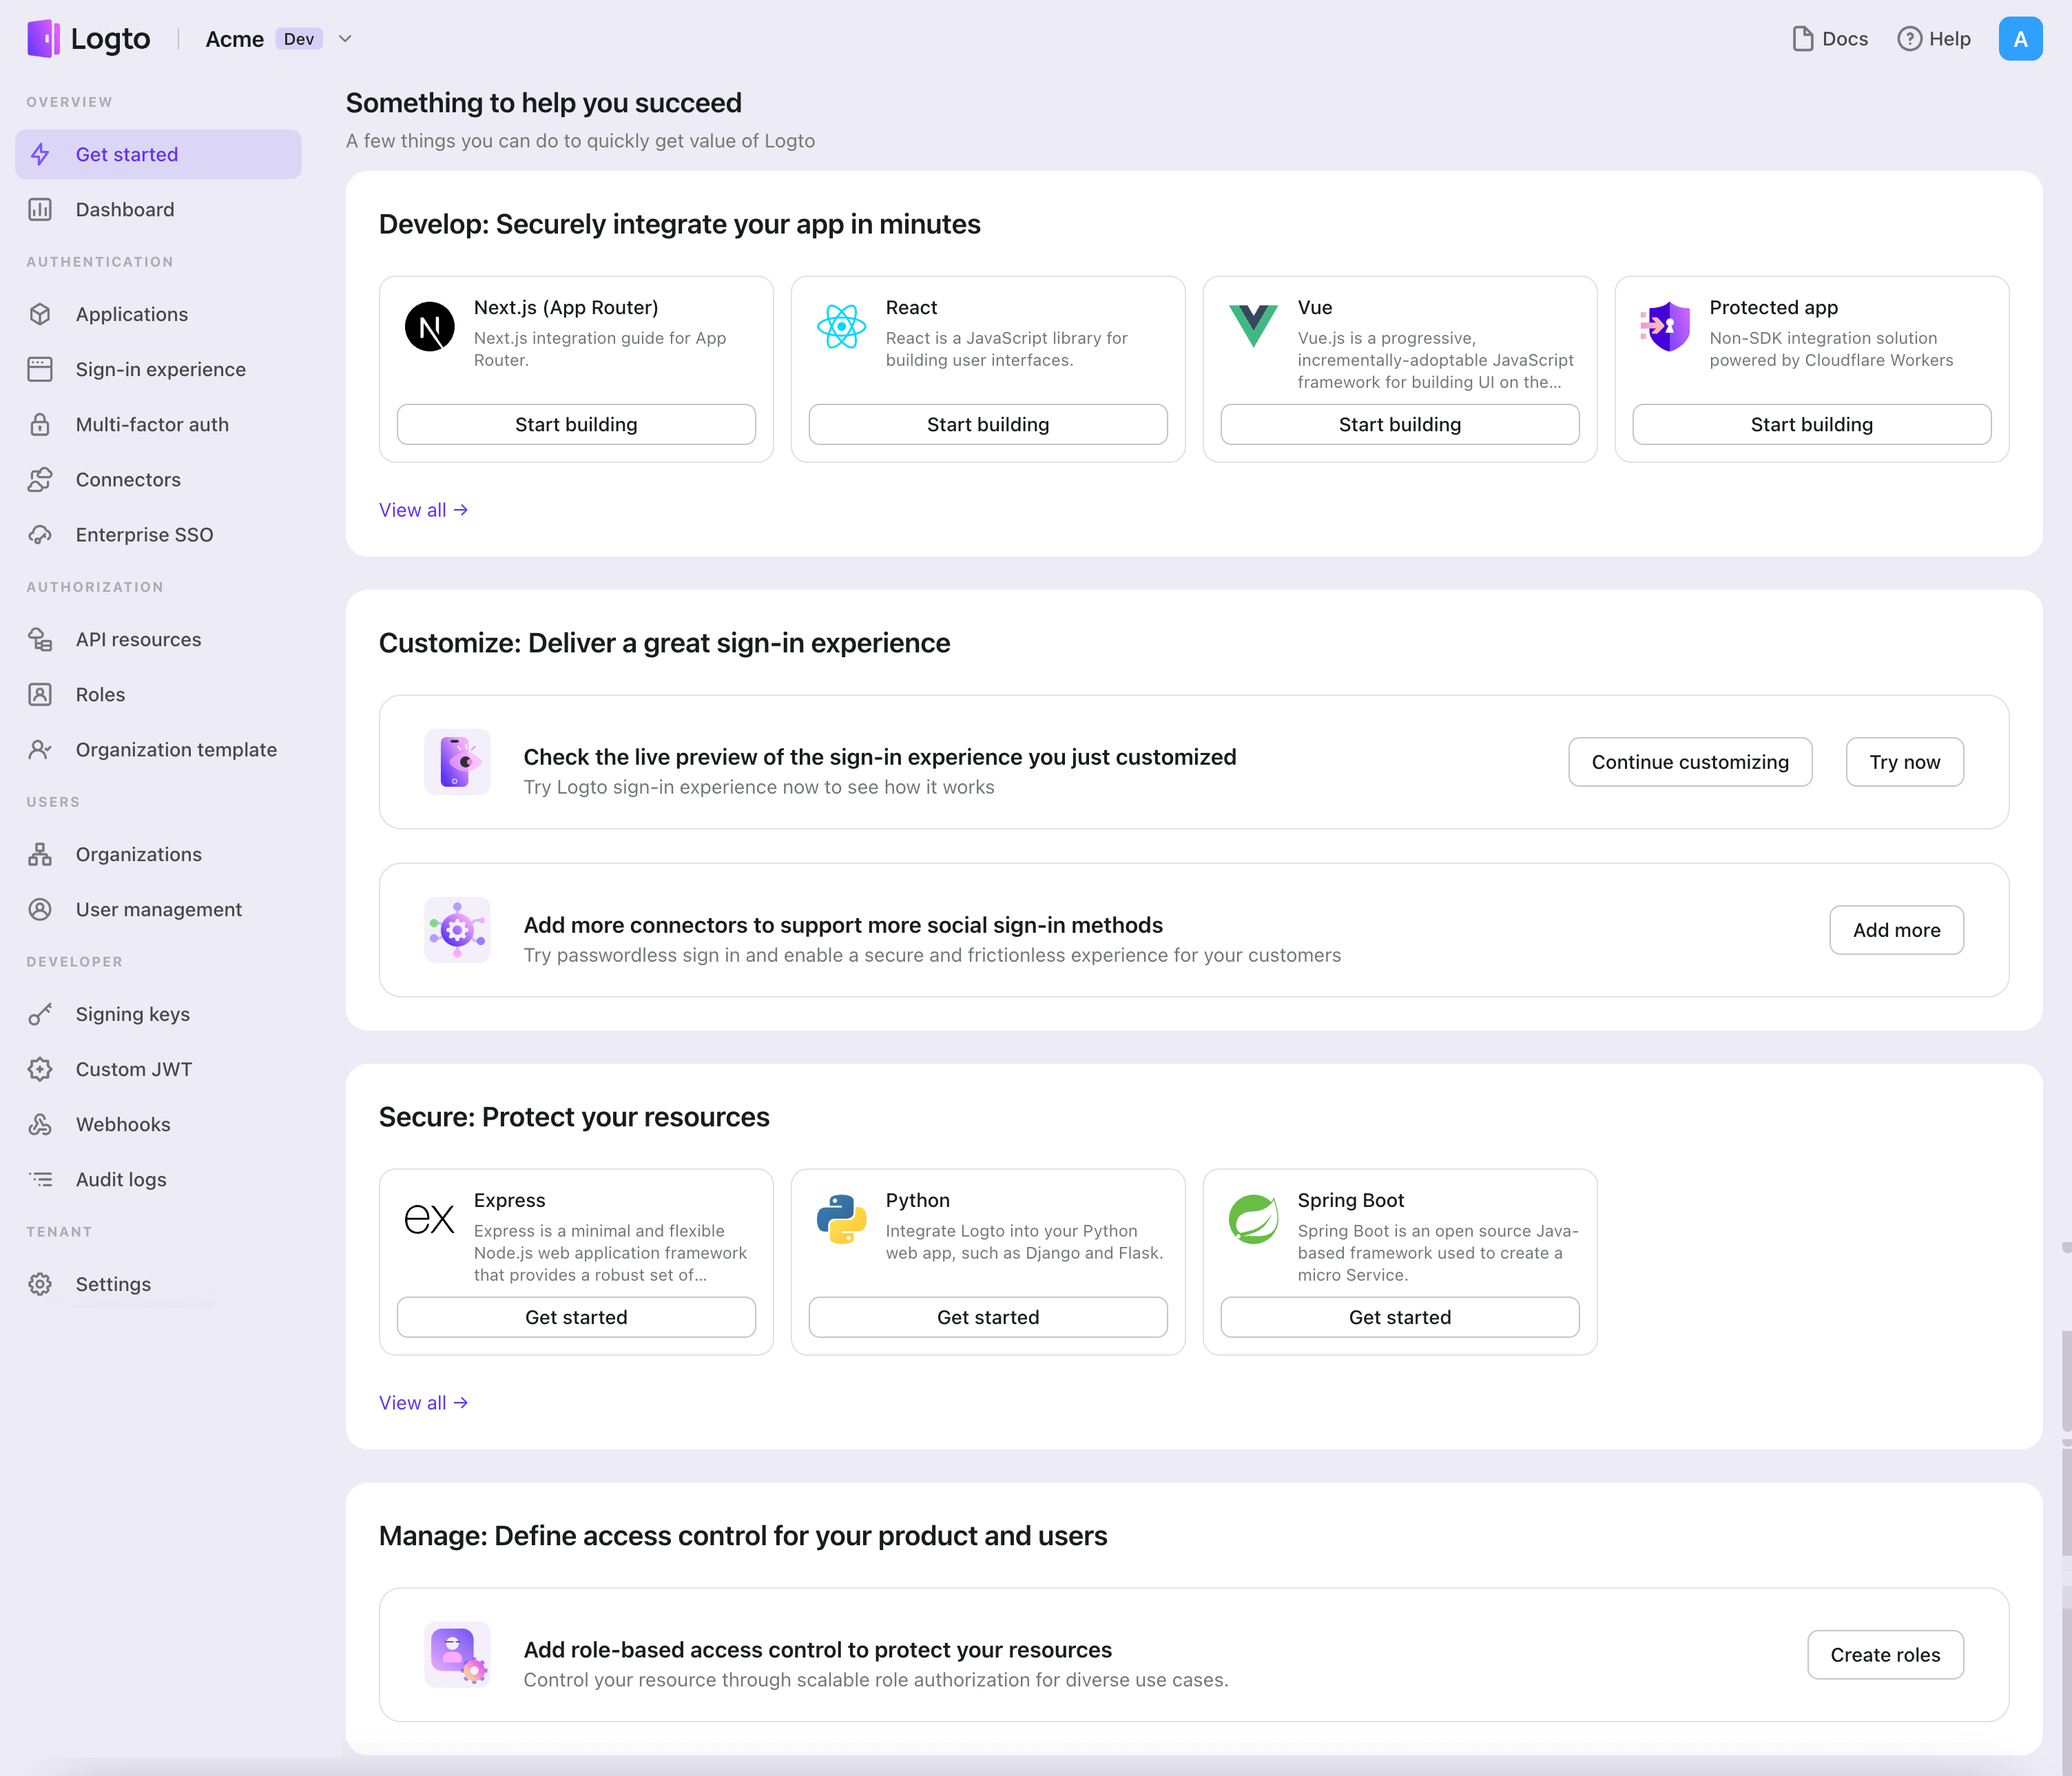
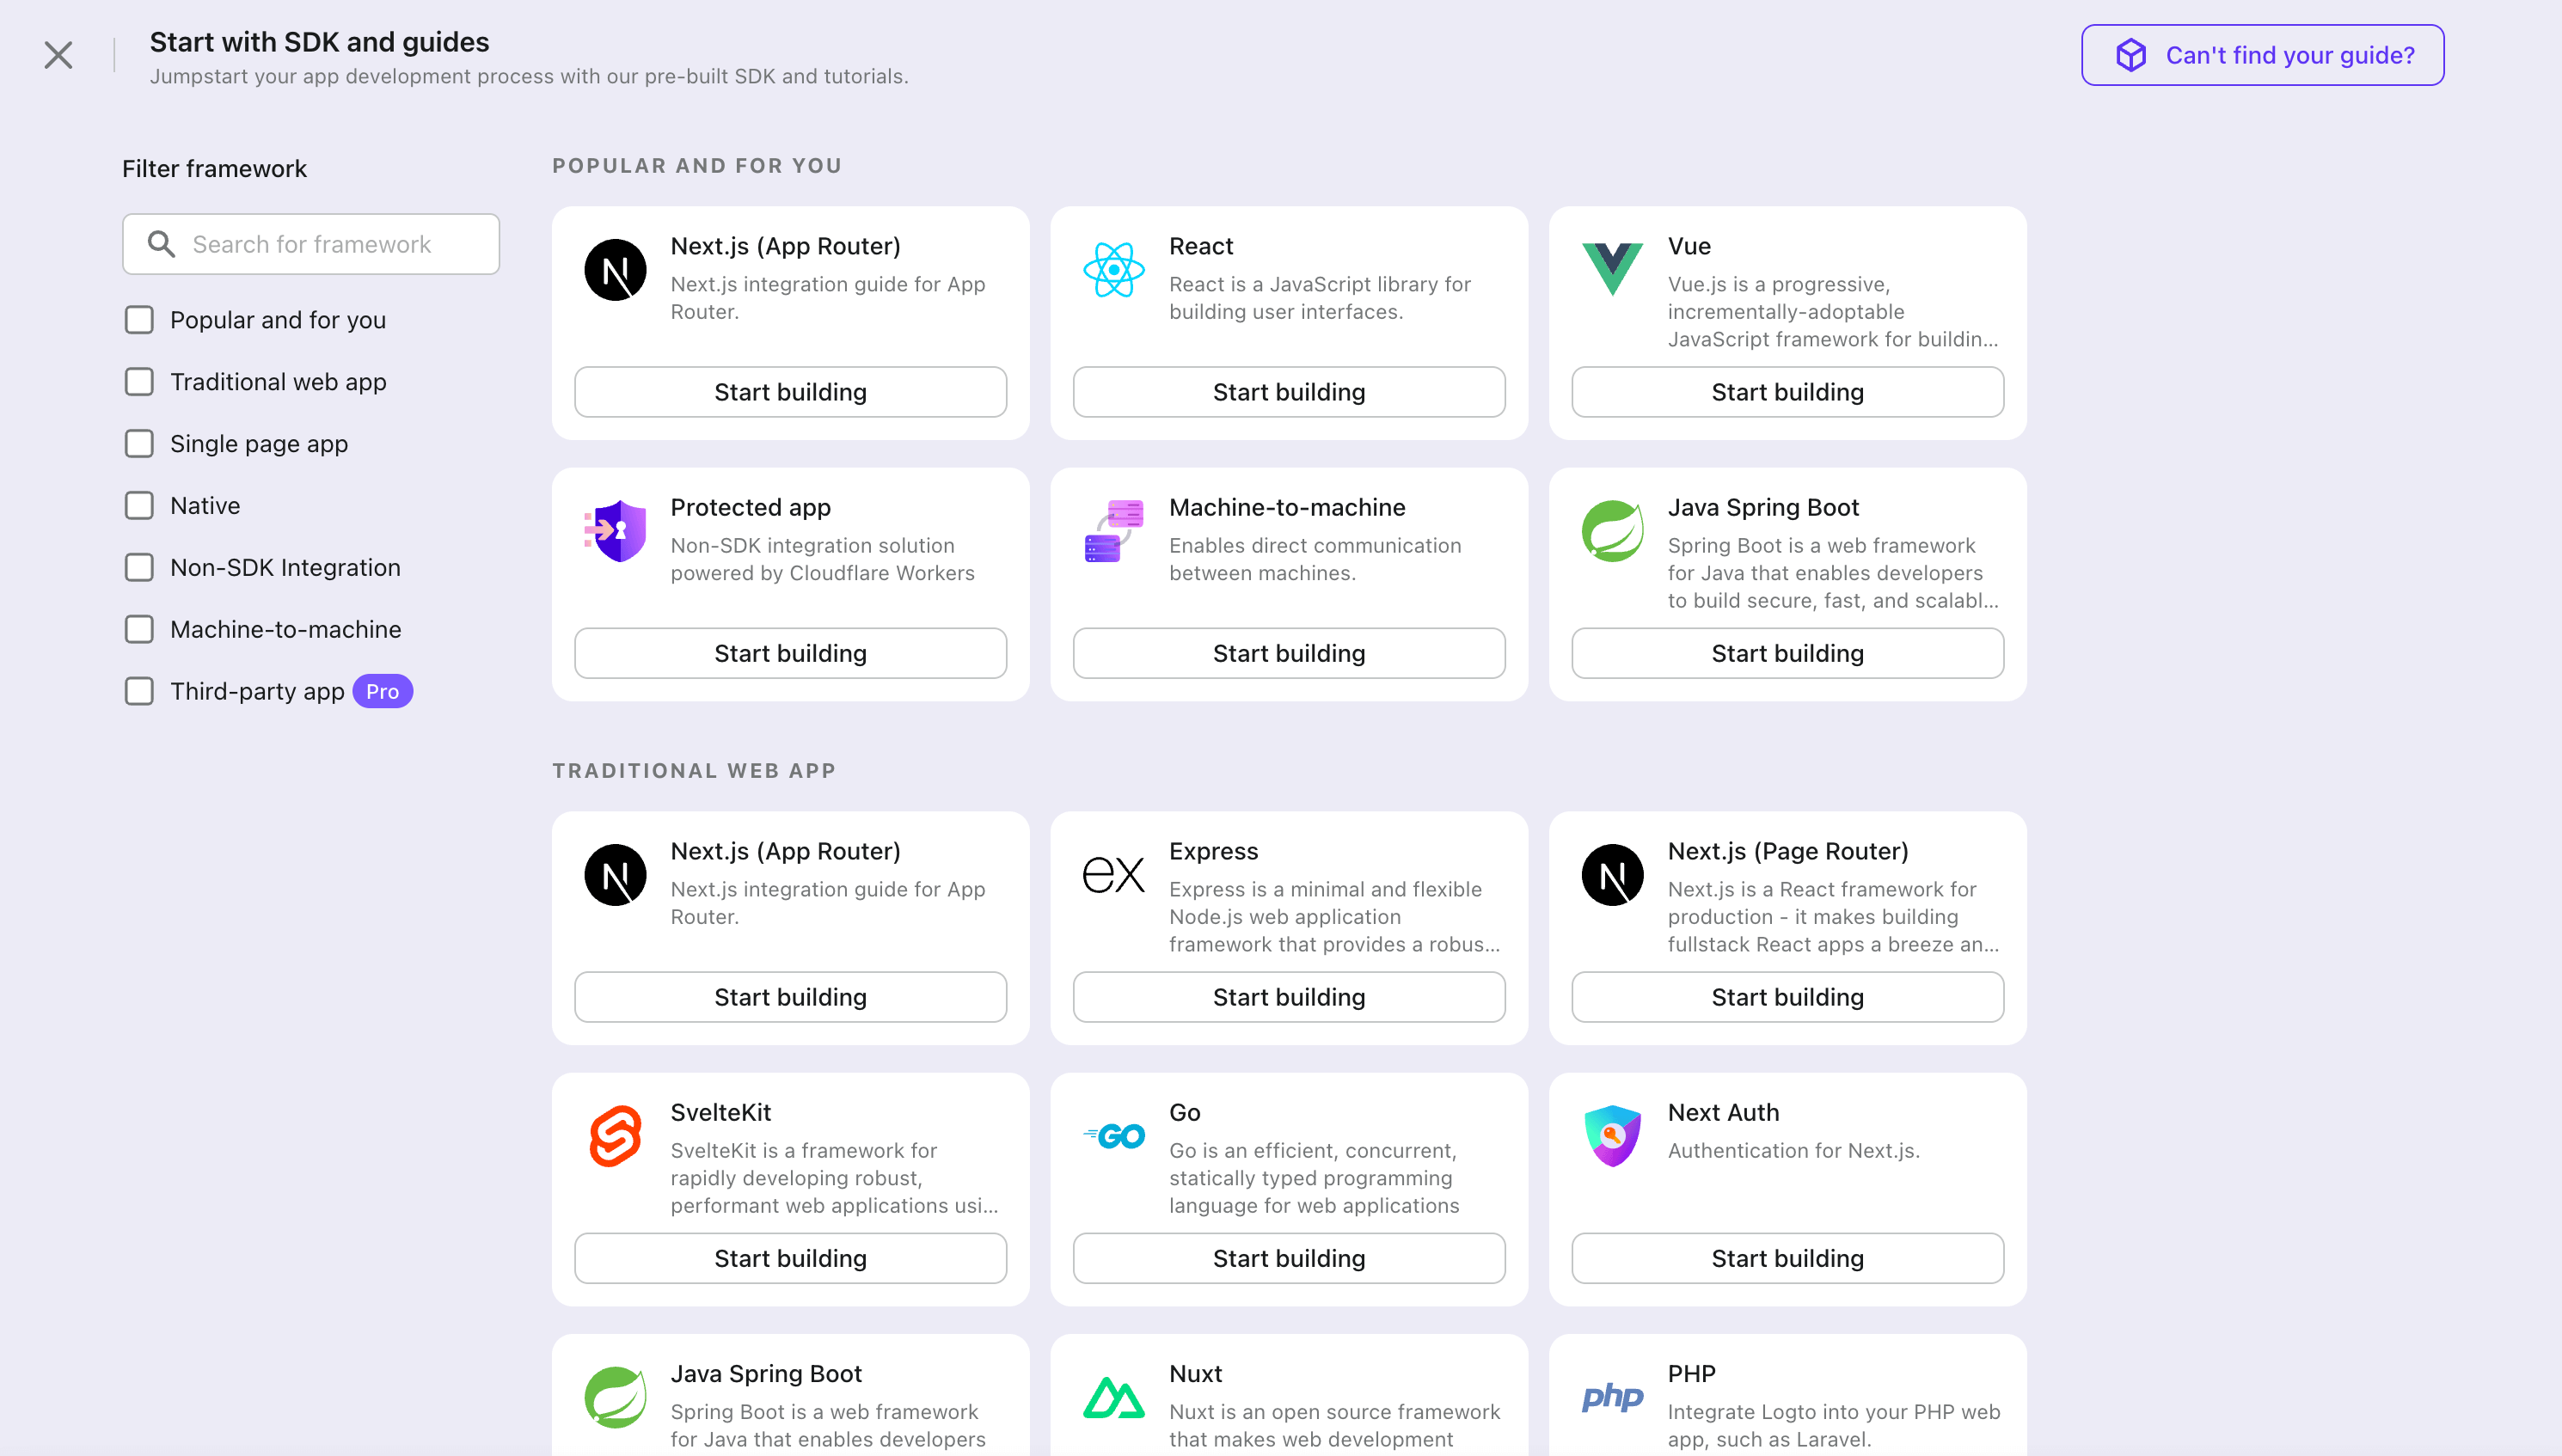
- Open the Logto Console. In the "Get started" section, click the "View all" link to open the application frameworks list. Alternatively, you can navigate to Logto Console > Applications, and click the "Create application" button.
- In the opening modal, click the "Traditional web" section or filter all the available "Traditional web" frameworks using the quick filter checkboxes on the left. Click the "Go" framework card to start creating your application.
- Enter the application name, e.g., "Bookstore," and click "Create application".
🎉 Ta-da! You just created your first application in Logto. You'll see a congrats page which includes a detailed integration guide. Follow the guide to see what the experience will be in your application.
Integrate Go with Logto
- The following demonstration is built upon the Gin Web Framework. You may also integrate Logto into other frameworks by taking the same steps.
- The Go sample project is available on our Go SDK repo.
Installation
Execute in the project root directory:
go get github.com/logto-io/go
Add the github.com/logto-io/go/client package to your application code:
// main.go
package main

import (
	"github.com/gin-gonic/gin"
	// Add dependency
	"github.com/logto-io/go/client"
)

func main() {
	router := gin.Default()
	router.GET("/", func(c *gin.Context) {
		c.String(200, "Hello Logto!")
	})
	router.Run(":3000")
}
Create a session storage
In traditional web applications, the user authentication information will be stored in the user session.
Logto SDK provides a Storage interface, you can implement a Storage adapter based on your web framework so that the Logto SDK can store user authentication information in the session.
We do NOT recommend using cookie-based sessions, as user authentication information stored by Logto may exceed the cookie size limit. In this example, we use memory-based sessions. You can use Redis, MongoDB, and other technologies in production to store sessions as needed.
The Storage type in the Logto SDK is as follows:
package client

type Storage interface {
	GetItem(key string) string
	SetItem(key, value string)
}
We use github.com/gin-contrib/sessions middleware as an example to demonstrate this process.
Apply the middleware to the application, so that we can get the user session by the user request context in the route handler:
package main

import (
	"github.com/gin-contrib/sessions"
	"github.com/gin-contrib/sessions/memstore"
	"github.com/gin-gonic/gin"
	"github.com/logto-io/go/client"
)

func main() {
	router := gin.Default()

	// We use memory-based session in this example
	store := memstore.NewStore([]byte("your session secret"))
	router.Use(sessions.Sessions("logto-session", store))

	router.GET("/", func(ctx *gin.Context) {
		// Get user session
		session := sessions.Default(ctx)
		// ...
		ctx.String(200, "Hello Logto!")
	})
	router.Run(":3000")
}
Create a session_storage.go file, define a SessionStorage and implement the Logto SDK's Storage interfaces:
package main

import (
	"github.com/gin-contrib/sessions"
)

type SessionStorage struct {
	session sessions.Session
}

func (storage *SessionStorage) GetItem(key string) string {
	value := storage.session.Get(key)
	if value == nil {
		return ""
	}
	return value.(string)
}

func (storage *SessionStorage) SetItem(key, value string) {
	storage.session.Set(key, value)
	storage.session.Save()
}
Now, in the route handler, you can create a session storage for Logto:
session := sessions.Default(ctx)
sessionStorage := &SessionStorage{session: session}
Init LogtoClient
First, create a Logto config:
func main() {
	// ...
	logtoConfig := &client.LogtoConfig{
		Endpoint:  "<your-logto-endpoint>", // E.g. http://localhost:3001
		AppId:     "<your-application-id>",
		AppSecret: "<your-application-secret>",
	}
	// ...
}
You can find and copy "App Secret" from application details page in Admin Console:

Then, you can create a LogtoClient for each user request with the Logto config above:
func main() {
	// ...

	router.GET("/", func(ctx *gin.Context) {
		// Create LogtoClient
		session := sessions.Default(ctx)
		logtoClient := client.NewLogtoClient(
			logtoConfig,
			&SessionStorage{session: session},
		)

		// Use Logto to control the content of the home page
		authState := "You are not logged in to this website. :("

		if logtoClient.IsAuthenticated() {
			authState = "You are logged in to this website! :)"
		}

		homePage := `<h1>Hello Logto</h1>` +
			"<div>" + authState + "</div>"

		ctx.Data(http.StatusOK, "text/html; charset=utf-8", []byte(homePage))
	})

	// ...
}
Implement sign-in route
After the redirect URI is configured, we add a sign-in route to handle the sign-in request and also add an sign-in link on the home page:
func main() {
	// ...

	// Add a link to perform a sign-in request on the home page
	router.GET("/", func(ctx *gin.Context) {
		// ...
		homePage := `<h1>Hello Logto</h1>` +
			"<div>" + authState + "</div>" +
			// Add link
			`<div><a href="/sign-in">Sign In</a></div>`

		ctx.Data(http.StatusOK, "text/html; charset=utf-8", []byte(homePage))
	})

	// Add a route for handling sign-in requests
	router.GET("/sign-in", func(ctx *gin.Context) {
		session := sessions.Default(ctx)
		logtoClient := client.NewLogtoClient(
			logtoConfig,
			&SessionStorage{session: session},
		)

		// The sign-in request is handled by Logto.
		// The user will be redirected to the Redirect URI on signed in.
		signInUri, err := logtoClient.SignIn("http://localhost:3000/callback")
		if err != nil {
			ctx.String(http.StatusInternalServerError, err.Error())
			return
		}

		// Redirect the user to the Logto sign-in page.
		ctx.Redirect(http.StatusTemporaryRedirect, signInUri)
	})

	// ...
}
Now, when your user visit http://localhost:3000/sign-in, the user will be redirected to the Logto sign-in page.
Implement the callback route
When the user signs in successfully on the Logto sign-in page, Logto will redirect the user to the Redirect URI.
Since the redirect URI is http://localhost:3000/callback, we add the /callback route to handle the callback after signing in.
func main() {
	// ...

	// Add a route for handling sign-in callback requests
	router.GET("/callback", func(ctx *gin.Context) {
		session := sessions.Default(ctx)
		logtoClient := client.NewLogtoClient(
			logtoConfig,
			&SessionStorage{session: session},
		)

		// The sign-in callback request is handled by Logto
		err := logtoClient.HandleSignInCallback(ctx.Request)
		if err != nil {
			ctx.String(http.StatusInternalServerError, err.Error())
			return
		}

		// Jump to the page specified by the developer.
		// This example takes the user back to the home page.
		ctx.Redirect(http.StatusTemporaryRedirect, "/")
	})

	// ...
}
Implement sign-out route
Similar to the sign-in flow, when the user signs out, Logto will redirect the user to the post sign-out redirect URI.
Now, let's add the sign-out route to handle the sign-out request and also add a sign-out link on the home page:
func main() {
	// ...

	// Add a link to perform a sign-out request on the home page
	router.GET("/", func(ctx *gin.Context) {
		// ...
		homePage := `<h1>Hello Logto</h1>` +
			"<div>" + authState + "</div>" +
			`<div><a href="/sign-in">Sign In</a></div>` +
			// Add link
			`<div><a href="/sign-out">Sign Out</a></div>`

		ctx.Data(http.StatusOK, "text/html; charset=utf-8", []byte(homePage))
	})

	// Add a route for handling signing out requests
	router.GET("/sign-out", func(ctx *gin.Context) {
		session := sessions.Default(ctx)
		logtoClient := client.NewLogtoClient(
			logtoConfig,
			&SessionStorage{session: session},
		)

		// The sign-out request is handled by Logto.
		// The user will be redirected to the Post Sign-out Redirect URI on signed out.
		signOutUri, signOutErr := logtoClient.SignOut("http://localhost:3000")

		if signOutErr != nil {
			ctx.String(http.StatusOK, signOutErr.Error())
			return
		}

		ctx.Redirect(http.StatusTemporaryRedirect, signOutUri)
	})

	// ...
}
After the user makes a signing-out request, Logto will clear all user authentication information in the session.
Checkpoint: Test your application
Now, you can test your application:
- Run your application, you will see the sign-in button.
- Click the sign-in button, the SDK will init the sign-in process and redirect you to the Logto sign-in page.
- After you signed in, you will be redirected back to your application and see the sign-out button.
- Click the sign-out button to clear token storage and sign out.
Add Google Workspace enterprise SSO connector
To simplify access management and gain enterprise-level safeguards for your big clients, connect with Go as a federated identity provider. The Logto enterprise SSO connector helps you establish this connection in minutes by allowing several parameter inputs.
To add an enterprise SSO connector, simply follow these steps:
- Navigate to Logto console > Enterprise SSO.
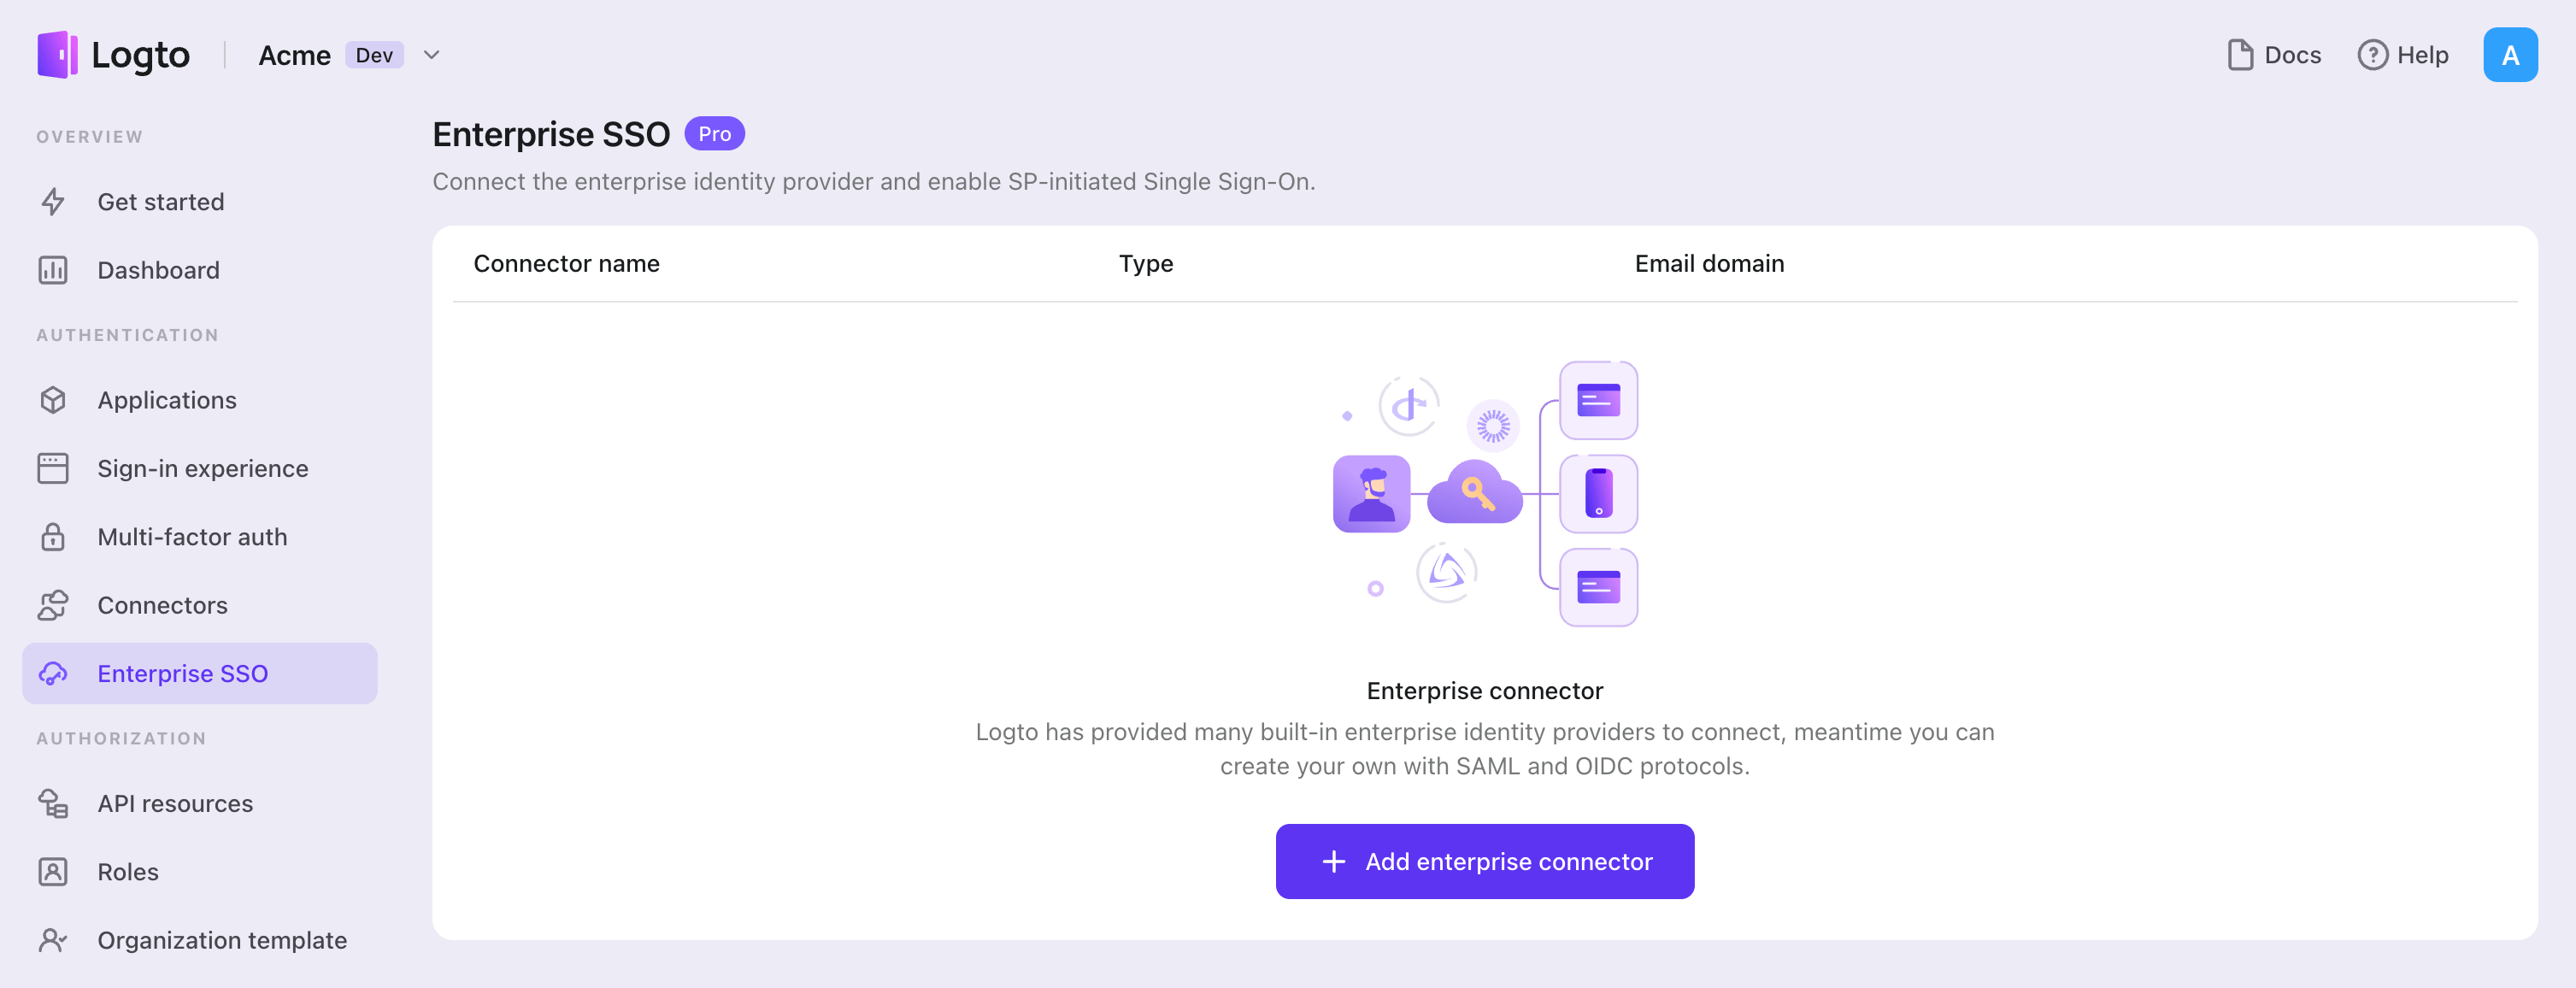
- Click "Add enterprise connector" button and choose your SSO provider type. Choose from prebuilt connectors for Microsoft Entra ID (Azure AD), Google Workspace, and Okta, or create a custom SSO connection using the standard OpenID Connect (OIDC) or SAML protocol.
- Provide a unique name (e.g., SSO sign-in for Acme Company).
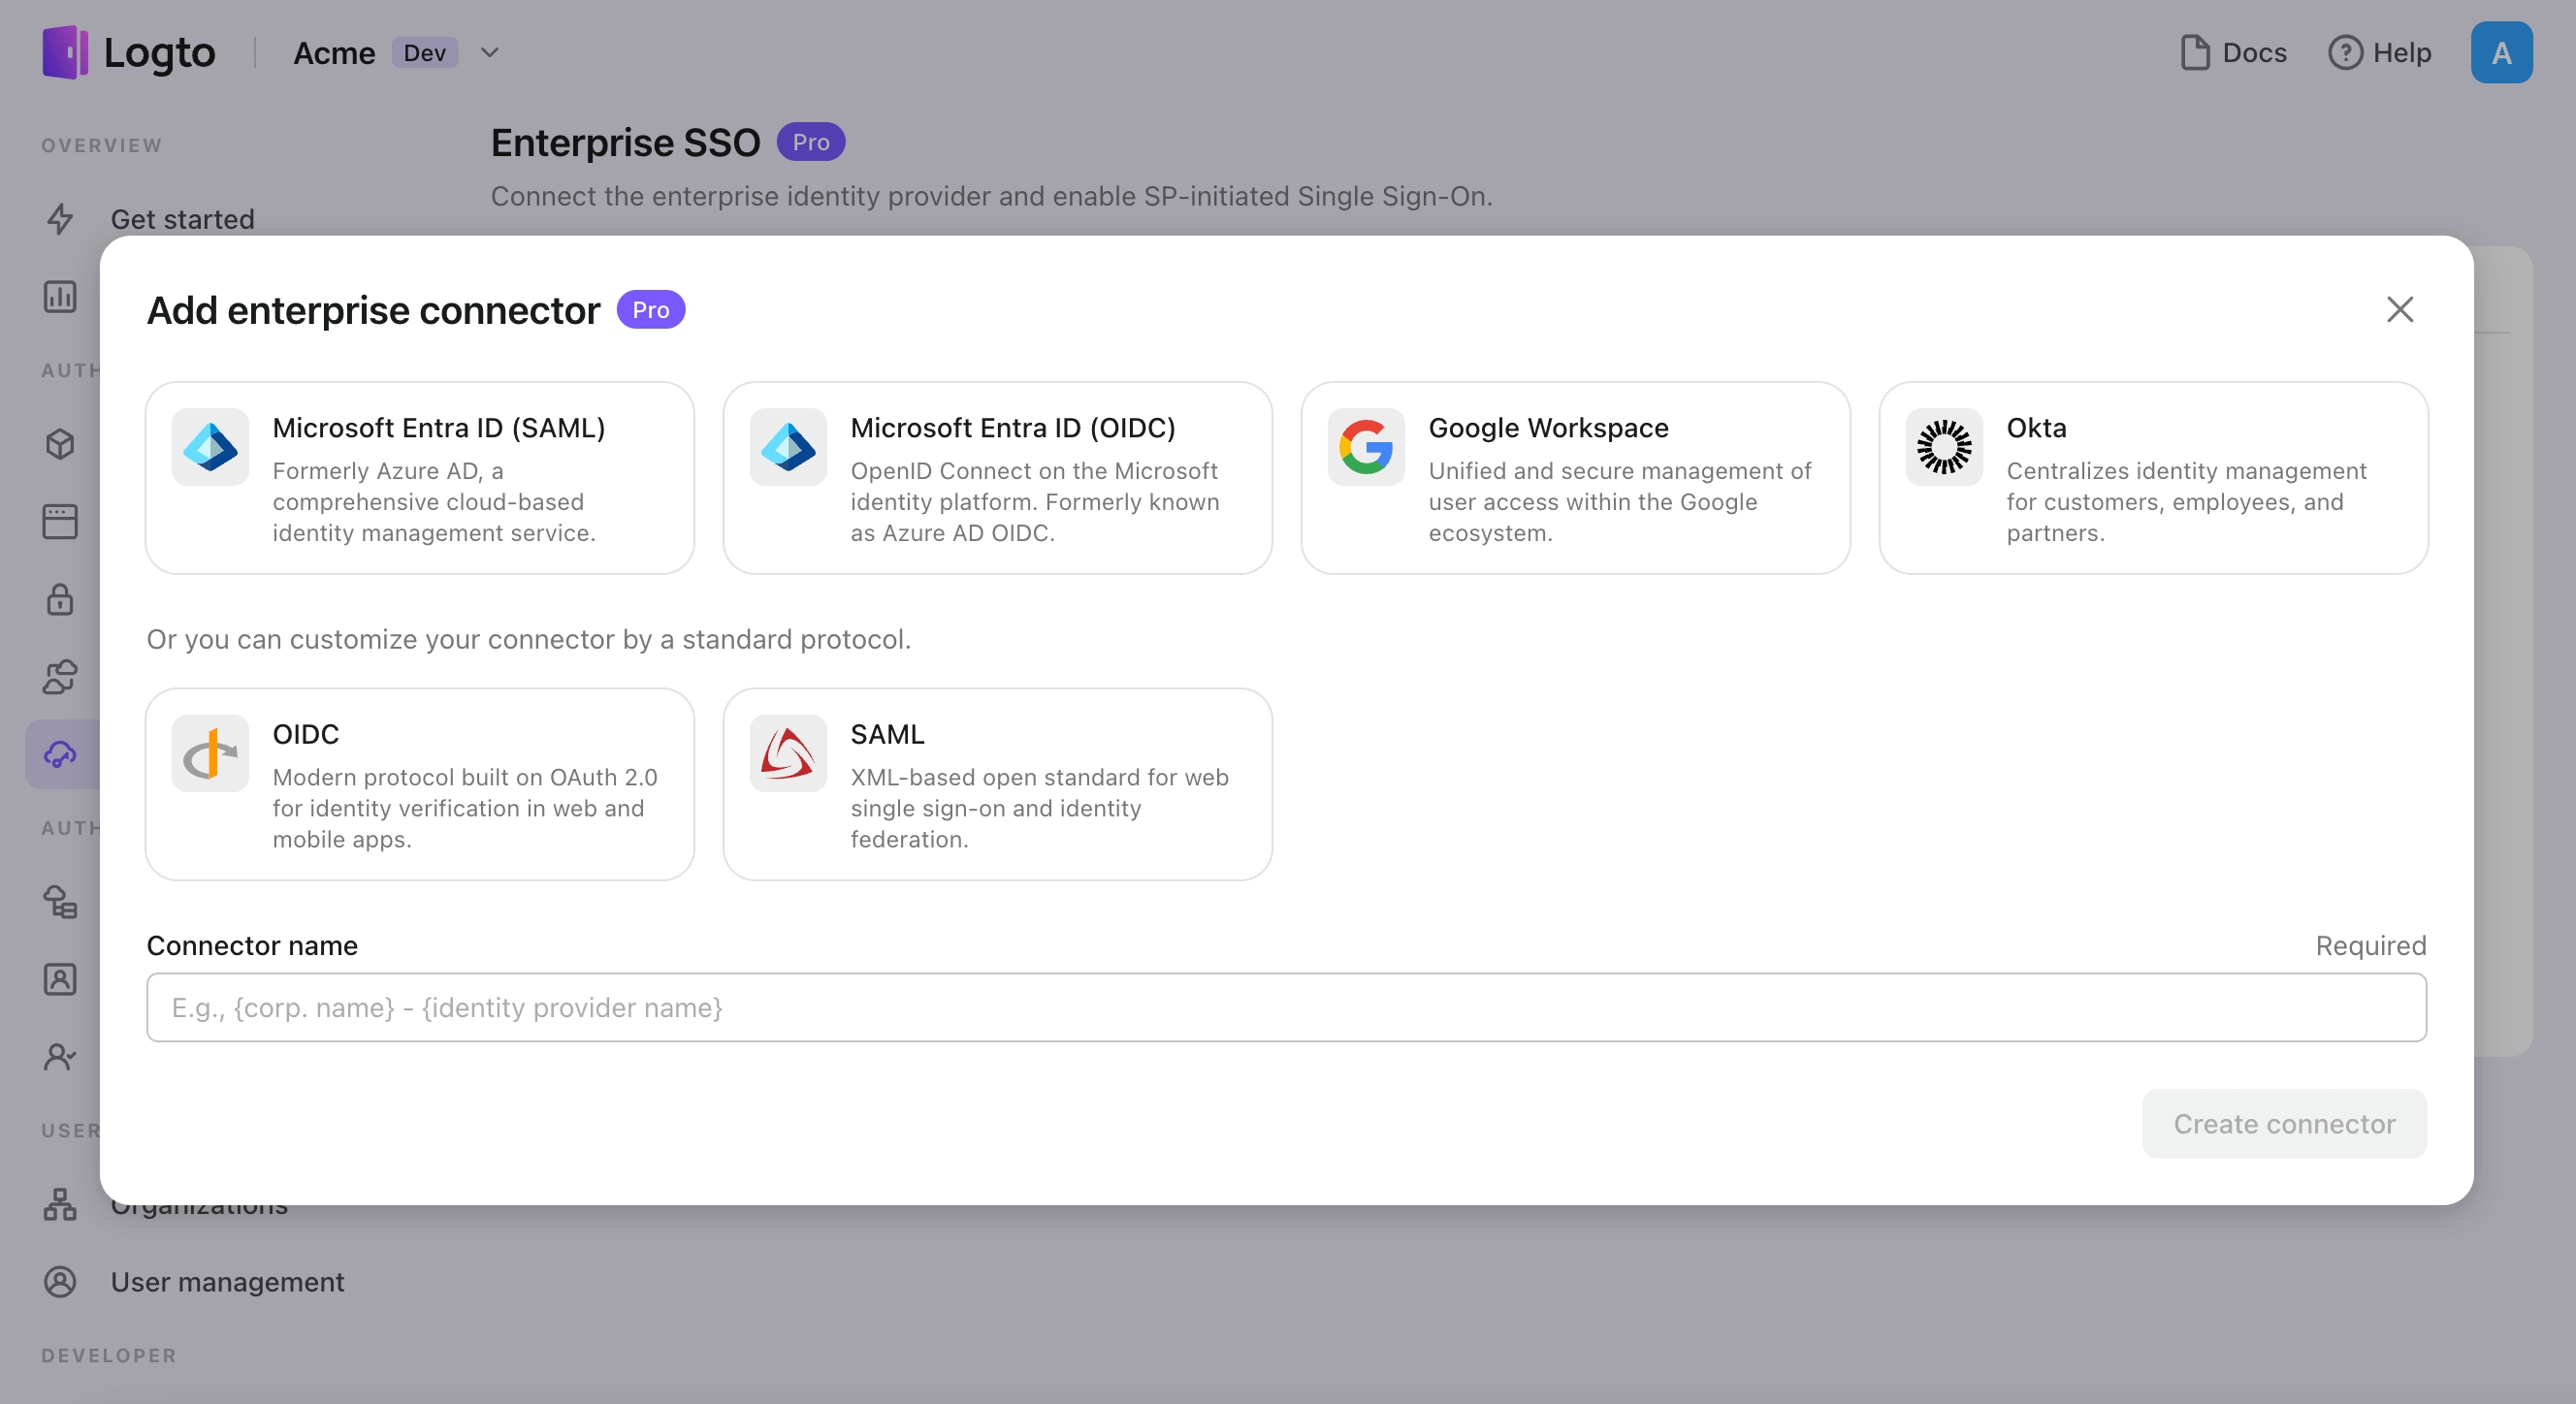
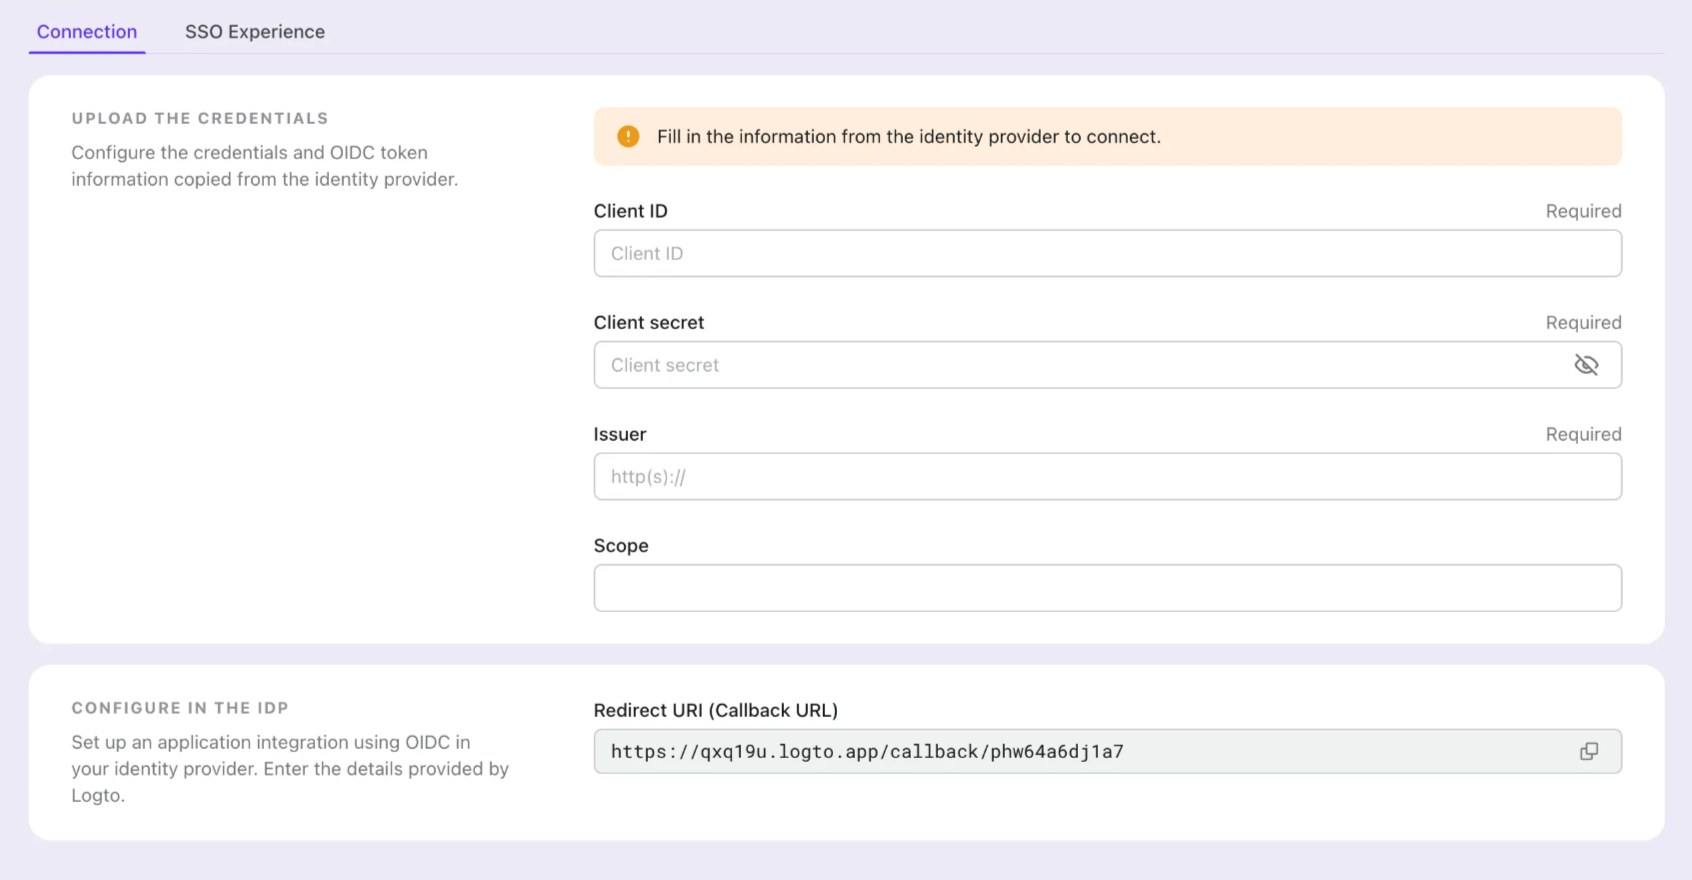
- Configure the connection with your IdP in the "Connection" tab. Check the guides above for each connector types.
- Customize the SSO experience and enterprise’s email domain in the "Experience" tab. Users sign in with the SSO-enabled email domain will be redirected to SSO authentication.

- Save changes.
Set up Google Cloud Platform
Step 1: Create a new project on Google Cloud Platform
Before you can use Google Workspace as an authentication provider, you must set up a project in the Google API Console to obtain OAuth 2.0 credentials, If you already have a project, you can skip this step. Otherwise, create a new project under your Google organization.
Step 2: Config the consent screen for your application
In order to create a new OIDC credential, you need to configure the consent screen for your application.
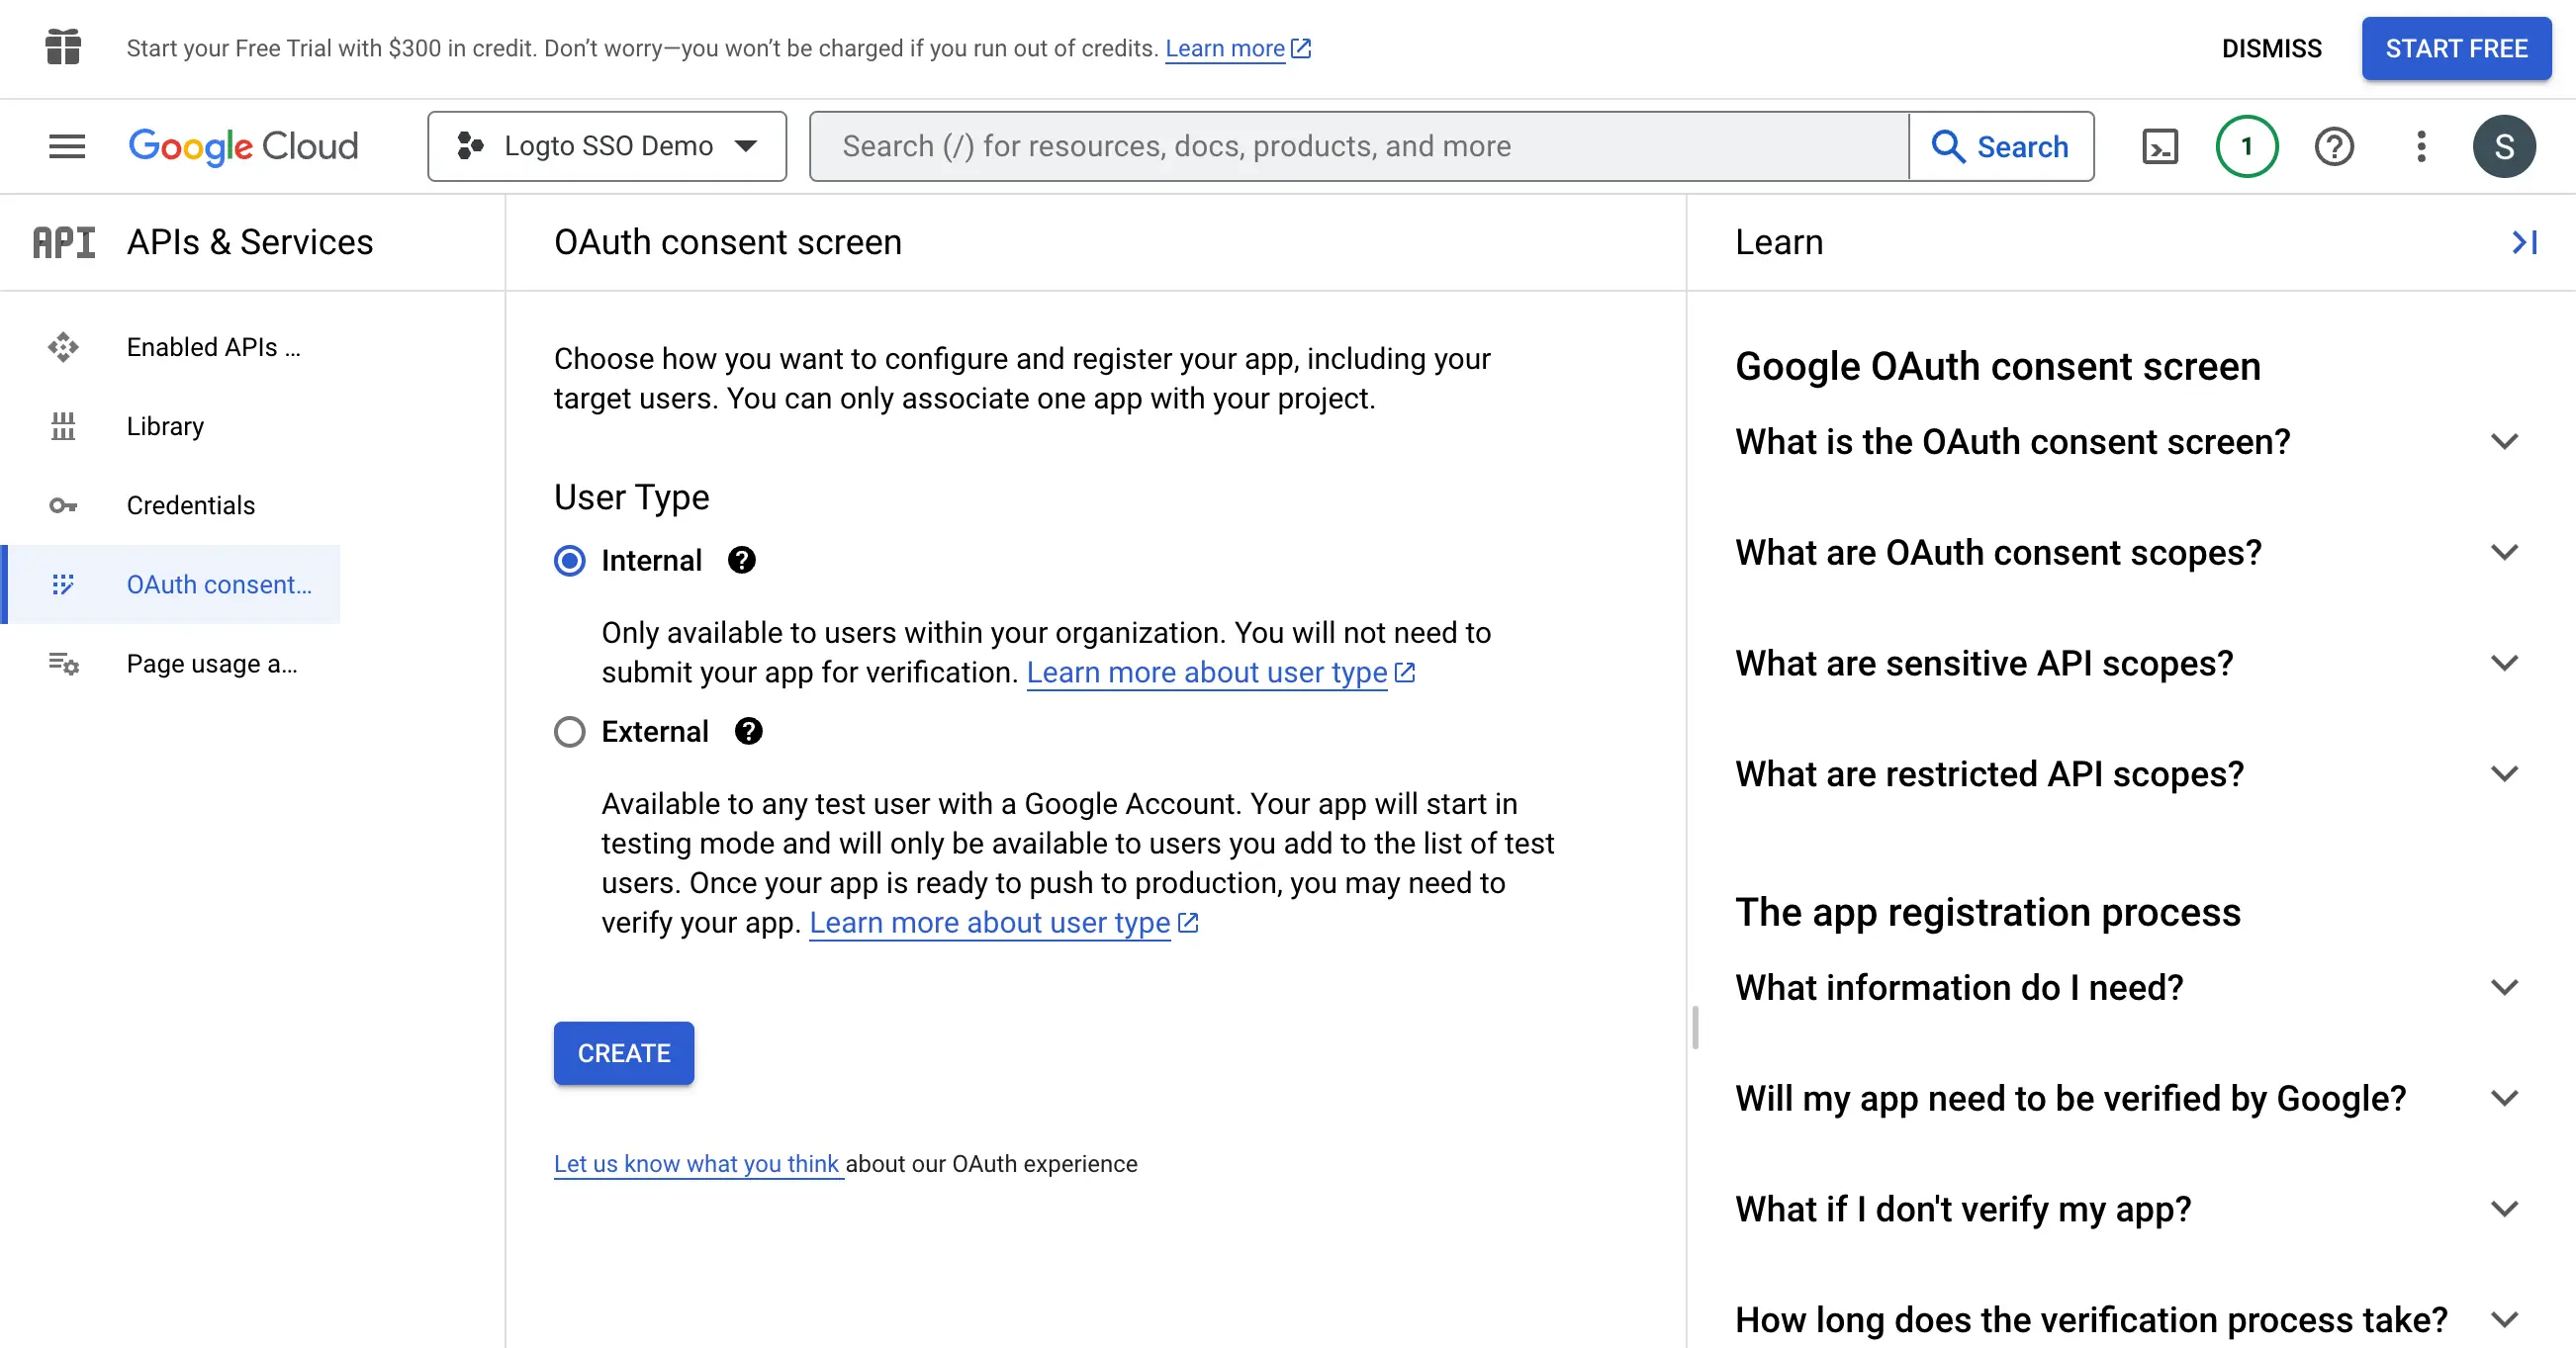
- Navigate to the OAuth consent screen page and select the
Internaluser type. This will make the OAuth application only available to users within your organization.
- Fill in the
Consent Screensettings following the instructions on the page. You need to provide the following minimum information:
- Application name: The name of your application. It will be displayed on the consent screen.
- Support email: The support email of your application. It will be displayed on the consent screen.

- Set the
Scopesfor your application. In order to retrieve the user's identity information and email address properly from the IdP, Logto SSO connectors need to grant the following scopes from the IdP:
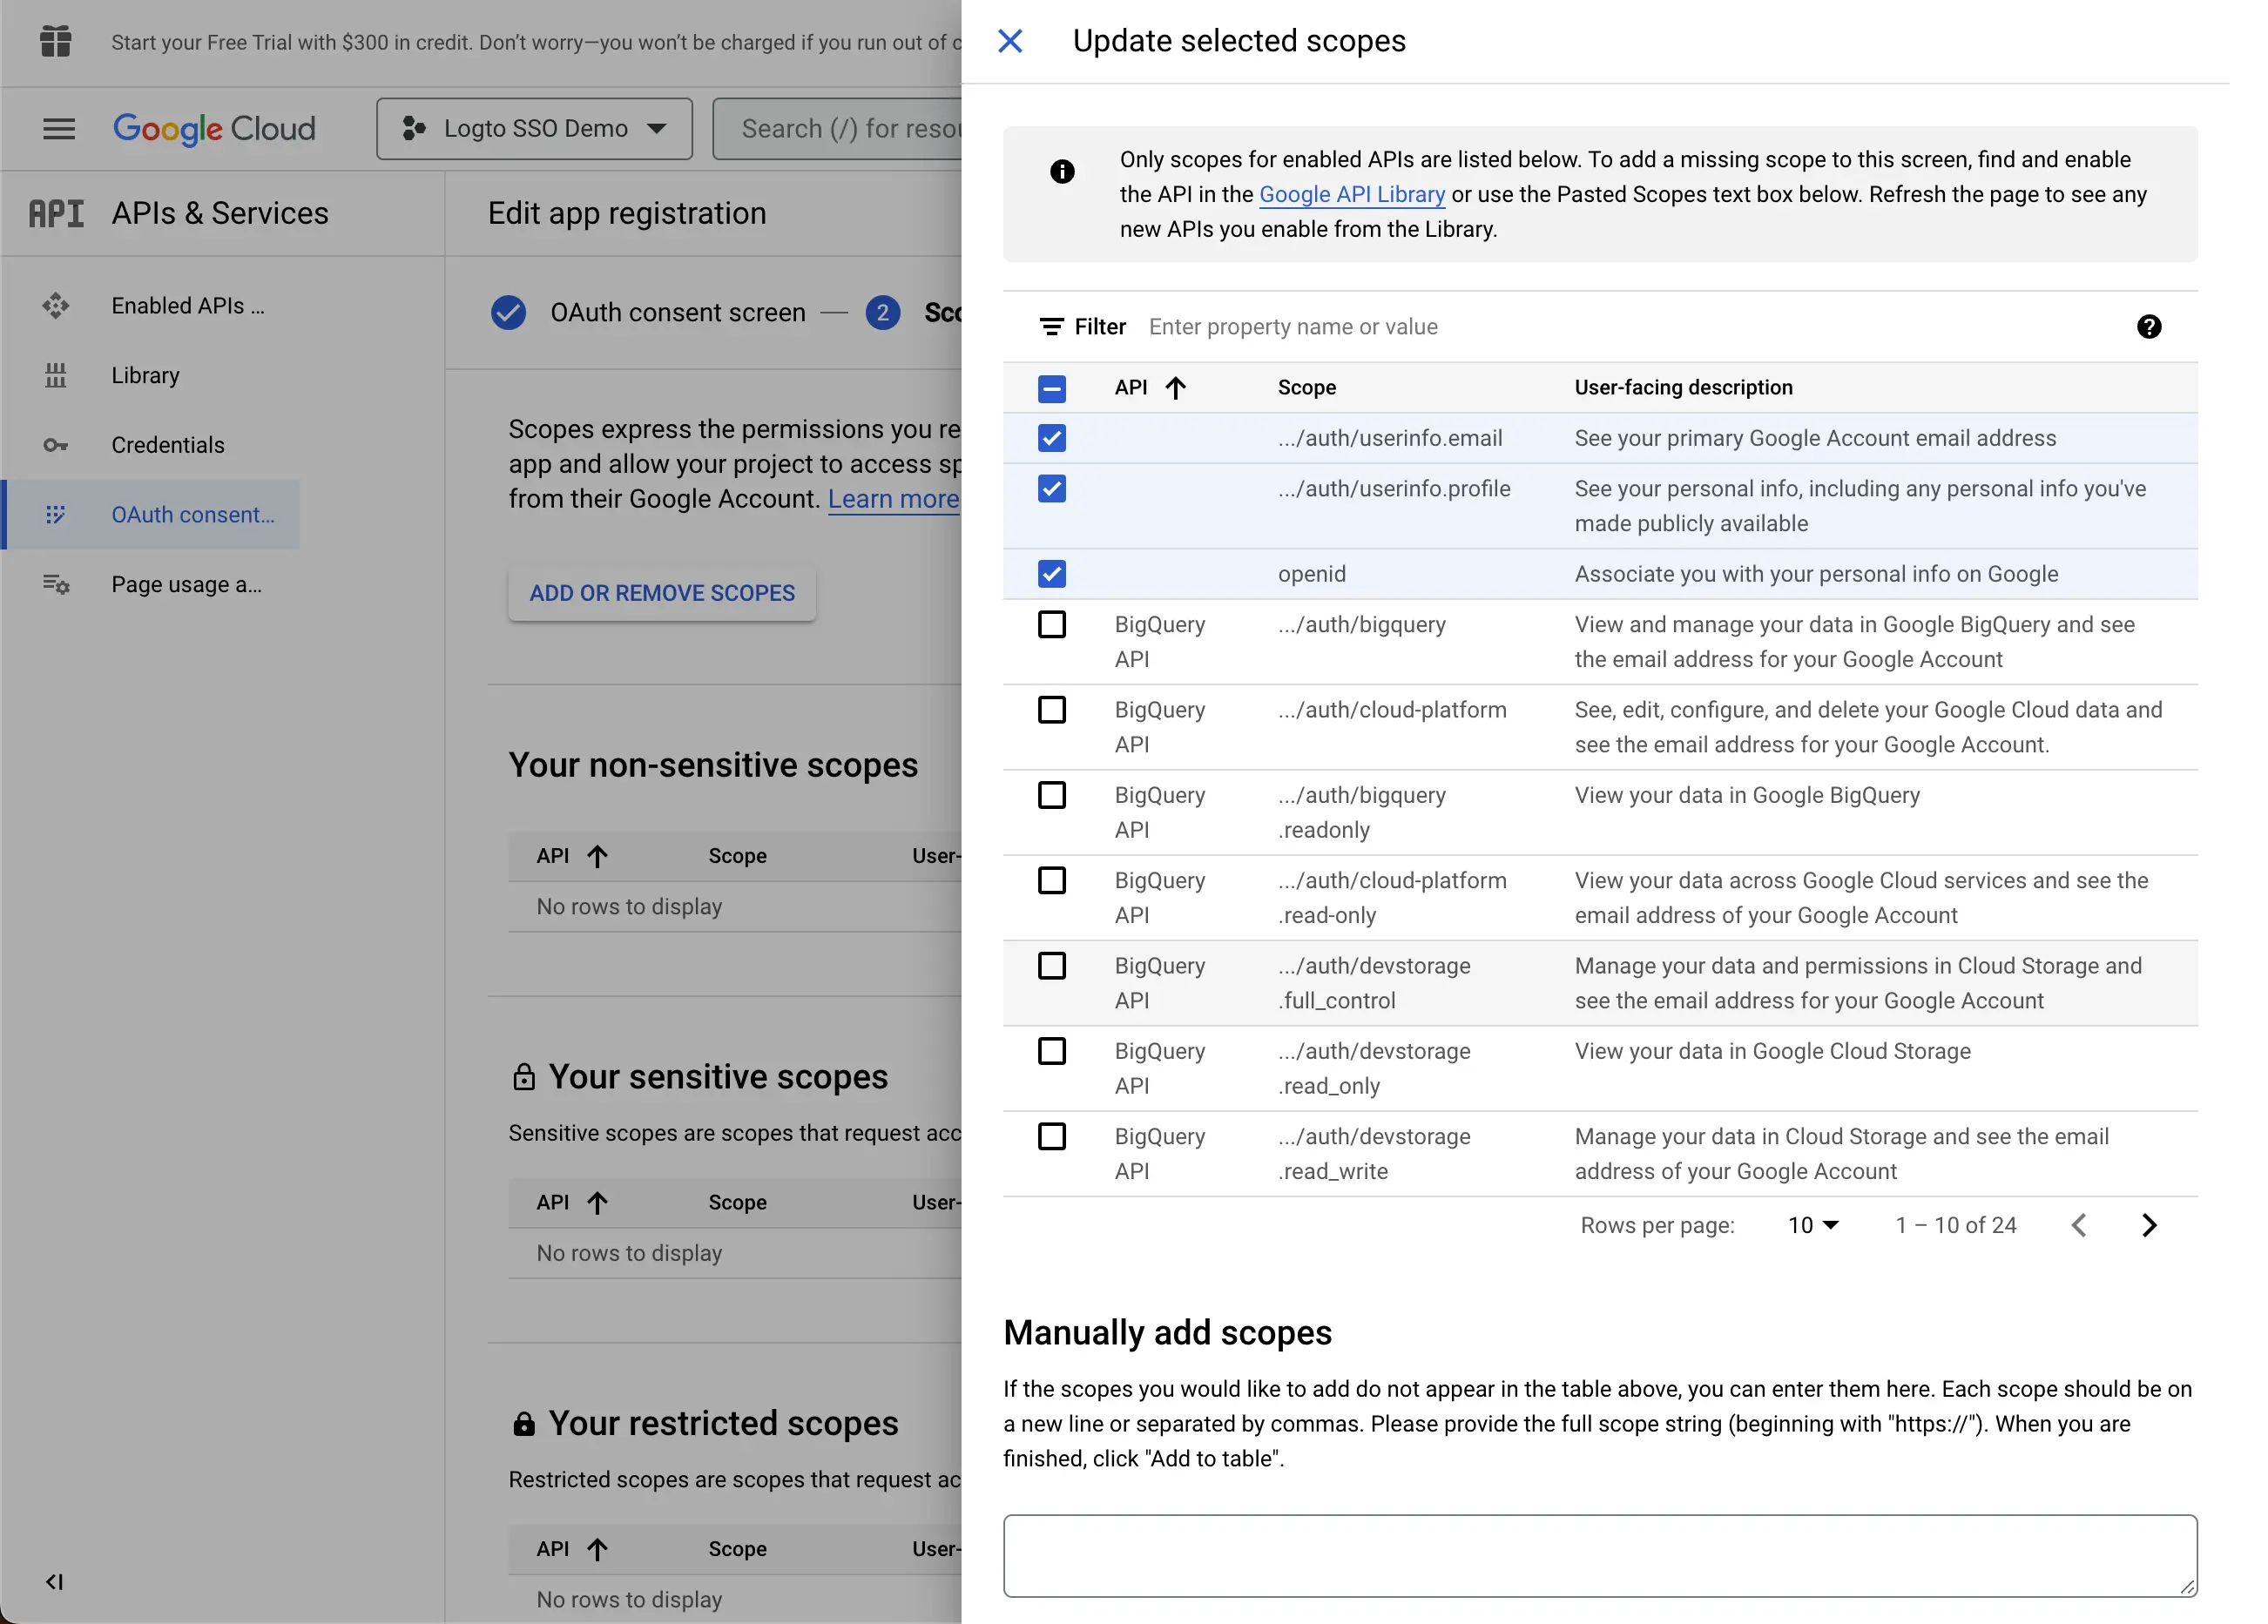
- openid: This scope is required for OIDC authentication. It is used to retrieve the ID token and get access to the userInfo endpoint of the IdP.
- profile: This scope is required for accessing the user's basic profile information.
- email: This scope is required for accessing the user's email address.
Click the Save button to save the consent screen settings.
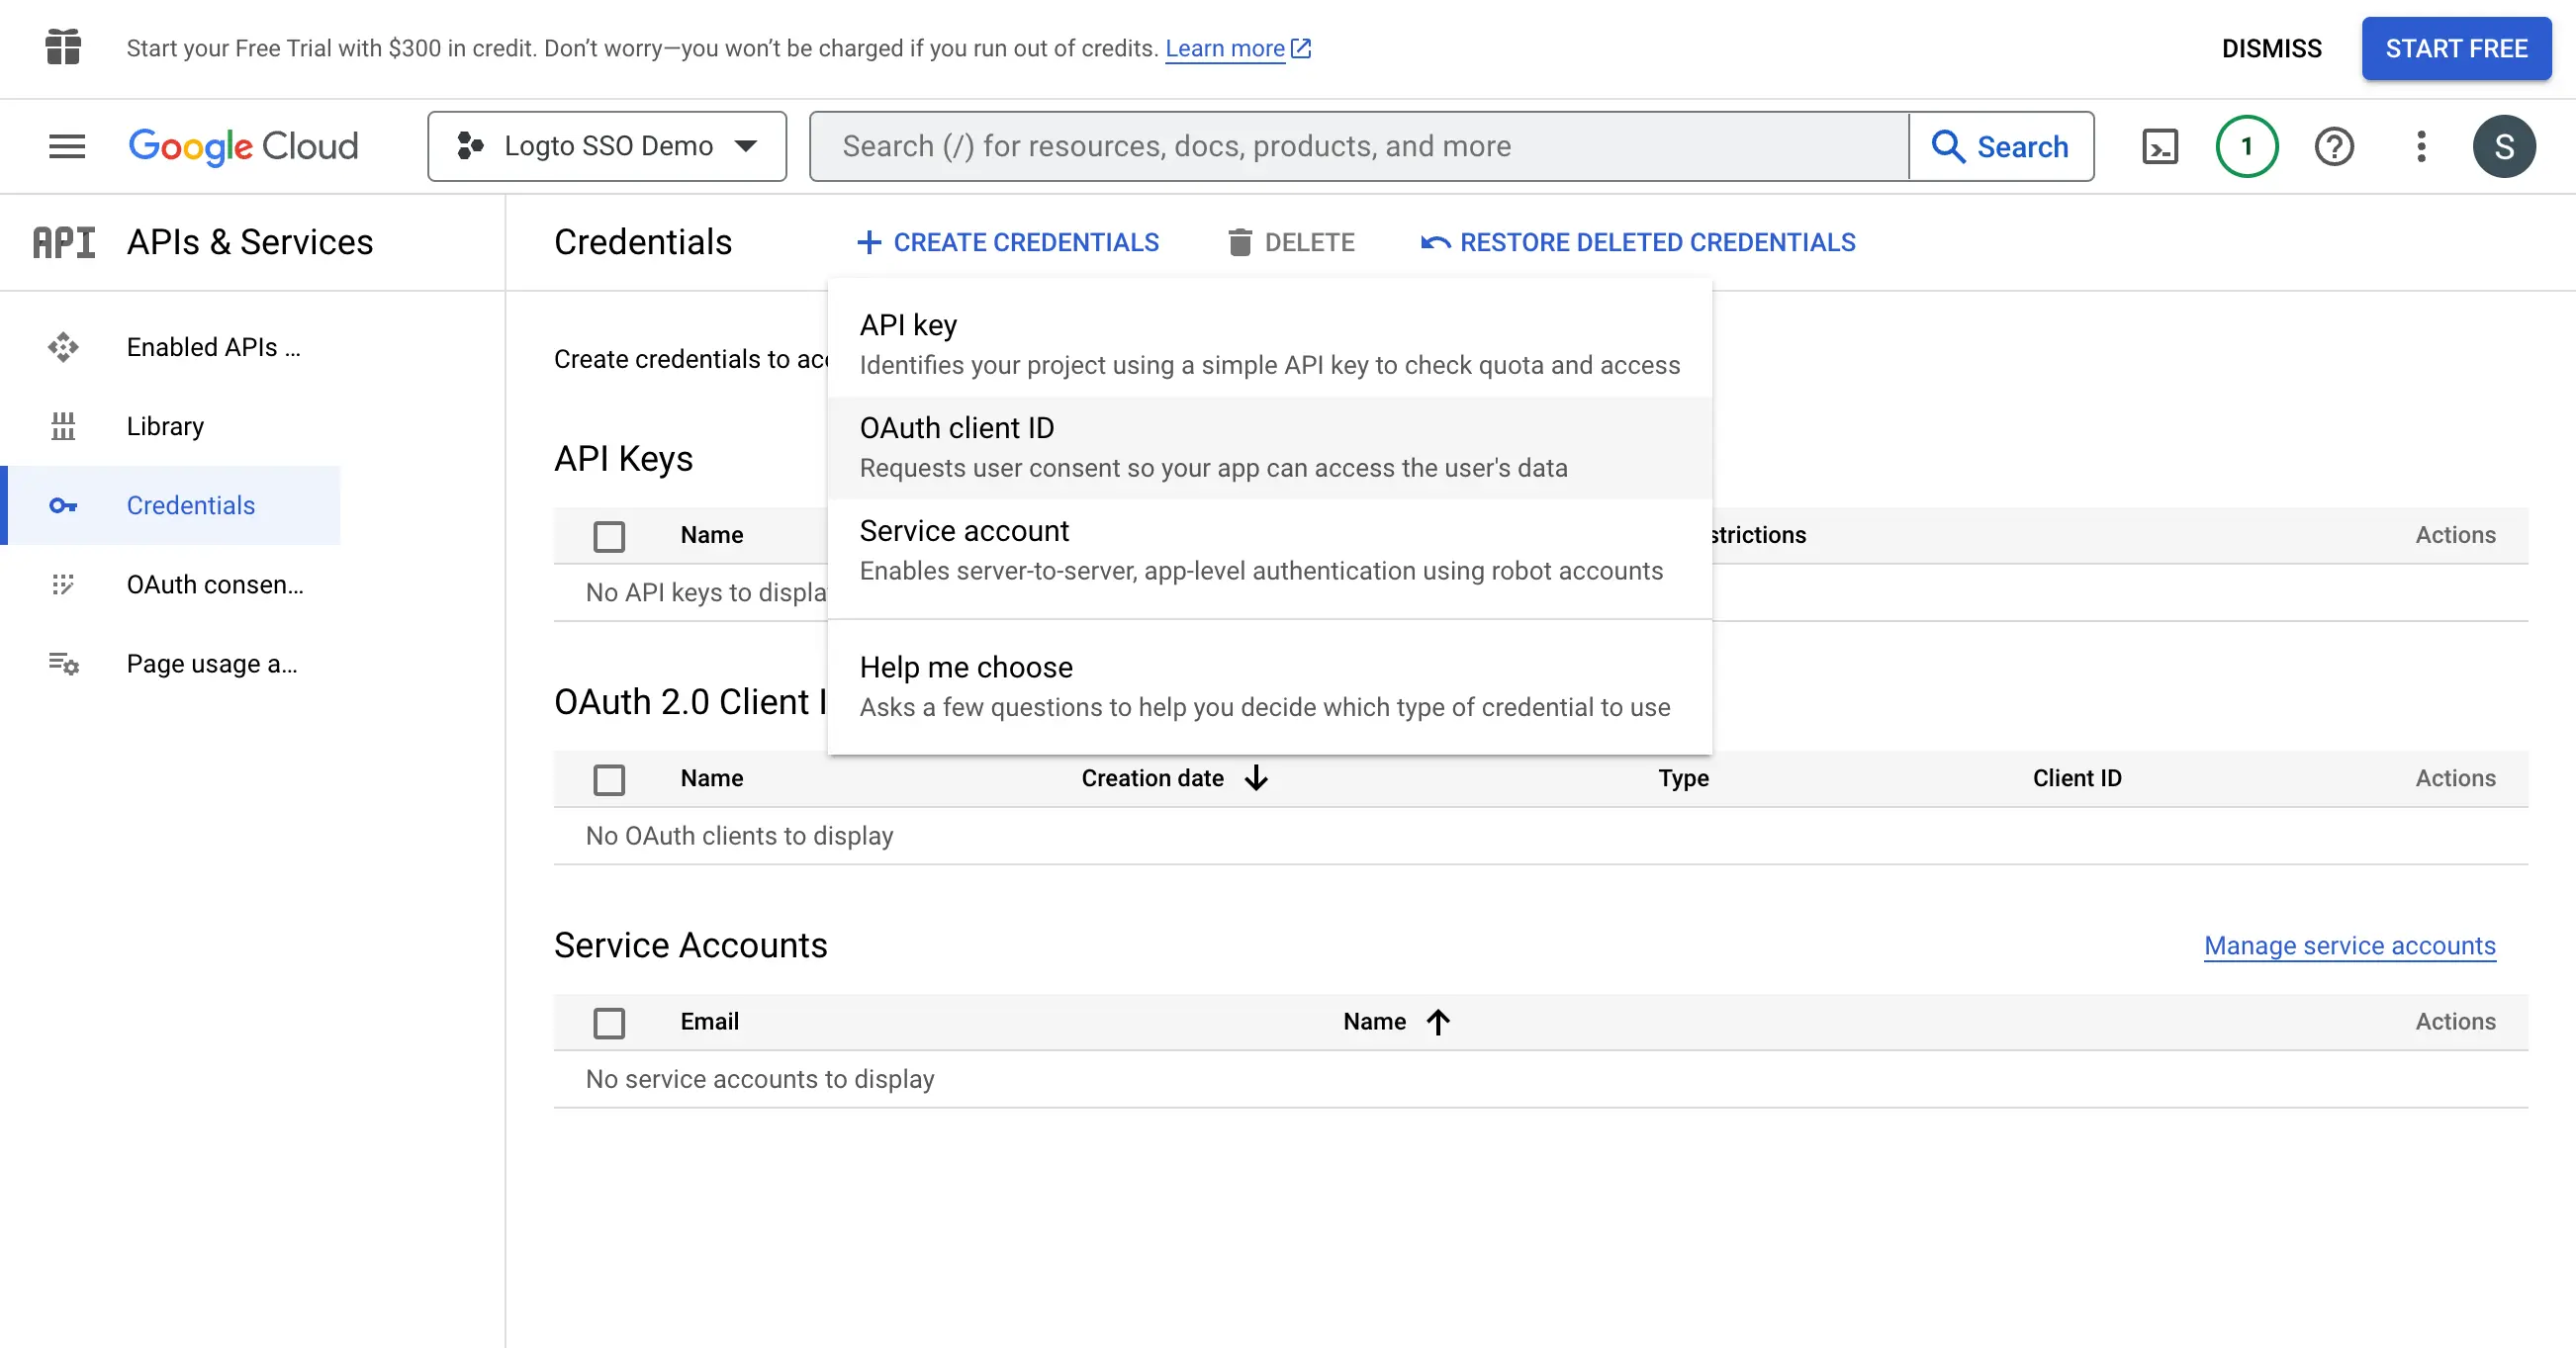
Step 3: Create a new OAuth credential
Navigate to the Credentials page and click the Create Credentials button. Select the OAuth client ID option from the dropdown menu to create a new OAuth credential for your application.
Continue setting up the OAuth credential by filling up the following information:
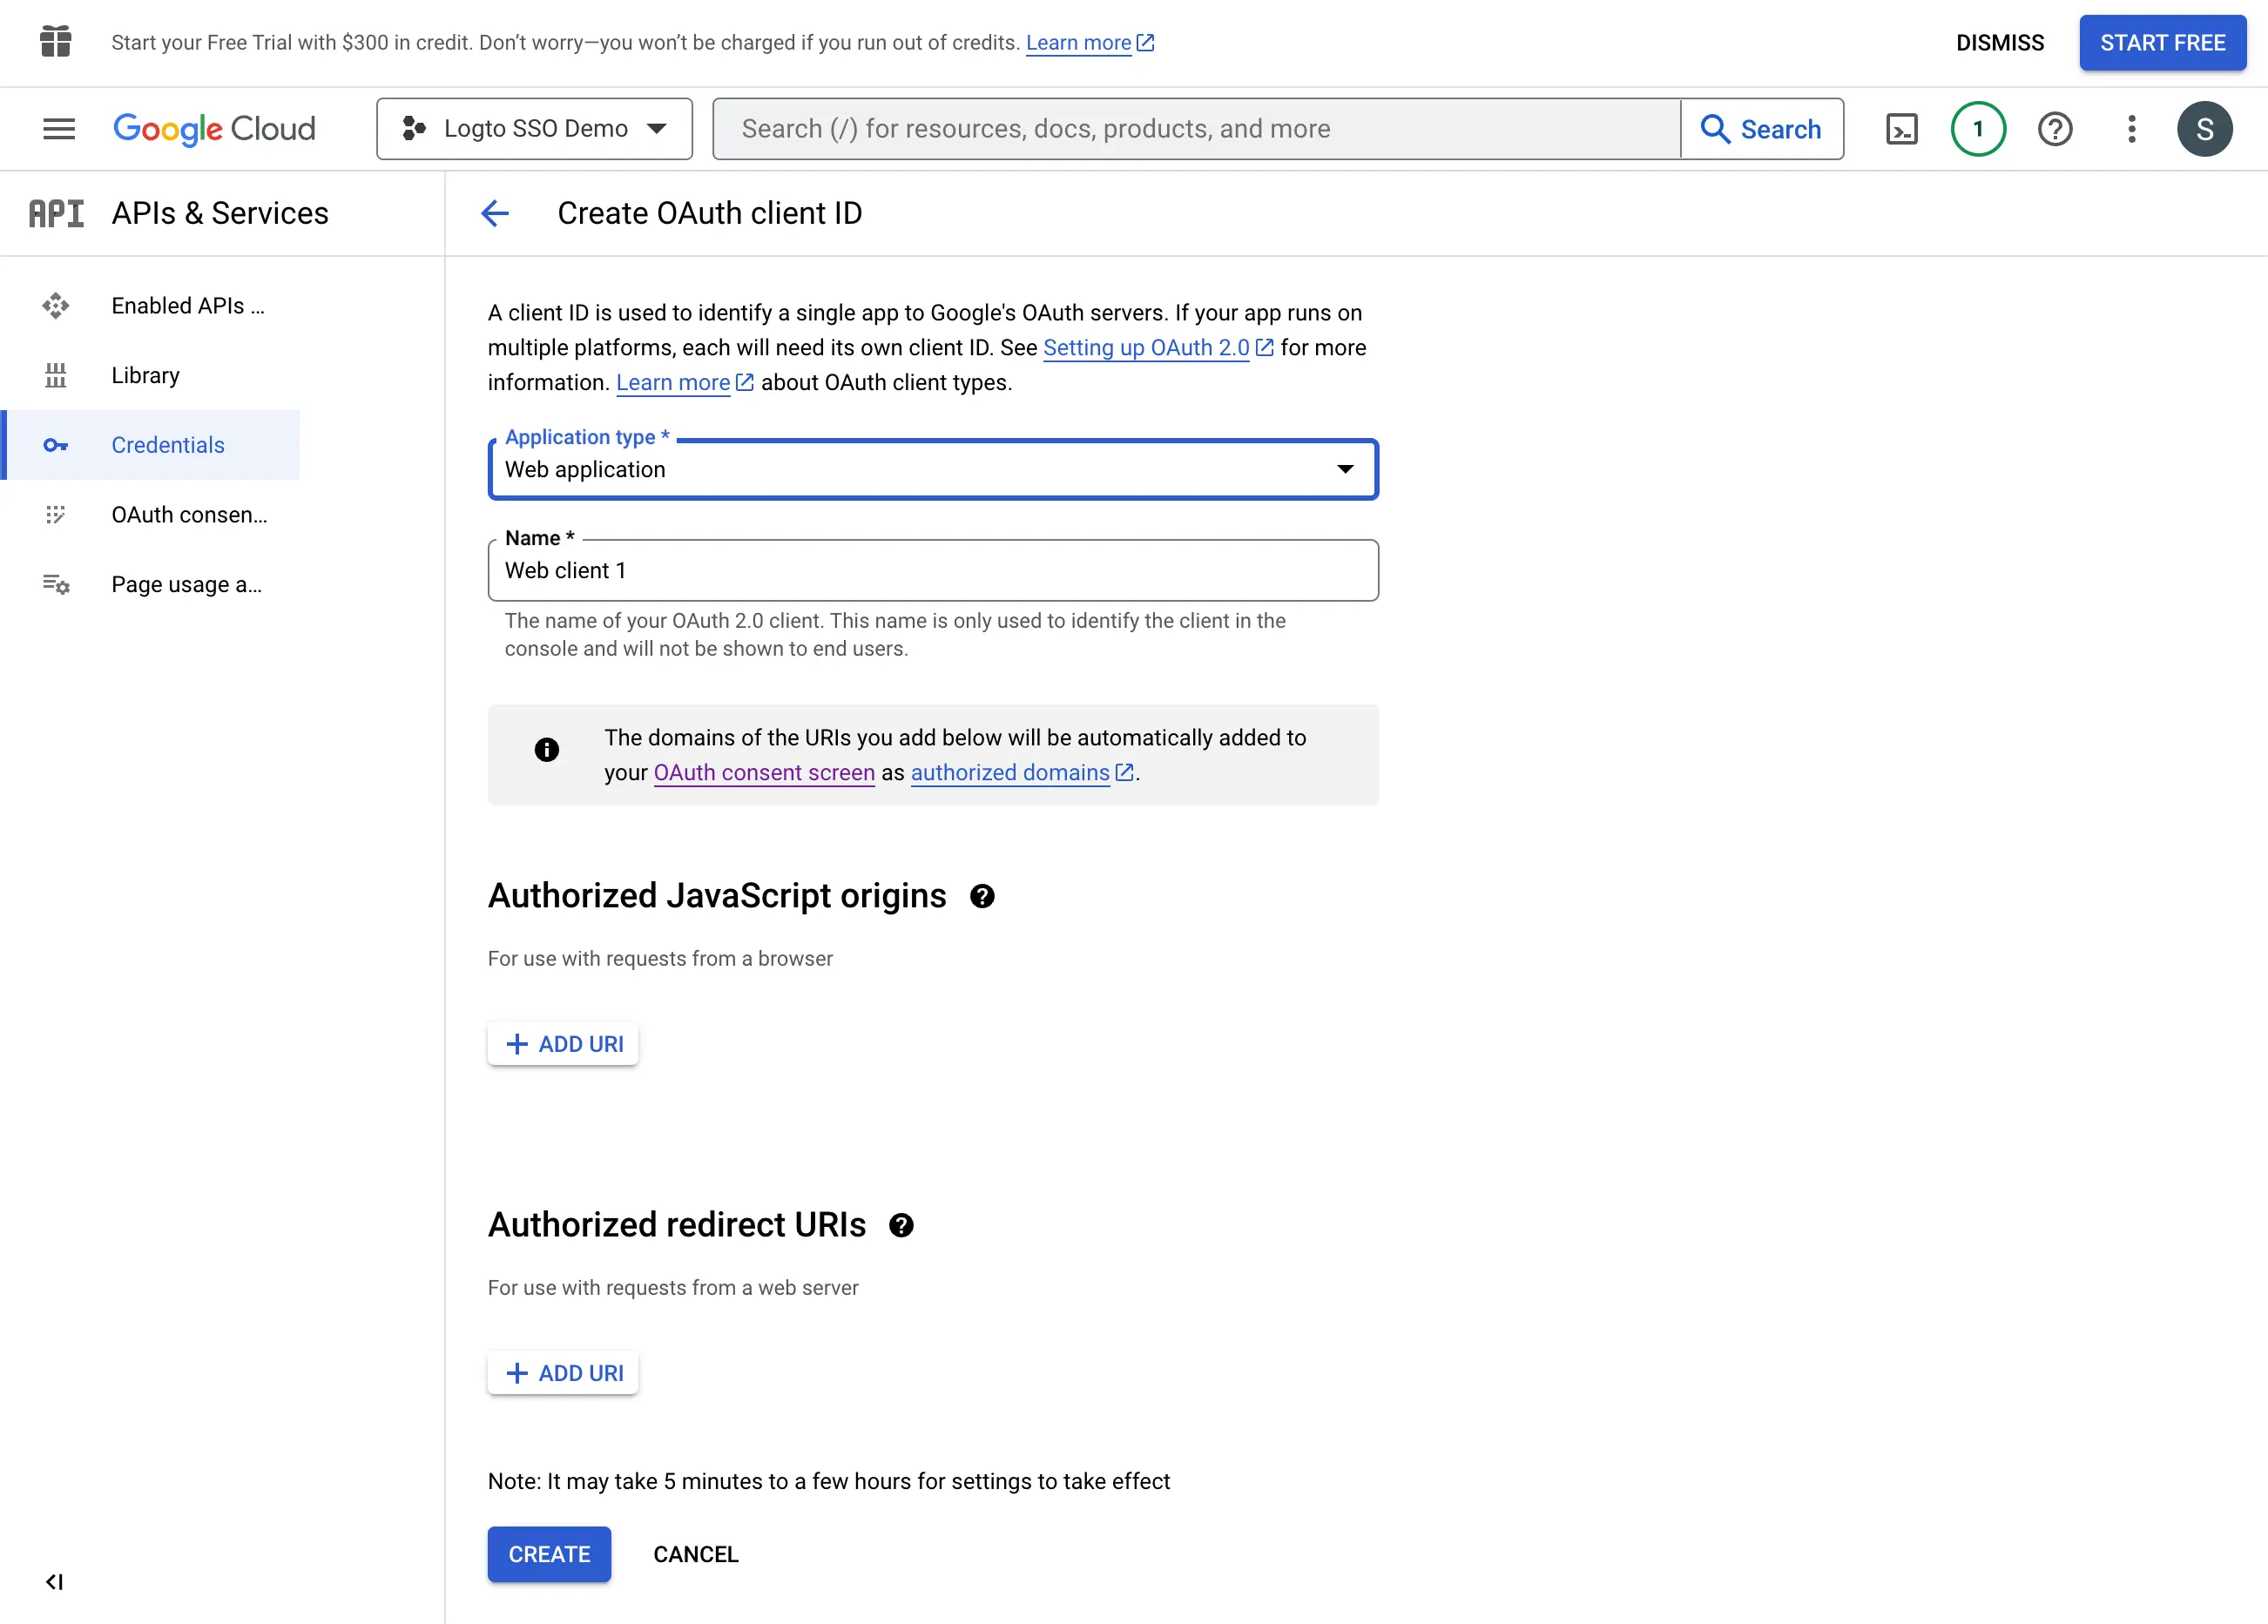
- Select the
Web applicationas the application type. - Fill in the
Nameof your client application,Logto SSO Connectorfor example. This will help you to identify the credentials in the future. - Fill in the
Authorized redirect URIswith the Logto callback URI. This is the URI that Google will redirect the user's browser after successful authentication. After a user successfully authenticates with the IdP, the IdP redirects the user's browser back to this designated URI along with an authorization code. Logto will complete the authentication process based on the authorization code received from this URI. - Fill in the
Authorized JavaScript originswith the Logto callback URI's origin. This ensures only your Logto application can send requests to the Google OAuth server. - Click the
Createbutton to create the OAuth credential.
Step 4: Set up Logto connector with the client credentials
After successfully creating the OAuth credential, you will receive a prompt modal with the client ID and client secret.
Copy the Client ID and Client secret and fill in the corresponding fields on Logto’s SSO connector Connection tab.
Now you have successfully configured a Google Workspace SSO connector on Logto.
Step 5: Additional Scopes (Optional)
Use the Scope field to add additional scopes to your OAuth request. This will allow you to request more information from the Google OAuth server. Please refer to the Google OAuth Scopes documentation for more information.
Regardless of the custom scope settings, Logto will always send the openid, profile, and email scopes to the IdP. This is to ensure that Logto can retrieve the user's identity information and email address properly.
Step 6: Set email domains and enable the SSO connector
Provide the email domains of your organization on Logto’s connector SSO experience tab. This will enable the SSO connector as an authentication method for those users.
Users with email addresses in the specified domains will be redirected to use your SSO connector as their only authentication method.
For more information about the Google Workspace SSO connector, please check Google OpenID Connector.
Save your configuration
Double check you have filled out necessary values in the Logto connector configuration area. Click "Save and Done" (or "Save changes") and the Google Workspace enterprise SSO connector should be available now.
Enable Google Workspace enterprise SSO connector in Sign-in Experience
You don’t need to configure enterprise connectors individually, Logto simplifies SSO integration into your applications with just one click.
- Navigate to: Console > Sign-in experience > Sign-up and sign-in.
- Enable the "Enterprise SSO" toggle.
- Save changes.
Once enabled, a "Single Sign-On" button will appear on your sign-in page. Enterprise users with SSO-enabled email domains can access your services using their enterprise identity providers (IdPs).
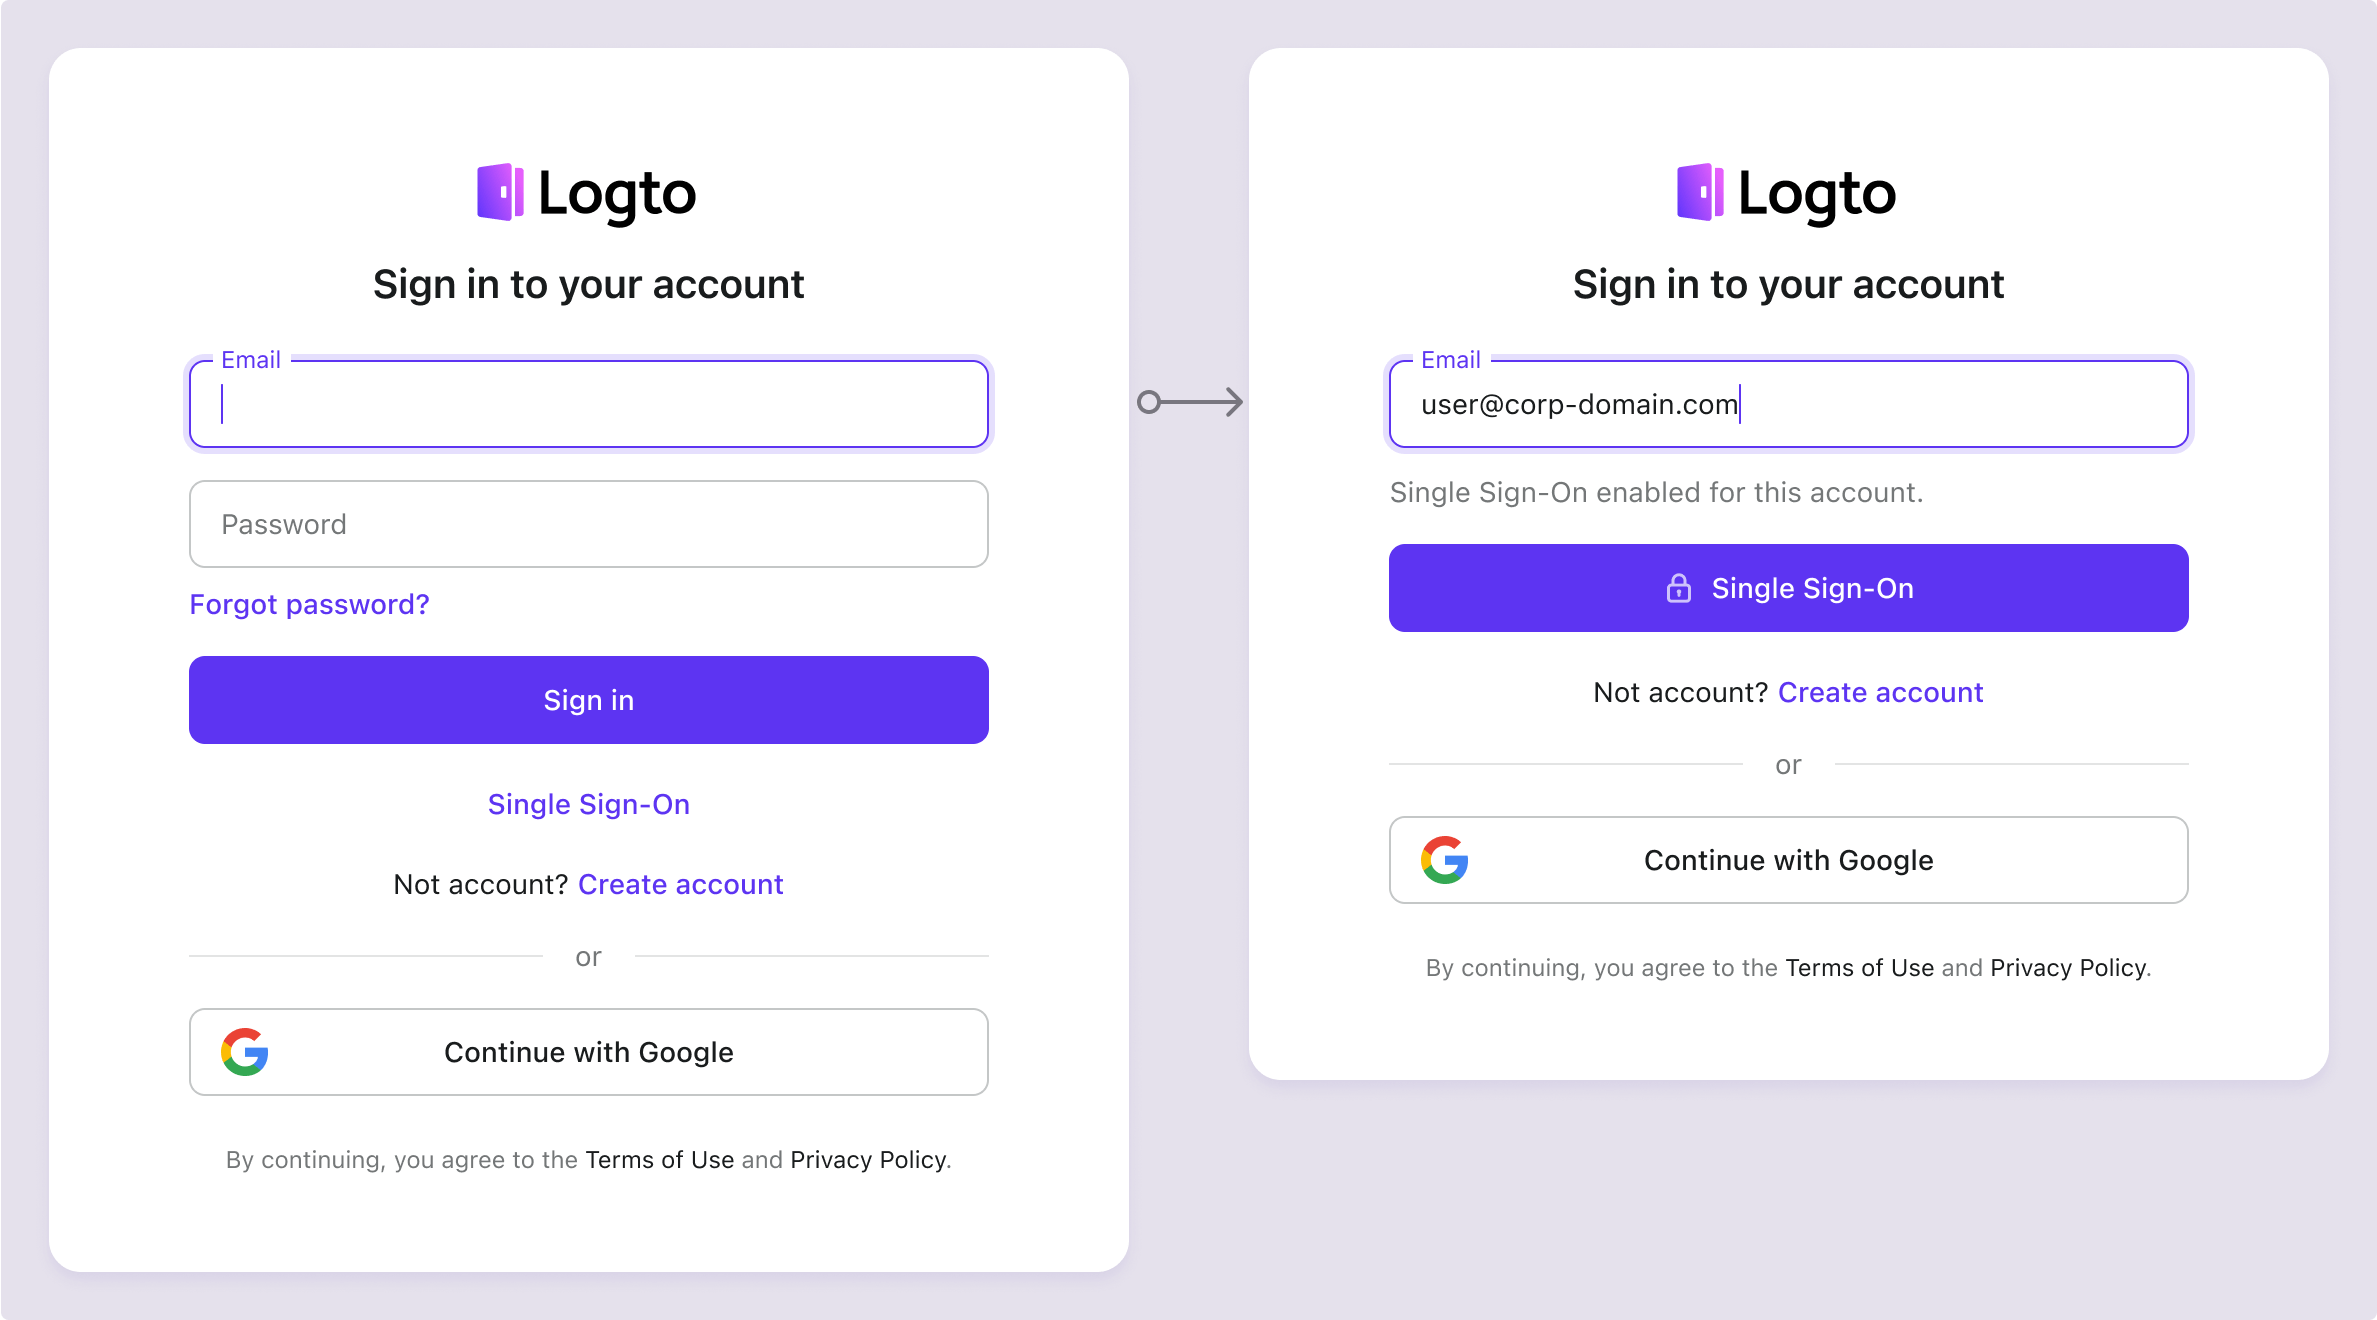
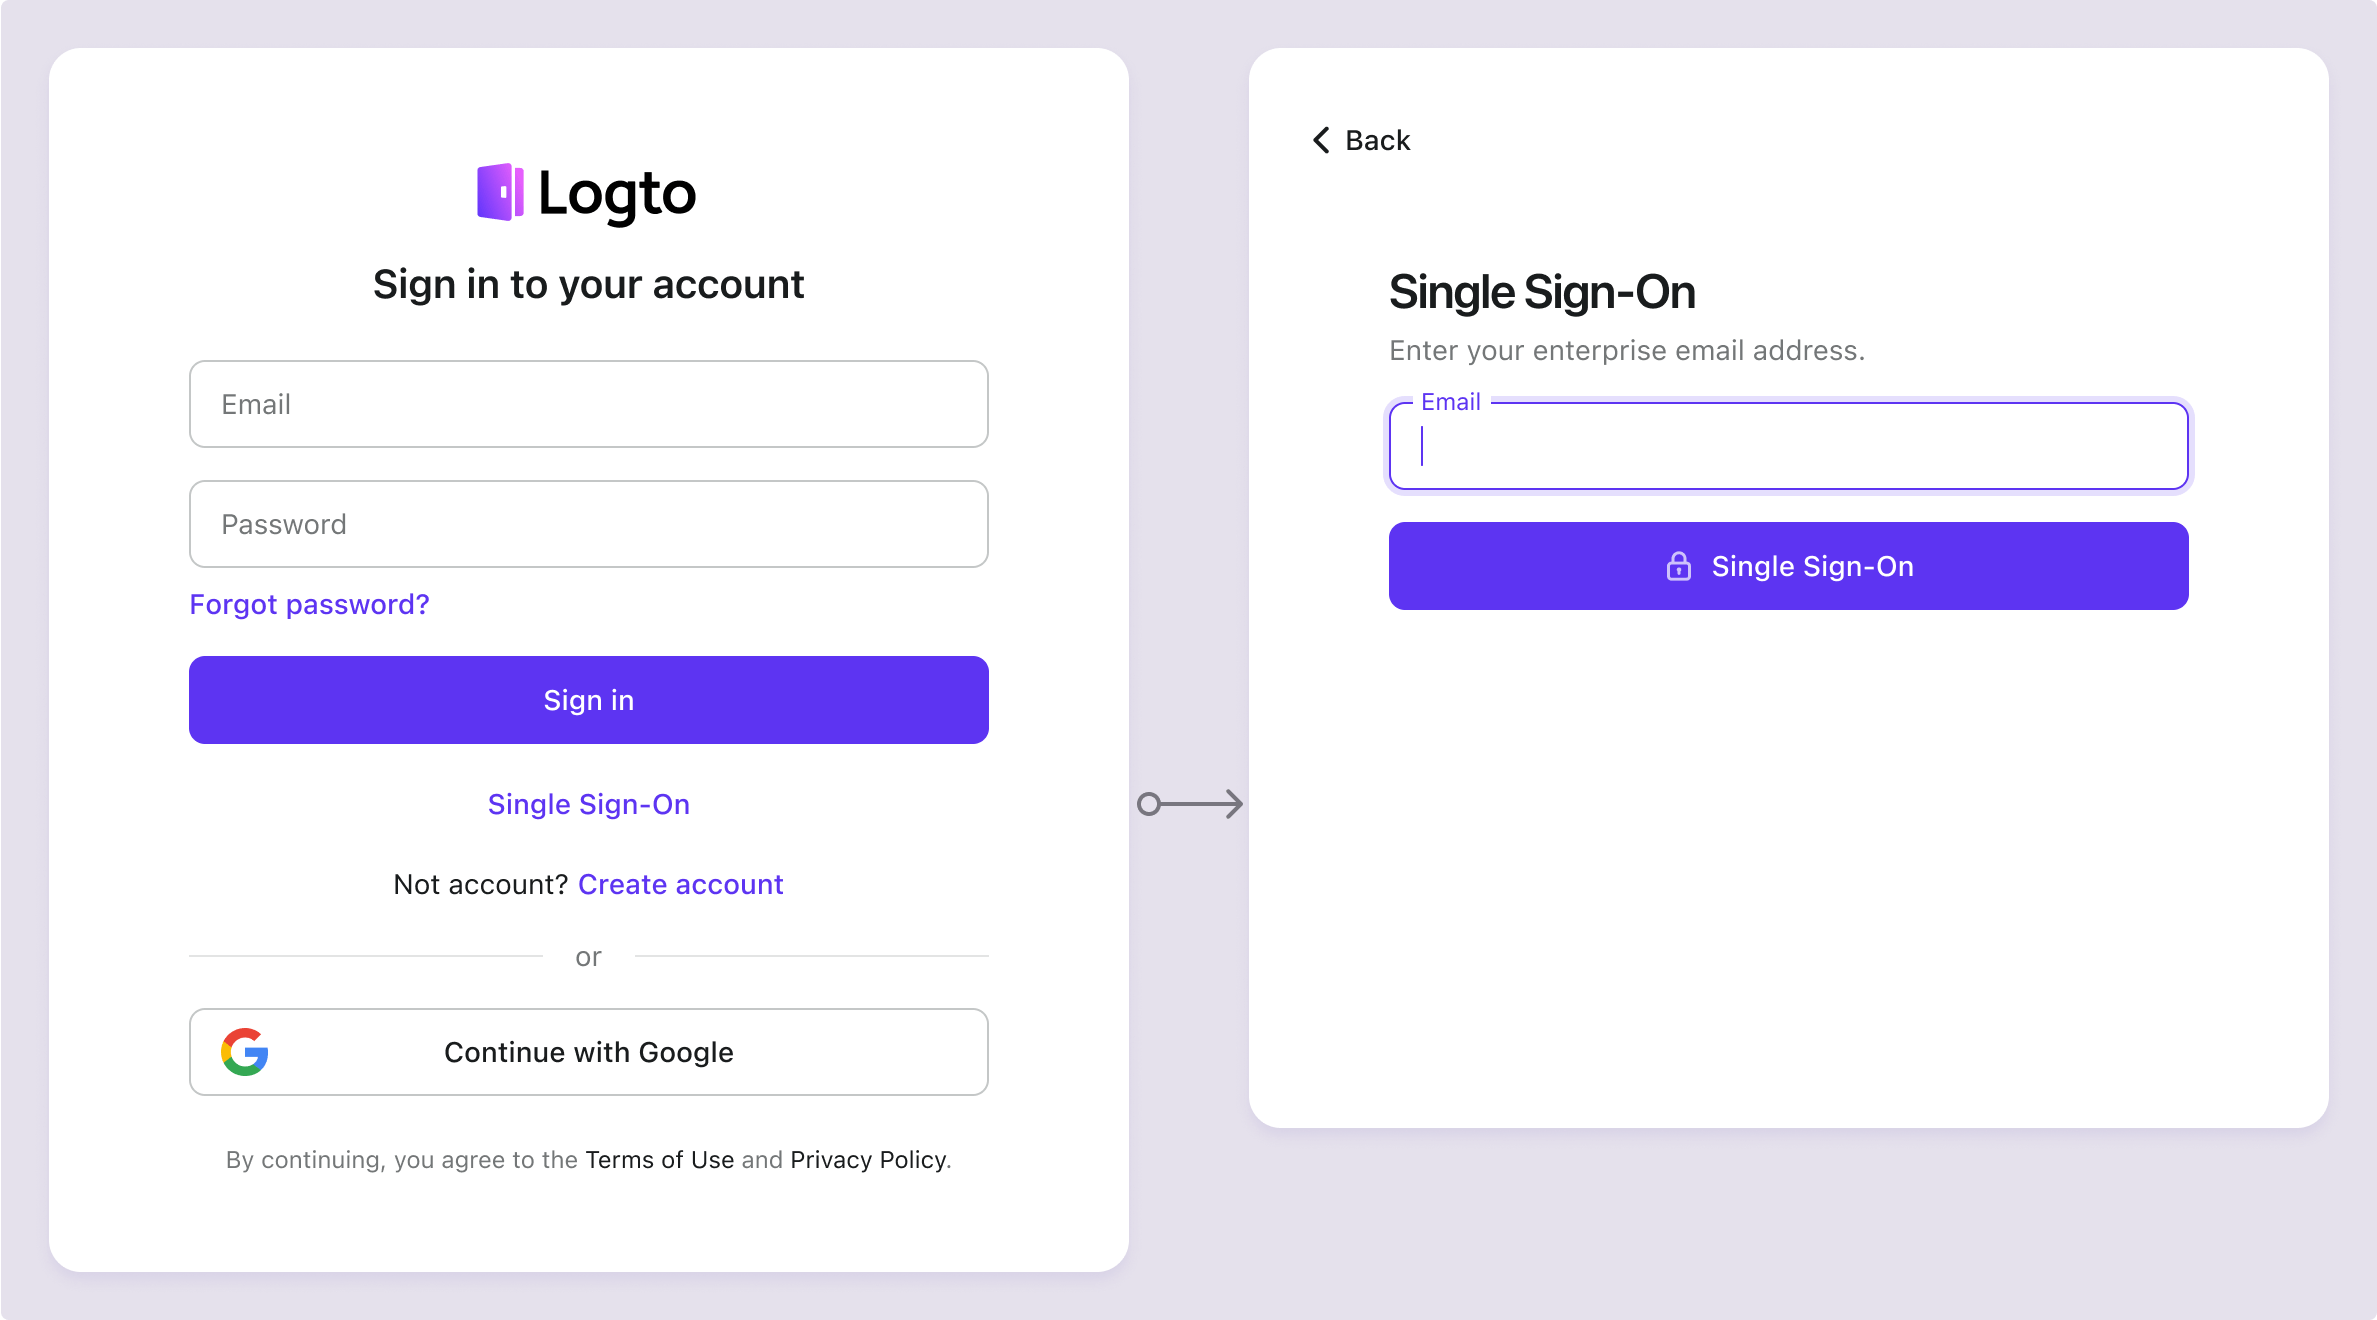
To learn more about the SSO user experience, including SP-initiated SSO and IdP-initiated SSO, refer to User flows: Enterprise SSO.
Testing and Validation
Return to your Go app. You should now be able to sign in with Google Workspace enterprise SSO. Enjoy!
Further readings
End-user flows: Logto provides a out-of-the-box authentication flows including MFA and enterprise SSO, along with powerful APIs for flexible implementation of account settings, security verification, and multi-tenant experience.
Authorization: Authorization defines the actions a user can do or resources they can access after being authenticated. Explore how to protect your API for native and single-page applications and implement Role-based Access Control (RBAC).
Organizations: Particularly effective in multi-tenant SaaS and B2B apps, the organization feature enable tenant creation, member management, organization-level RBAC, and just-in-time-provisioning.
Customer IAM series Our serial blog posts about Customer (or Consumer) Identity and Access Management, from 101 to advanced topics and beyond.