Logto is an Auth0 alternative designed for modern apps and SaaS products. It offers both Cloud and Open-source services to help you quickly launch your identity and management (IAM) system. Enjoy authentication, authorization, and multi-tenant management all in one.
We recommend starting with a free development tenant on Logto Cloud. This allows you to explore all the features easily.
In this article, we will go through the steps to quickly build the Twilio sign-in experience (user authentication) with Java Spring Boot and Logto.
Prerequisites
- A running Logto instance. Check out the introduction page to get started.
- Basic knowledge of Java Spring Boot.
- A usable Twilio account.
Create an application in Logto
Logto is based on OpenID Connect (OIDC) authentication and OAuth 2.0 authorization. It supports federated identity management across multiple applications, commonly called Single Sign-On (SSO).
To create your Traditional web application, simply follow these steps:
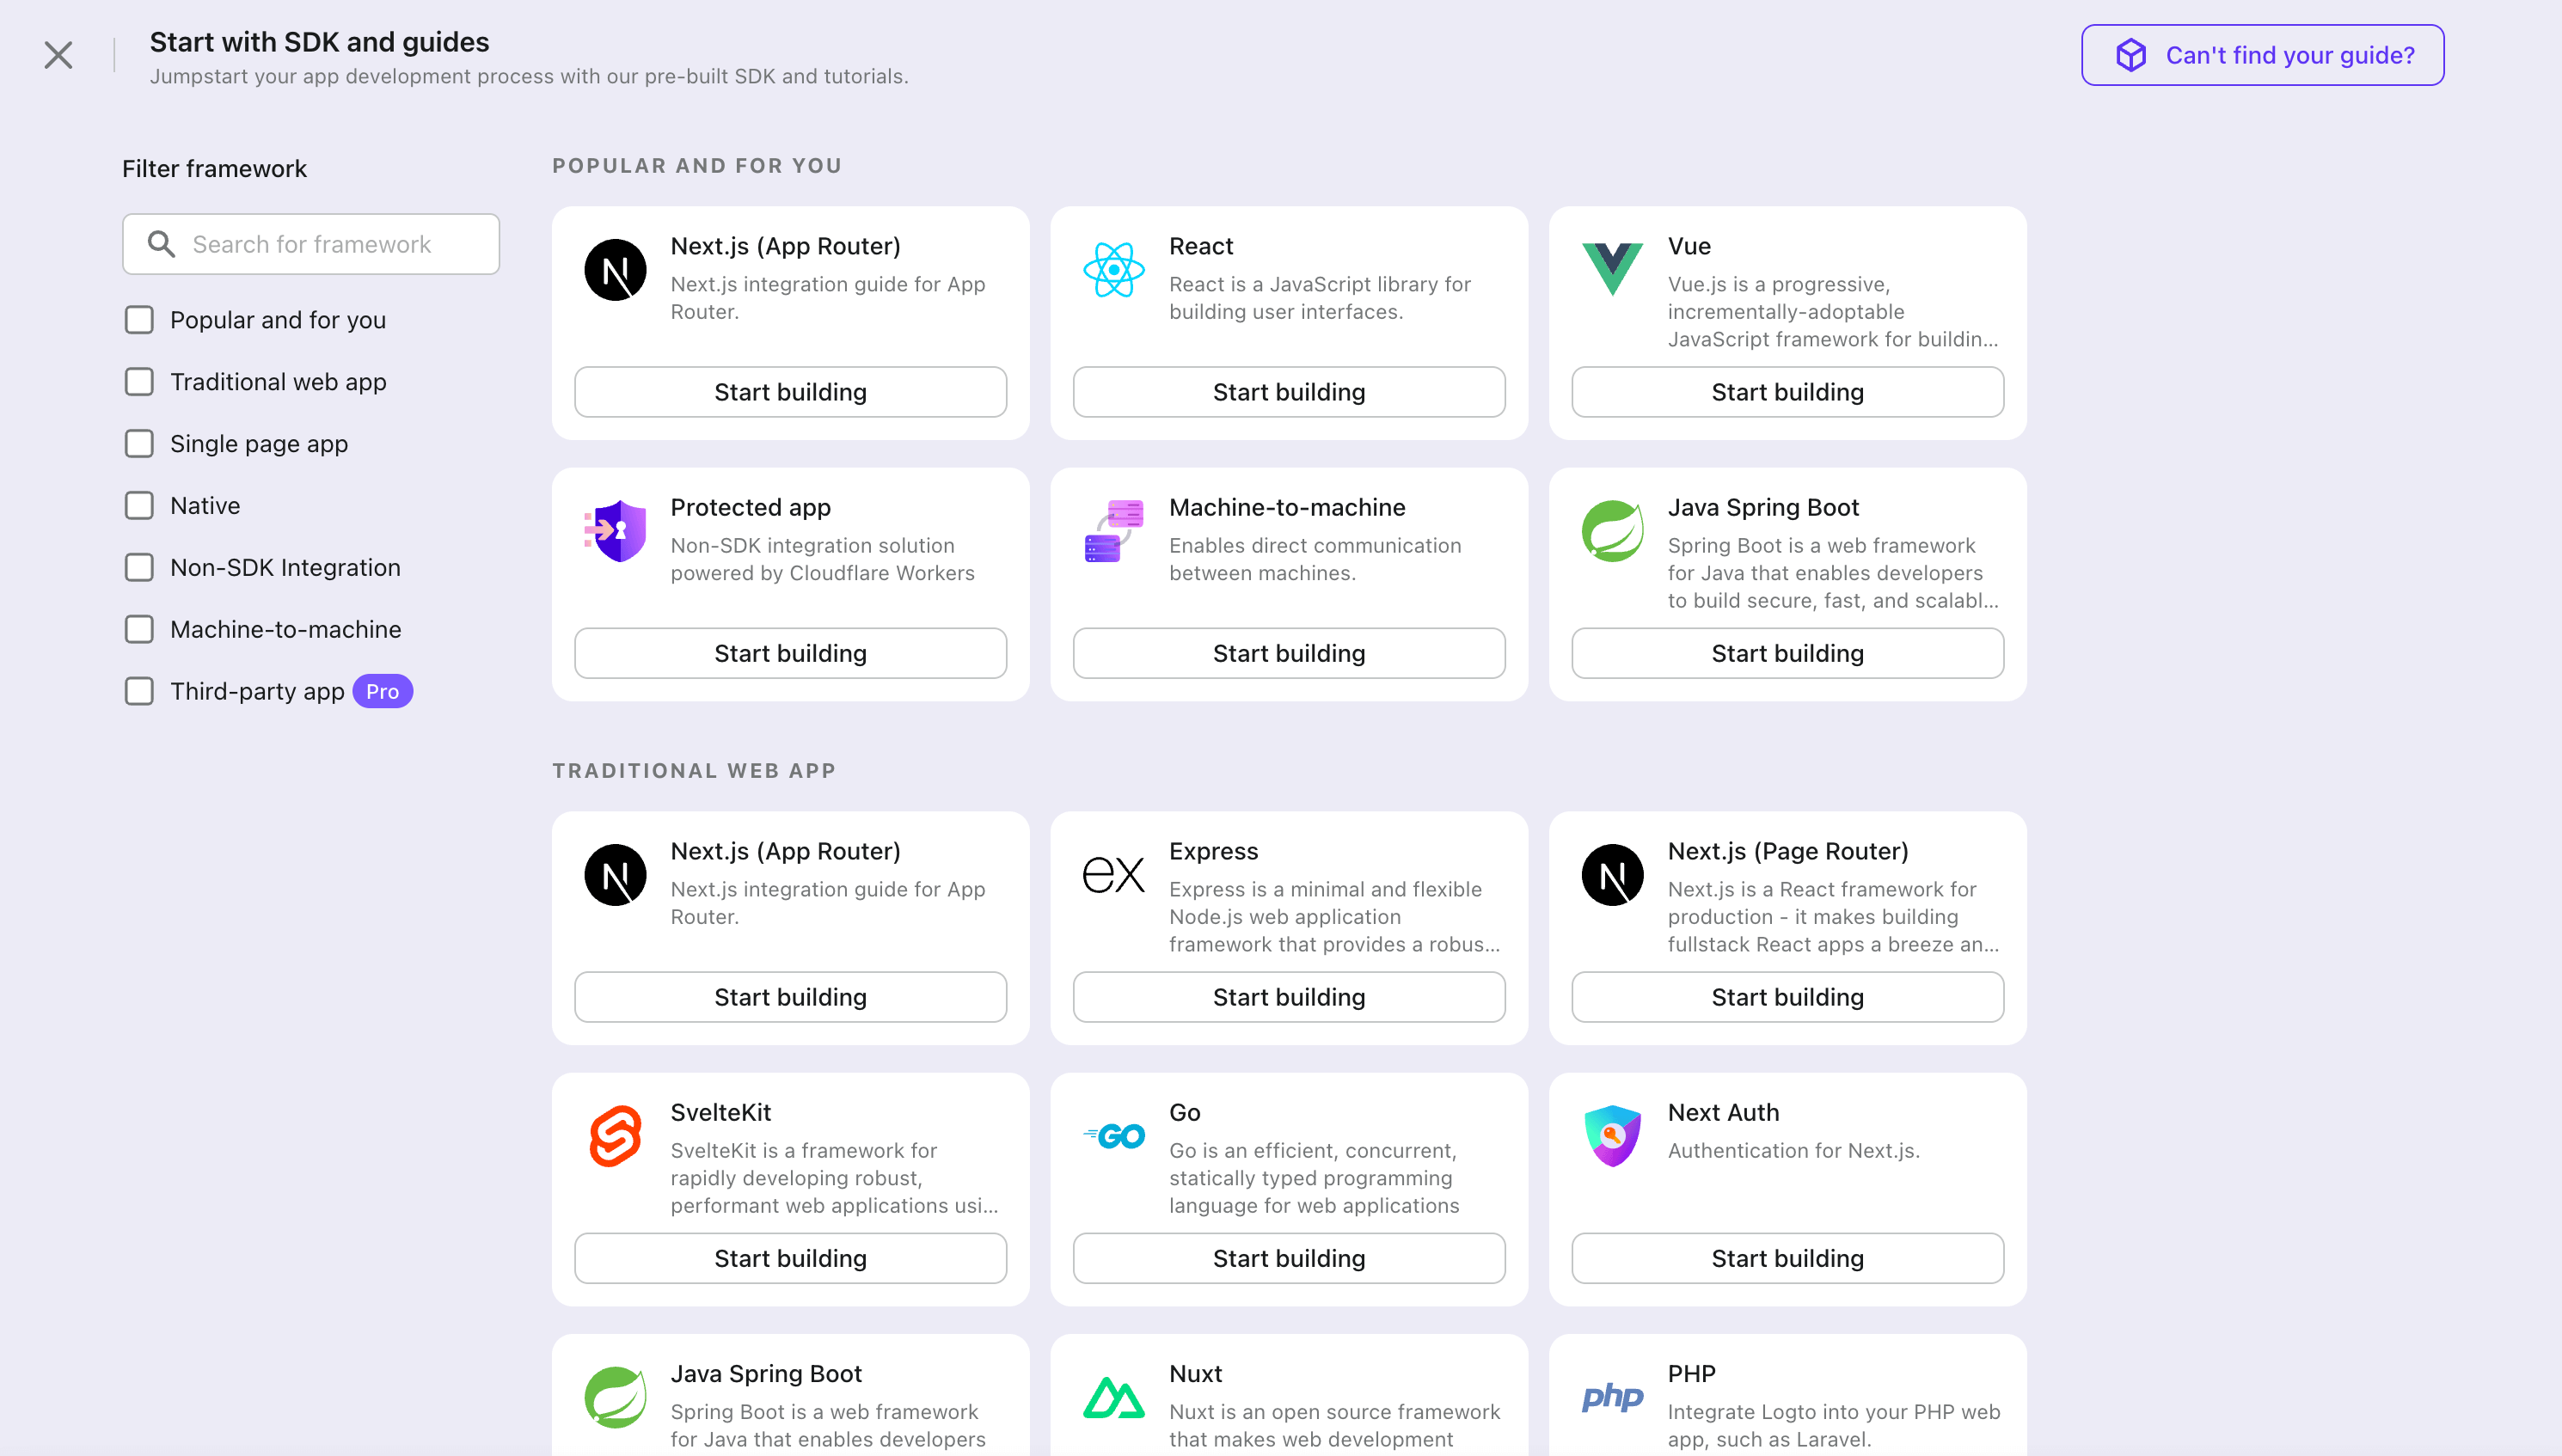
- Open the Logto Console. In the "Get started" section, click the "View all" link to open the application frameworks list. Alternatively, you can navigate to Logto Console > Applications, and click the "Create application" button.
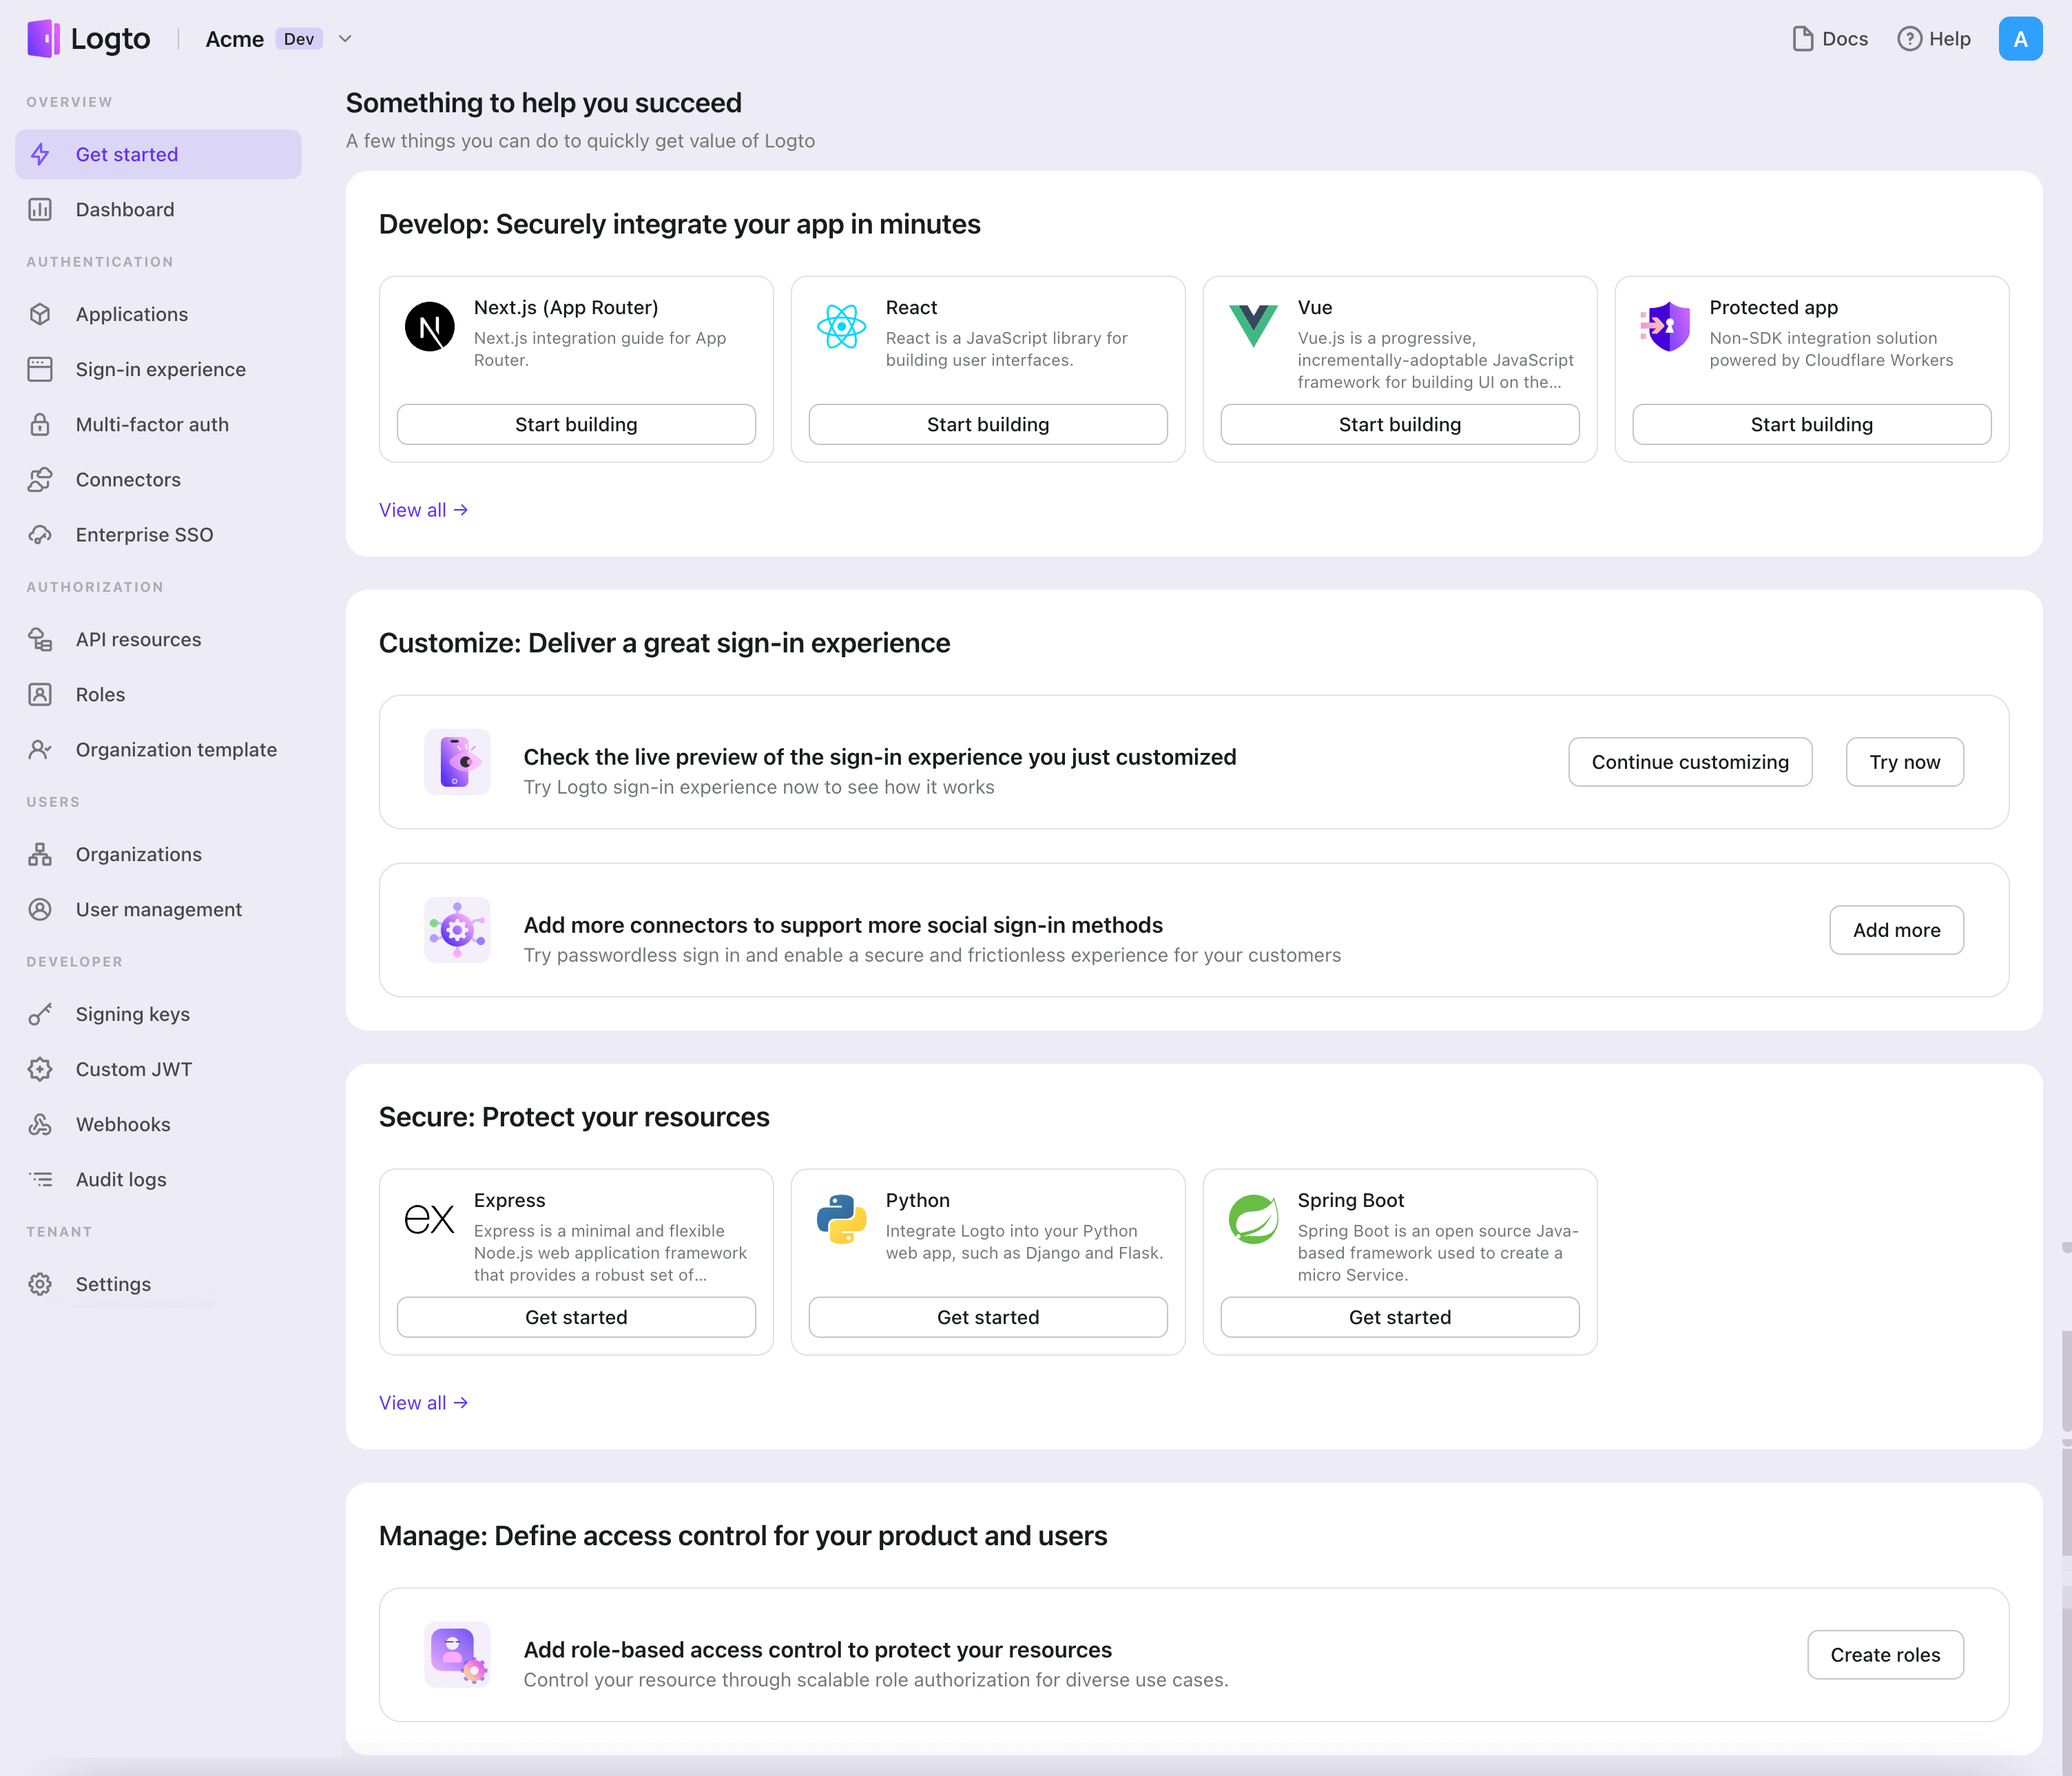
- In the opening modal, click the "Traditional web" section or filter all the available "Traditional web" frameworks using the quick filter checkboxes on the left. Click the "Java Spring Boot" framework card to start creating your application.
- Enter the application name, e.g., "Bookstore," and click "Create application".
🎉 Ta-da! You just created your first application in Logto. You'll see a congrats page which includes a detailed integration guide. Follow the guide to see what the experience will be in your application.
Integrate Java Spring Boot with Logto
- You may find the sample code for this guide in our spring-boot-sample github repository.
- No official SDK is required to integrate Logto with your Java Spring Boot application. We will use the Spring Security and Spring Security OAuth2 libraries to handle the OIDC authentication flow with Logto.
Configure your Java Spring Boot application
Adding dependencies
For gradle users, add the following dependencies to your build.gradle file:
dependencies {
  implementation 'org.springframework.boot:spring-boot-starter-thymeleaf'
	implementation 'org.springframework.boot:spring-boot-starter-web'
  implementation 'org.springframework.boot:spring-boot-starter-security'
	implementation 'org.springframework.boot:spring-boot-starter-oauth2-client'
}
For maven users, add the following dependencies to your pom.xml file:
<dependency>
  <groupId>org.springframework.boot</groupId>
  <artifactId>spring-boot-starter-thymeleaf</artifactId>
</dependency>
<dependency>
  <groupId>org.springframework.boot</groupId>
  <artifactId>spring-boot-starter-web</artifactId>
</dependency>
<dependency>
  <groupId>org.springframework.boot</groupId>
  <artifactId>spring-boot-starter-security</artifactId>
</dependency>
<dependency>
  <groupId>org.springframework.boot</groupId>
  <artifactId>spring-boot-starter-oauth2-client</artifactId>
</dependency>
OAuth2 Client Configuration
Register a new Java Spring Boot application in Logto Console and get the client credential and IdP configurations for your web application.
Add the following configuration to your application.properties file:
spring.security.oauth2.client.registration.logto.client-name=logto
spring.security.oauth2.client.registration.logto.client-id={{YOUR_CLIENT_ID}}
spring.security.oauth2.client.registration.logto.client-secret={{YOUR_CLIENT_ID}}
spring.security.oauth2.client.registration.logto.redirect-uri={baseUrl}/login/oauth2/code/{registrationId}
spring.security.oauth2.client.registration.logto.authorization-grant-type=authorization_code
spring.security.oauth2.client.registration.logto.scope=openid,profile,offline_access
spring.security.oauth2.client.registration.logto.provider=logto

spring.security.oauth2.client.provider.logto.issuer-uri={{LOGTO_ENDPOINT}}/oidc
spring.security.oauth2.client.provider.logto.authorization-uri={{LOGTO_ENDPOINT}}/oidc/auth
spring.security.oauth2.client.provider.logto.jwk-set-uri={{LOGTO_ENDPOINT}}/oidc/jwks
Implementation
Before we dive into the details, here's a quick overview of the end-user experience. The sign-in process can be simplified as follows:
- Your app invokes the sign-in method.
- The user is redirected to the Logto sign-in page. For native apps, the system browser is opened.
- The user signs in and is redirected back to your app (configured as the redirect URI).
Regarding redirect-based sign-in
- This authentication process follows the OpenID Connect (OIDC) protocol, and Logto enforces strict security measures to protect user sign-in.
- If you have multiple apps, you can use the same identity provider (Logto). Once the user signs in to one app, Logto will automatically complete the sign-in process when the user accesses another app.
To learn more about the rationale and benefits of redirect-based sign-in, see Logto sign-in experience explained.
In order to redirect users back to your application after they sign in, you need to set the redirect URI using the client.registration.logto.redirect-uri property in the previous step.
Configure redirect URIs
Switch to the application details page of Logto Console. Add a redirect URI http://localhost:3000/callback.
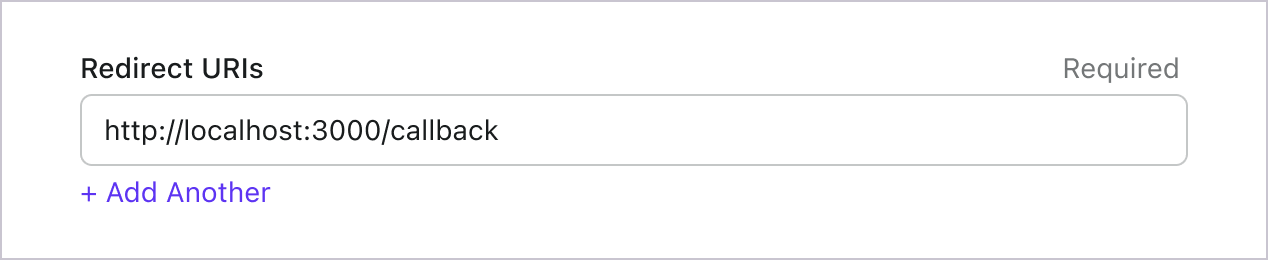
Just like signing in, users should be redirected to Logto for signing out of the shared session. Once finished, it would be great to redirect the user back to your website. For example, add http://localhost:3000/ as the post sign-out redirect URI section.
Then click "Save" to save the changes.
Implement the WebSecurityConfig
Create a new class WebSecurityConfig in your project
The WebSecurityConfig class will be used to configure the security settings for your application. It is the key class that will handle the authentication and authorization flow. Please check the Spring Security documentation for more details.
package com.example.securingweb;

import org.springframework.context.annotation.Configuration;
import org.springframework.security.config.annotation.web.configuration.EnableWebSecurity;

@Configuration
@EnableWebSecurity

public class WebSecurityConfig {
 // ...
}
Create a idTokenDecoderFactory bean
This is required because Logto uses ES384 as the default algorithm, we need to overwrite the default OidcIdTokenDecoderFactory to use the same algorithm.
import org.springframework.context.annotation.Bean;
import org.springframework.security.oauth2.client.oidc.authentication.OidcIdTokenDecoderFactory;
import org.springframework.security.oauth2.client.registration.ClientRegistration;
import org.springframework.security.oauth2.jose.jws.SignatureAlgorithm;
import org.springframework.security.oauth2.jwt.JwtDecoderFactory;

public class WebSecurityConfig {
  // ...

  @Bean
  public JwtDecoderFactory<ClientRegistration> idTokenDecoderFactory() {
    OidcIdTokenDecoderFactory idTokenDecoderFactory = new OidcIdTokenDecoderFactory();
    idTokenDecoderFactory.setJwsAlgorithmResolver(clientRegistration -> SignatureAlgorithm.ES384);
    return idTokenDecoderFactory;
  }
}
Create a LoginSuccessHandler class to handle the login success event
We will redirect the user to the /user page after a successful login.
package com.example.securingweb;

import java.io.IOException;

import org.springframework.security.core.Authentication;
import org.springframework.security.web.authentication.AuthenticationSuccessHandler;

import jakarta.servlet.ServletException;
import jakarta.servlet.http.HttpServletRequest;
import jakarta.servlet.http.HttpServletResponse;

public class CustomSuccessHandler implements AuthenticationSuccessHandler {
  @Override
  public void onAuthenticationSuccess(HttpServletRequest request, HttpServletResponse response,
      Authentication authentication) throws IOException, ServletException {
    response.sendRedirect("/user");
  }
}
Create a LogoutSuccessHandler class to handle the logout success event
Clear the session and redirect the user to the home page.
package com.example.securingweb;

import java.io.IOException;

import org.springframework.security.core.Authentication;
import org.springframework.security.web.authentication.logout.LogoutSuccessHandler;

import jakarta.servlet.ServletException;
import jakarta.servlet.http.HttpServletRequest;
import jakarta.servlet.http.HttpServletResponse;
import jakarta.servlet.http.HttpSession;

public class CustomLogoutHandler implements LogoutSuccessHandler {
  @Override
  public void onLogoutSuccess(HttpServletRequest request, HttpServletResponse response, Authentication authentication)
      throws IOException, ServletException {
    HttpSession session = request.getSession();

    if (session != null) {
      session.invalidate();
    }

    response.sendRedirect("/home");
  }
}
Update the WebSecurityConfig class with a securityFilterChain
securityFilterChain is a chain of filters that are responsible for processing the incoming requests and responses.
We will configure the securityFilterChain to allow access to the home page and require authentication for all other requests. Use the CustomSuccessHandler and CustomLogoutHandler to handle the login and logout events.
import org.springframework.context.annotation.Bean;
import org.springframework.security.config.annotation.web.builders.HttpSecurity;
import org.springframework.security.web.DefaultSecurityFilterChain;

public class WebSecurityConfig {
  // ...

  @Bean
  public DefaultSecurityFilterChain securityFilterChain(HttpSecurity http) throws Exception {
    http
      .authorizeRequests(authorizeRequests ->
        authorizeRequests
          .antMatchers("/", "/home").permitAll() // Allow access to the home page
          .anyRequest().authenticated() // All other requests require authentication
      )
      .oauth2Login(oauth2Login ->
        oauth2Login
          .successHandler(new CustomSuccessHandler())
      )
      .logout(logout ->
        logout
          .logoutSuccessHandler(new CustomLogoutHandler())
      );
    return http.build();
  }
}
Create a home page
(You may skip this step if you already have a home page in your project)
package com.example.securingweb;

import java.security.Principal;

import org.springframework.stereotype.Controller;
import org.springframework.web.bind.annotation.GetMapping;

@Controller
public class HomeController {
  @GetMapping({ "/", "/home" })
  public String home(Principal principal) {
    return principal != null ? "redirect:/user" : "home";
  }
}
This controller will redirect the user to the user page if the user is authenticated, otherwise, it will show the home page. Add a sign-in link to the home page.
<body>
  <h1>Welcome!</h1>

  <p><a th:href="@{/oauth2/authorization/logto}">Login with Logto</a></p>
</body>
Create a user page
Create a new controller to handle the user page:
package com.example.securingweb;

import java.security.Principal;
import java.util.Map;

import org.springframework.security.oauth2.client.authentication.OAuth2AuthenticationToken;
import org.springframework.security.oauth2.core.user.OAuth2User;
import org.springframework.stereotype.Controller;
import org.springframework.ui.Model;
import org.springframework.web.bind.annotation.GetMapping;
import org.springframework.web.bind.annotation.RequestMapping;

@Controller
@RequestMapping("/user")
public class UserController {

  @GetMapping
  public String user(Model model, Principal principal) {
    if (principal instanceof OAuth2AuthenticationToken) {
      OAuth2AuthenticationToken token = (OAuth2AuthenticationToken) principal;
      OAuth2User oauth2User = token.getPrincipal();
      Map<String, Object> attributes = oauth2User.getAttributes();

      model.addAttribute("username", attributes.get("username"));
      model.addAttribute("email", attributes.get("email"));
      model.addAttribute("sub", attributes.get("sub"));
    }

    return "user";
  }
}
Once the user is authenticated, we will retrieve the OAuth2User data from the authenticated principal object. Please refer OAuth2AuthenticationToken and OAuth2User for more details.
Read the user data and pass it to the user.html template.
<body>
  <h1>User Details</h1>
  <div>
    <p>
    <div><strong>name:</strong> <span th:text="${username}"></span></div>
    <div><strong>email:</strong> <span th:text="${email}"></span></div>
    <div><strong>id:</strong> <span th:text="${sub}"></span></div>
    </p>
  </div>

  <form th:action="@{/logout}" method="post">
    <input type="submit" value="Logout" />
  </form>
</body>
Request additional claims
You may find some user information are missing in the returned object from principal (OAuth2AuthenticationToken). This is because OAuth 2.0 and OpenID Connect (OIDC) are designed to follow the principle of least privilege (PoLP), and Logto is built on top of these standards.
By default, limited claims are returned. If you need more information, you can request additional scopes to access more claims.
A "claim" is an assertion made about a subject; a "scope" is a group of claims. In the current case, a claim is a piece of information about the user.
Here's a non-normative example the scope - claim relationship:
The "sub" claim means "subject", which is the unique identifier of the user (i.e. user ID).
Logto SDK will always request three scopes: openid, profile, and offline_access.
To retrieve additional user information, you can add extra scopes to the application.properties file. For example, to request the email, phone, and urn:logto:scope:organizations scope, add the following line to the application.properties file:
spring.security.oauth2.client.registration.logto.scope=openid,profile,offline_access,email,phone,urn:logto:scope:organizations
Then you can access the additional claims in the OAuth2User object.
Run and test the application
Run the application and navigate to http://localhost:8080.
- You will see the home page with a sign-in link.
- Click on the link to sign in with Logto.
- After successful authentication, you will be redirected to the user page with your user details.
- Click on the logout button to sign out. You will be redirected back to the home page.
Add Twilio connector
SMS connector is a method used to send one-time passwords (OTPs) for authentication. It enables Phone number verification to support passwordless authentication, including SMS-based registration, sign-in, two-factor authentication (2FA), and account recovery. You can easily connect Twilio as your SMS provider. With the Logto SMS connector, you can set this up in just a few minutes.
To add a SMS connector, simply follow these steps:
- Navigate to Console > Connector > Email and SMS connectors.
- To add a new SMS connector, click the "Set up" button and select "Twilio".
- Review the README documentation for your selected provider.
- Complete the configuration fields in the "Parameter Configuration" section.
- Customize the SMS template using the JSON editor.
- Test your configuration by sending a verification code to your Phone number.

If you are following the in-place Connector guide, you can skip the next section.
Set up Twilio SMS connector
Register Twilio account
Create a new account on Twilio. (Jump to the next step if you already have one.)
Set up senders' phone numbers
Go to the Twilio console page and sign in with your Twilio account.
Purchase a phone number under "Phone Numbers" -> "Manage" -> "Buy a number".
Sometimes you may encounter the situation that SMS service is not supported in specific countries or areas. Pick a number from other regions to bypass.
Once we have a valid number claimed, nav to the "Messaging" -> "Services". Create a new Message Service by clicking on the button.
Give a friendly service name and choose Notify my users as our service purpose.
Following the next step, choose Phone Number as Sender Type, and add the phone number we just claimed to this service as a sender.
Each phone number can only be linked with one messaging service.
Get account credentials
We will need the API credentials to make the connector work. Let's begin from the Twilio console page.
Click on the "Account" menu in the top-right corner, then go to the "API keys & tokens" page to get your Account SID and Auth token.
Back to "Messaging" -> "Services" settings page starting from the sidebar, and find the Sid of your service.
Compose the connector JSON
Fill out the accountSID, authToken and fromMessagingServiceSID fields with Account SID, Auth token and Sid of the corresponding messaging service.
You can add multiple SMS connector templates for different cases. Here is an example of adding a single template:
- Fill out the
contentfield with arbitrary string-typed contents. Do not forget to leave{{code}}placeholder for random verification code. - Fill out the
usageTypefield with eitherRegister,SignIn,ForgotPassword,Genericfor different use cases. In order to enable full user flows, templates with usageTypeRegister,SignIn,ForgotPasswordandGenericare required.
Test Twilio SMS connector
You can enter a phone number and click on "Send" to see whether the settings can work before "Save and Done".
That's it. Don't forget to Enable connector in sign-in experience.
Config types
| Name | Type |
|---|---|
| accountSID | string |
| authToken | string |
| fromMessagingServiceSID | string |
| templates | Templates[] |
| Template Properties | Type | Enum values |
|---|---|---|
| content | string | N/A |
| usageType | enum string | 'Register' | 'SignIn' | 'ForgotPassword' | 'Generic' |
Save your configuration
Double check you have filled out necessary values in the Logto connector configuration area. Click "Save and Done" (or "Save changes") and the Twilio connector should be available now.
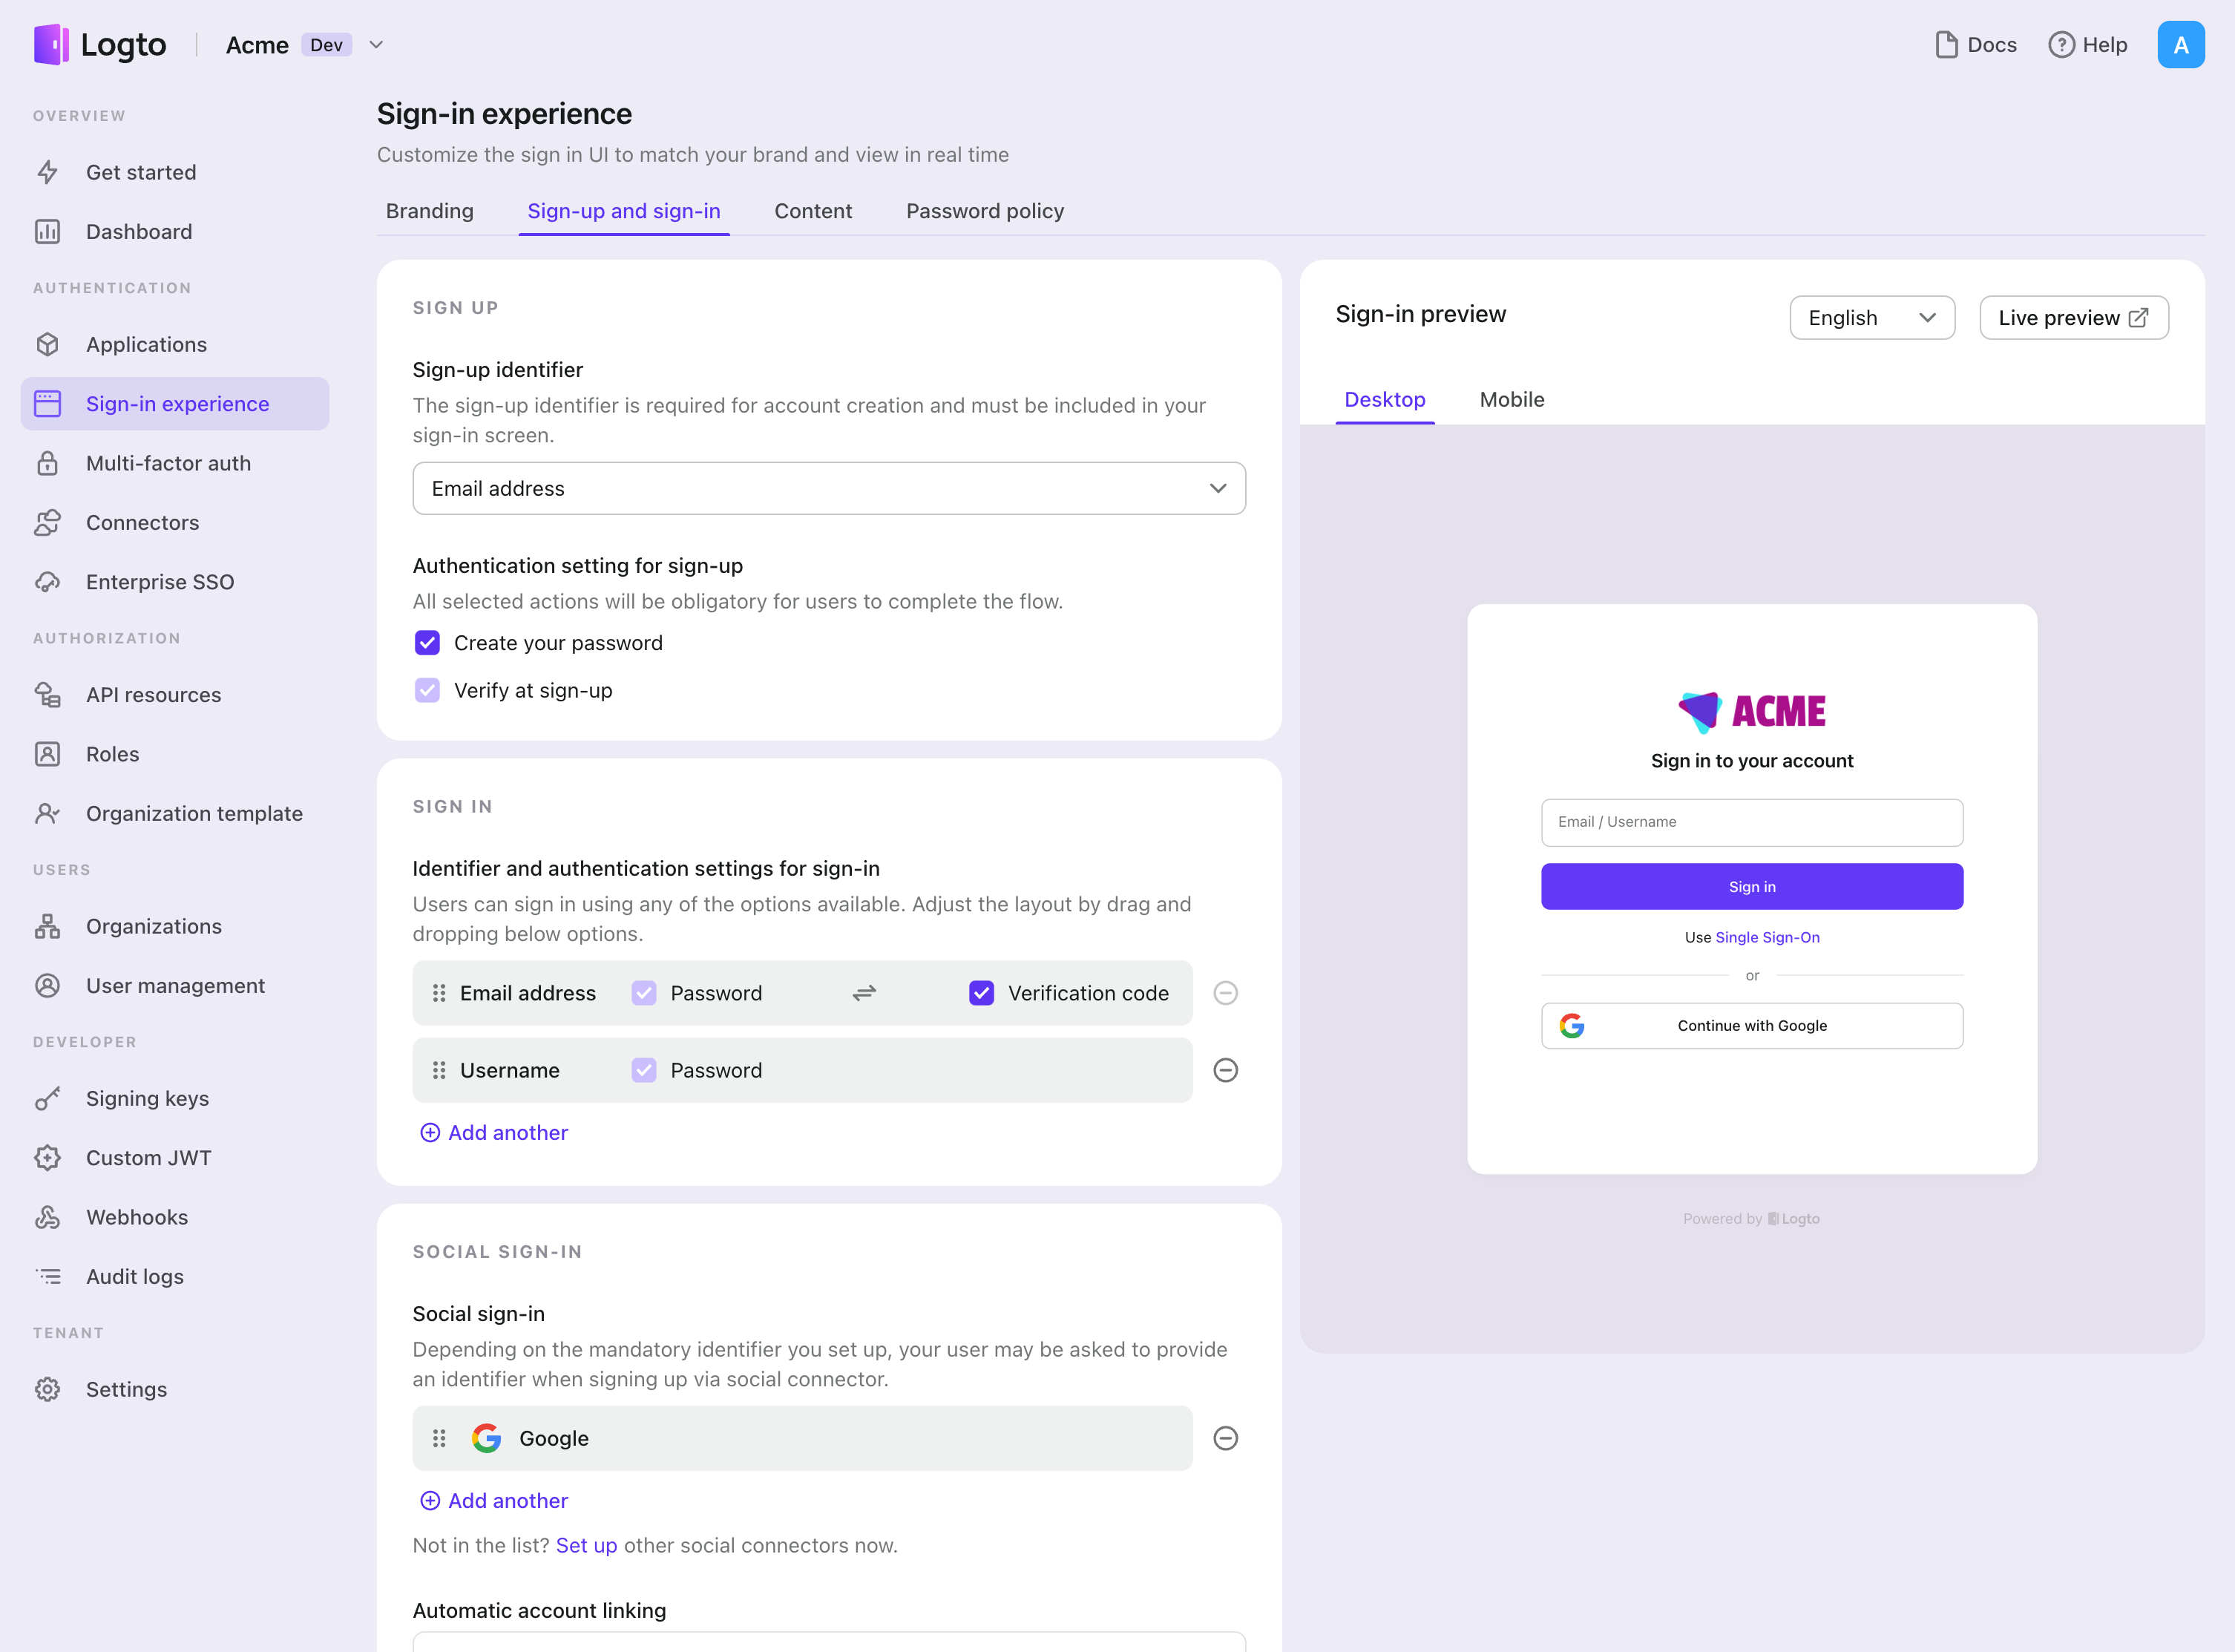
Enable Twilio connector in Sign-in Experience
Once you create a connector successfully, you can enable phone number-based passwordless login and registration.
- Navigate to Console > Sign-in experience > Sign-up and sign-in.
- Set up sign-up methods (Optional):
- Select "Phone number" or "Email or phone number" as the sign-up identifier.
- "Verify at sign-up" is forced to be enabled. You can also enable "Create a password" on registration.
- Set up sign-in methods:
- Select Phone number as one of sign-in identifiers. You can provide multiple available identifiers (email, phone number, and username).
- Select "Verification code" and / or "Password" as the authentication factor.
- Click "Save changes" and test it in "Live preview".
In addition to registration and login via OTPs, you can also have password recovery and -based security verification enabled, as well as linking Phone number to profile. See End-user flows for more details.
Testing and Validation
Return to your Java Spring Boot app. You should now be able to sign in with Twilio. Enjoy!
Further readings
End-user flows: Logto provides a out-of-the-box authentication flows including MFA and enterprise SSO, along with powerful APIs for flexible implementation of account settings, security verification, and multi-tenant experience.
Authorization: Authorization defines the actions a user can do or resources they can access after being authenticated. Explore how to protect your API for native and single-page applications and implement Role-based Access Control (RBAC).
Organizations: Particularly effective in multi-tenant SaaS and B2B apps, the organization feature enable tenant creation, member management, organization-level RBAC, and just-in-time-provisioning.
Customer IAM series Our serial blog posts about Customer (or Consumer) Identity and Access Management, from 101 to advanced topics and beyond.